BigPond email to Office 365 Migration
BigPond, a well-known Australian internet service provider, has been a reliable platform for email communication over the years. However, it lacks many advanced features and integrations in modern cloud-based solutions like Microsoft Office 365. For users seeking enhanced security, better functionality, and seamless integration with productivity tools, migrating from BigPond to Office 365 is an increasingly preferred choice. Office 365 offers powerful email management capabilities, including built-in spam protection, advanced threat detection, and real-time collaboration across Microsoft applications such as Word, Excel, Outlook, and Teams. With cloud-based storage and multi-device access, Office 365 ensures greater flexibility and efficiency for both individuals and businesses.
Microsoft 365 provides a powerful email and collaboration platform that includes built-in spam protection, advanced threat management, cloud storage, and access across multiple devices. Integrated apps such as Outlook, Teams, Word, Excel, and SharePoint make it a comprehensive solution for communication and productivity, ensuring better efficiency and flexibility for organizations of all sizes.

While manual migration from BigPond to Office 365 can be complex and time-consuming, especially when handling large mailboxes or multiple users, EdbMails IMAP Migration Tool simplifies the process. It enables a secure, direct, and automated transfer of emails, folders, and attachments without the need for PowerShell scripts or manual configuration.
EdbMails also supports incremental migration, transferring only newly added or modified items after the initial sync to prevent duplicates and save bandwidth. Its batch migration capability allows multiple BigPond mailboxes to be migrated simultaneously, and the intuitive step-by-step interface ensures a smooth process even for users with limited technical knowledge.
With 24/7 free technical support, automatic mailbox mapping, and zero-downtime performance, EdbMails offers a fast, reliable, and secure solution for migrating from BigPond to Office 365 with complete data integrity and minimal effort.
User Query
We are looking to migrate from BigPond email to Office 365 and have encountered several challenges along the way. We want to move all our emails, contacts, and calendar items to Office 365 without using complex manual processes or losing any data. Could you please provide a step-by-step guide on how we can efficiently migrate from BigPond to Office 365 without disrupting our workflow or requiring PowerShell?
BigPond email to Office 365 Migration Plan
Planning is one of the most important steps before you begin the BigPond email to Office 365 migration. Here is a checklist of points to consider before you migrate.
- Determine the size of the data and the number of mailboxes you want to migrate.
- Make a list of all the data and permissions from the BigPond email that you want to transfer.
- Create appropriate user mailboxes on Office 365 and assign licenses to them.
- Ensure you have enough network capacity and bandwidth to migrate.
- Communicate the migration plan and flow to your end users.
BigPond email to Office 365: Pre-migration Activities
- Find the IMAP server name of your BigPond email server. You can find this information from your server’s dashboard settings or by connecting your email system to Outlook.
- Have the users email address, passwords, IMAP hostname and port number.
- Create mailboxes on your target Office 365 server. You can choose the option to automatically create target mailboxes in EdbMails. If you prefer to create them manually, refer to the links below.
- If you have a custom email domain from your hosting provider to which you want to migrate and receive emails, you must add and verify the domain on Office 365.
Steps to add a custom domain to Office 365 and Steps to add DNS records to connect your domain. - Configure Office 365 to send and receive large messages.
Follow the steps to increase the message size on Office 365 to 150MB and see tips to optimize IMAP migration to Exchange online.
Steps to Migrate emails from BigPond to Office 365
Step 1: Download and install EdbMails IMAP migration software
- Download and install EdbMails on your computer.
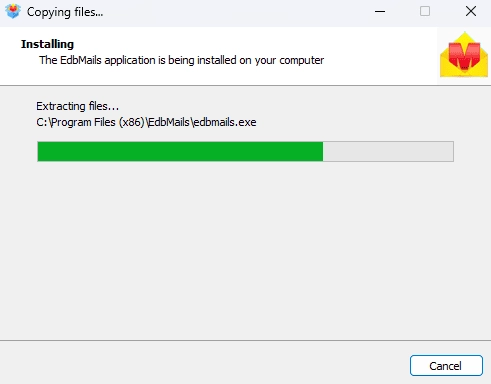
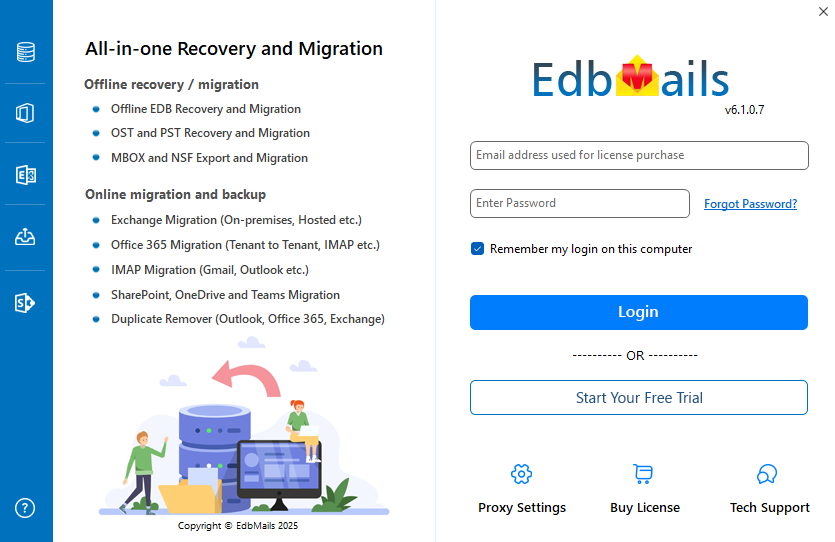
- Launch the EdbMails application on your computer.
- Enter your registered email address and password, then click ‘Login’. If you are using EdbMails for the first time, select ‘Start Your Free Trial’ to access the trial version.
Note: The trial version includes all major features and lets you migrate up to 30 items per folder. To migrate all the items, purchase a valid license from the official EdbMails website.
Click here to know IMAP Migration Pricing Details.
Once the purchase is complete, exit and reopen the application. Then log in again using the same email address and password used during the purchase to activate the license successfully.
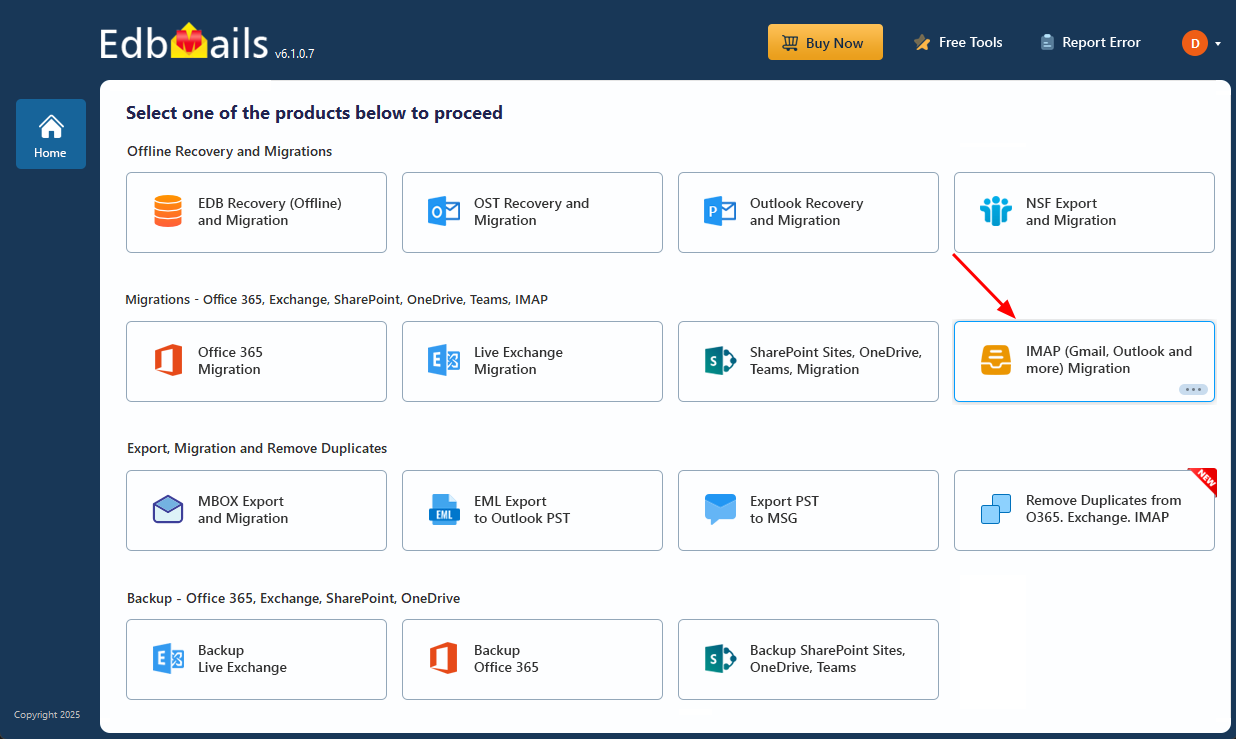
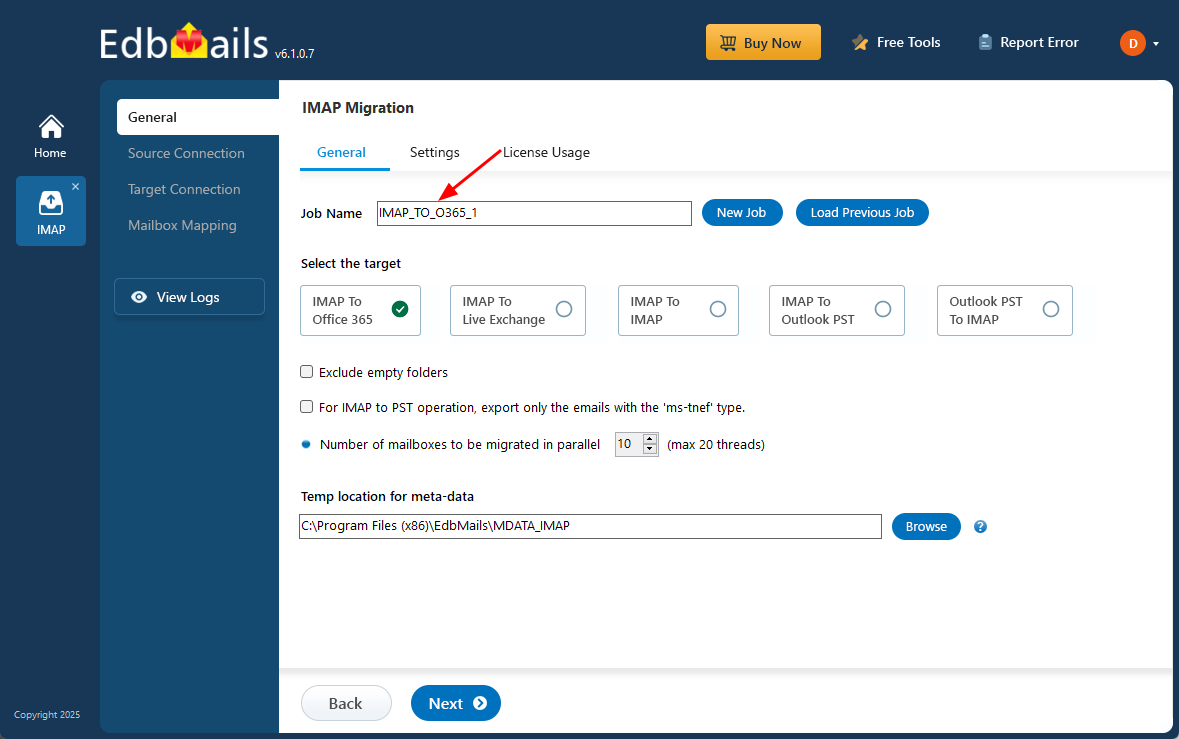
- Choose the ‘IMAP (Gmail, Outlook and more) Migration’ option to begin the transfer process.
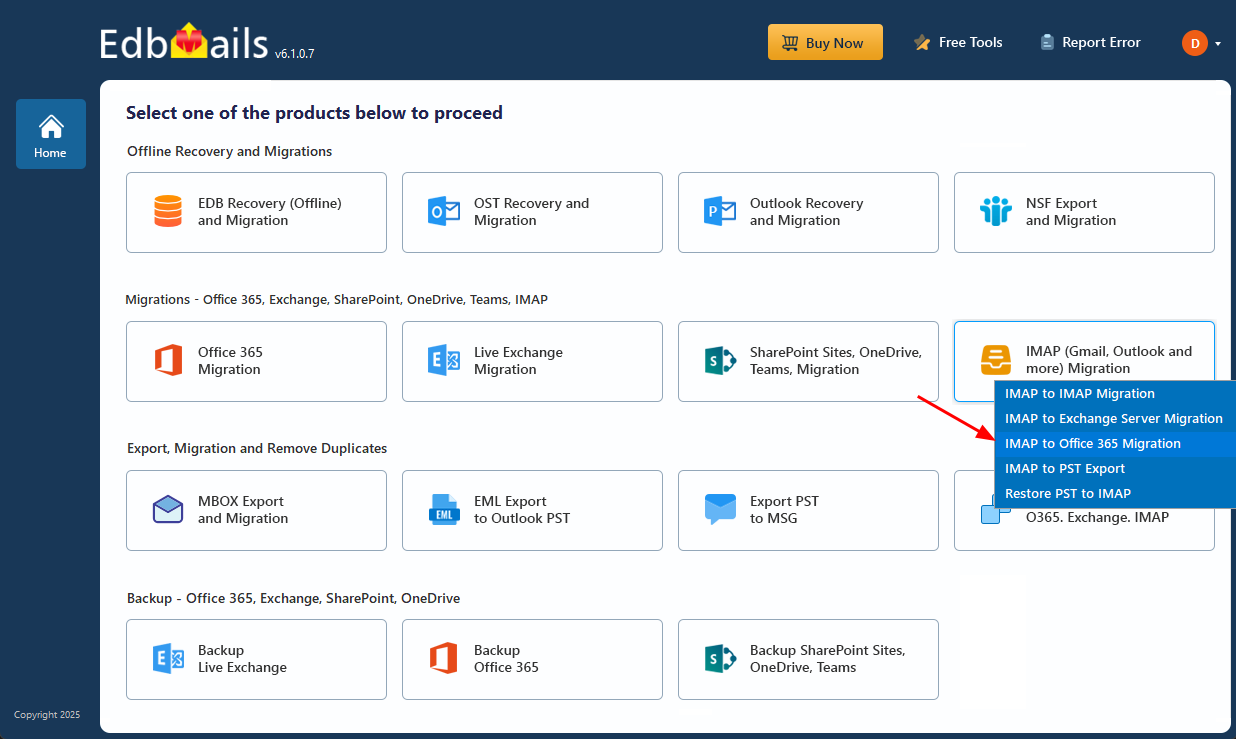
- Select ‘IMAP to Office 365 Migration’.
- You can continue with the default job name or select ‘New Job’ if you want to create a customized name for the task.
- Download and install EdbMails on your computer.
Step 2: Connect to the source BigPond email server
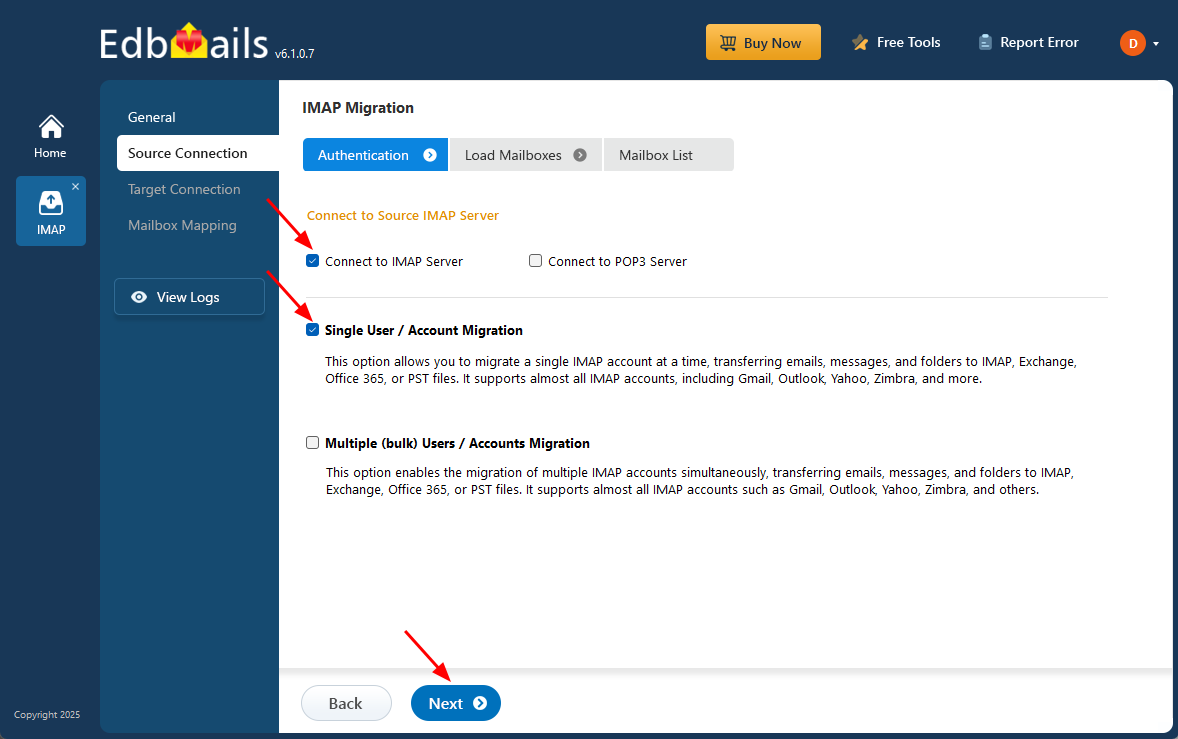
- To connect a single BigPond email account for migration, click ‘Single User / Account Migration’, choose the suitable connection option such as ‘Connect to IMAP Server’ or ‘Connect to POP3 Server’. Click ‘Next’ to proceed.
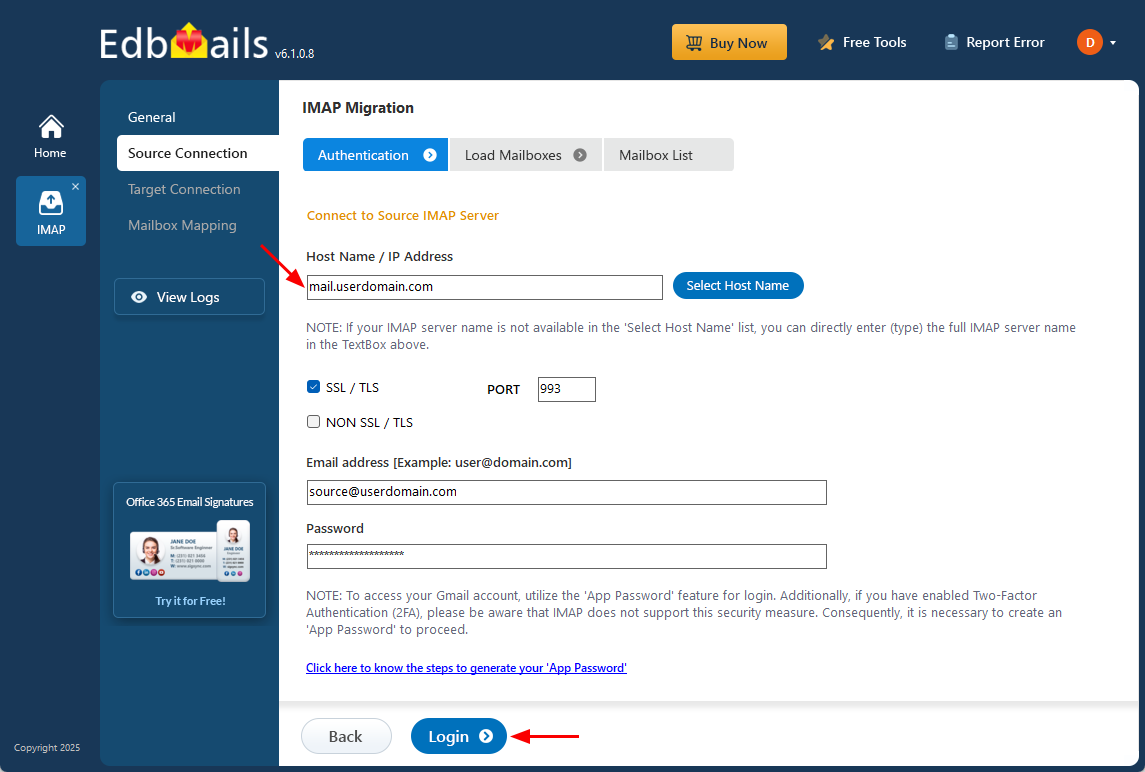
- Choose the appropriate IMAP host name for BigPond (commonly imap.telstra.com) from the available list, or enter it manually if it does not appear. Then, enter your BigPond email address along with the corresponding password to authenticate the mailbox connection.
- Once the credentials are entered, click the ‘Login’ button. This allows EdbMails to securely connect to your BigPond mailbox and retrieve the mailbox data required for migration.
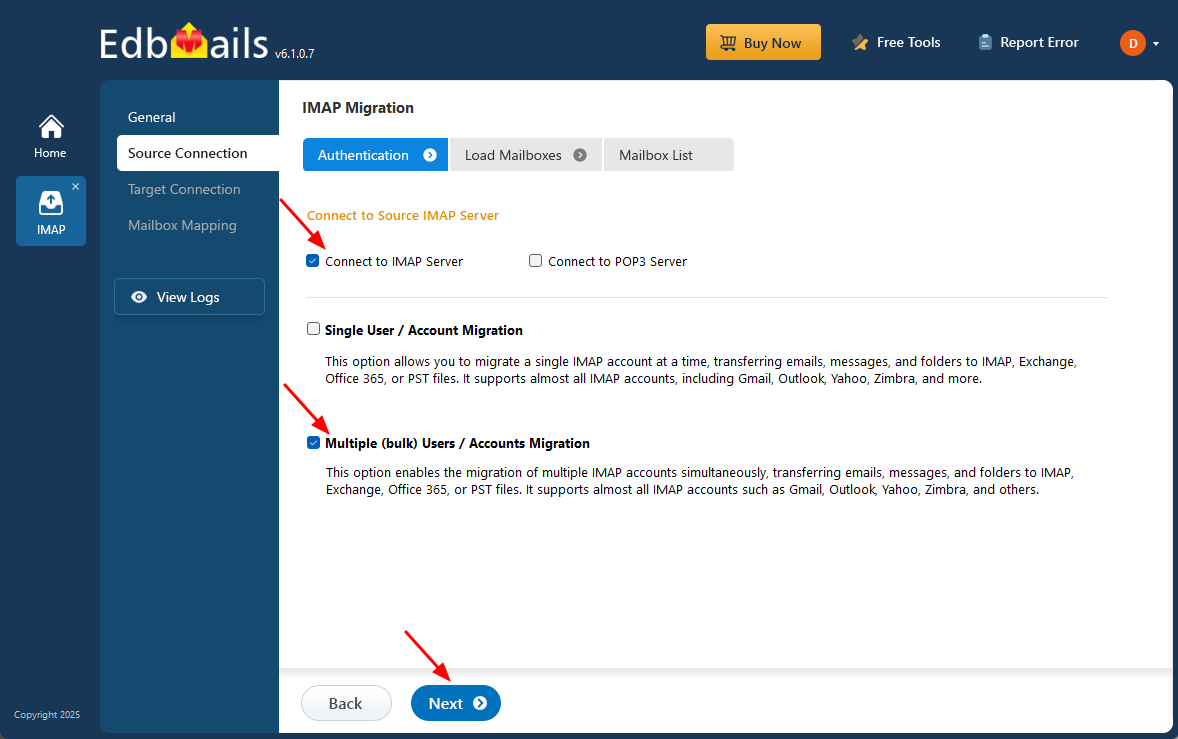
- To migrate multiple BigPond mailboxes at once, select ‘Multiple (bulk) Users/Accounts Migration’, choose the suitable connection method such as ‘Connect to IMAP Server’ or ‘Connect to POP3 Server’.
- Then proceed by clicking ‘Next’.
- Click ‘IMAP Migration CSV File’.
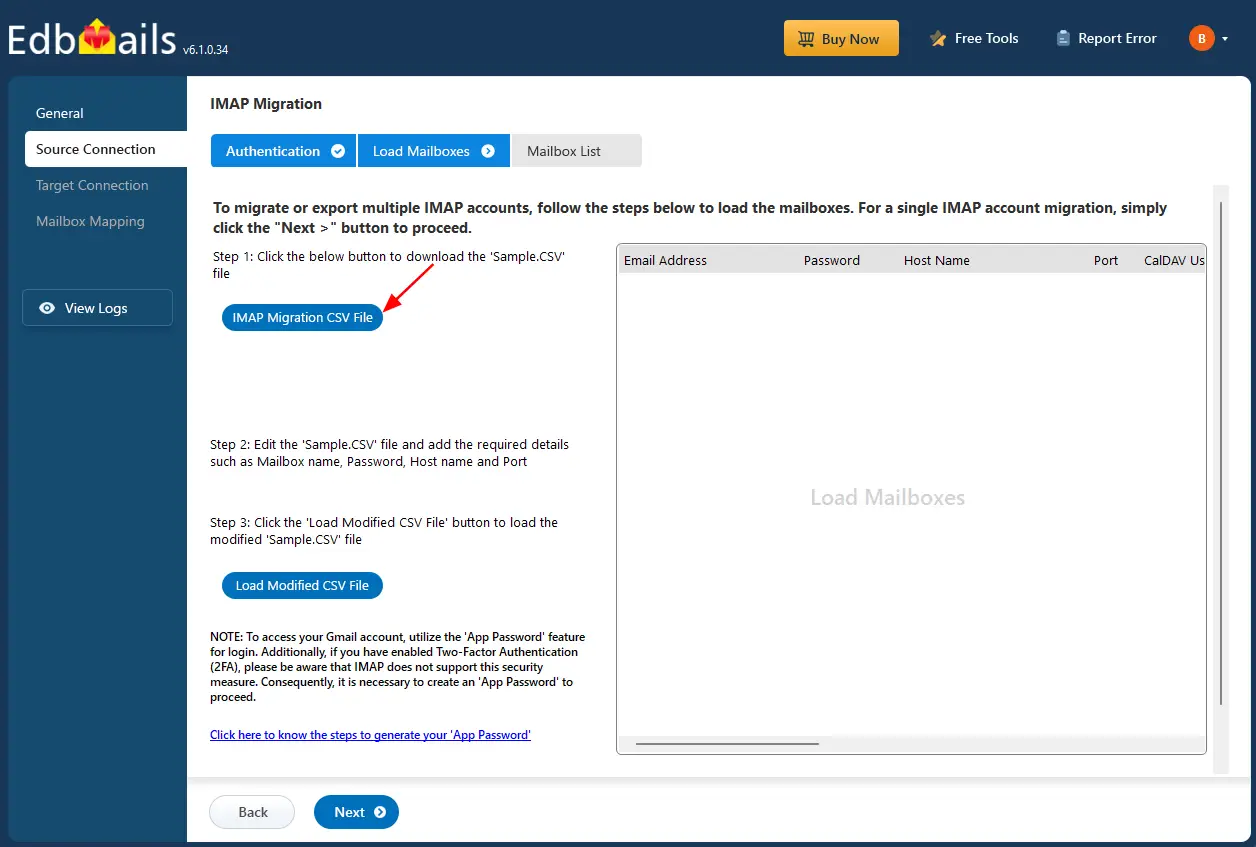
- Open the CSV file and input the required details, such as email address, password, server name, and port number. Once you've entered all the information, save the file.

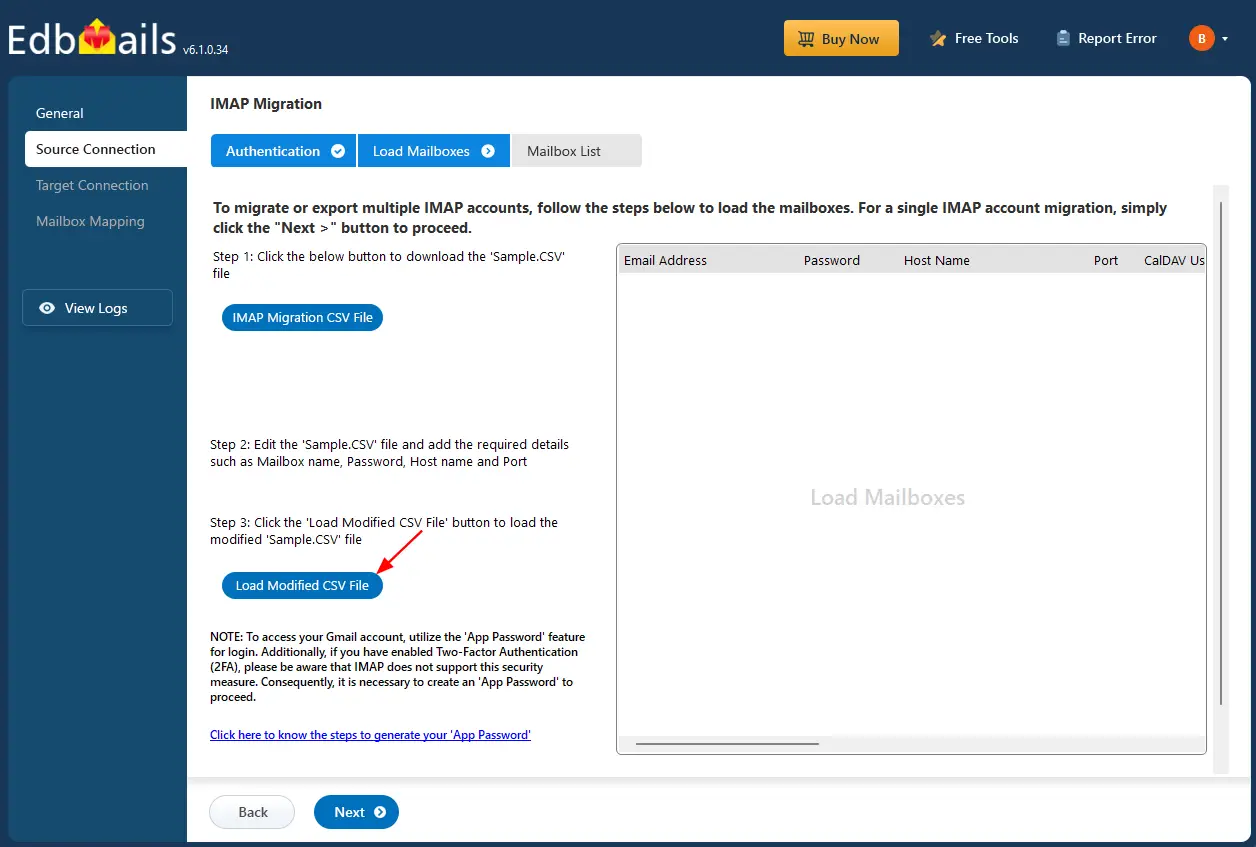
- After updating the CSV file, save it and close it.
- Then, click on the ‘Load Modified CSV File’ button in the migration tool, navigate to the updated file on your system, select it, and click ‘Open’ to continue. This step enables the tool to read the mailbox mapping details required for the migration process.
- To connect a single BigPond email account for migration, click ‘Single User / Account Migration’, choose the suitable connection option such as ‘Connect to IMAP Server’ or ‘Connect to POP3 Server’. Click ‘Next’ to proceed.
Step 3: Select the mailboxes or folders to migrate
- Select the mailboxes or specific email folders you want to migrate from your BigPond account. You can choose all mail items or filter by folders such as Inbox, Sent Items, or Custom Folders based on your requirements. Once selected, click ‘Next’ to proceed with the migration process
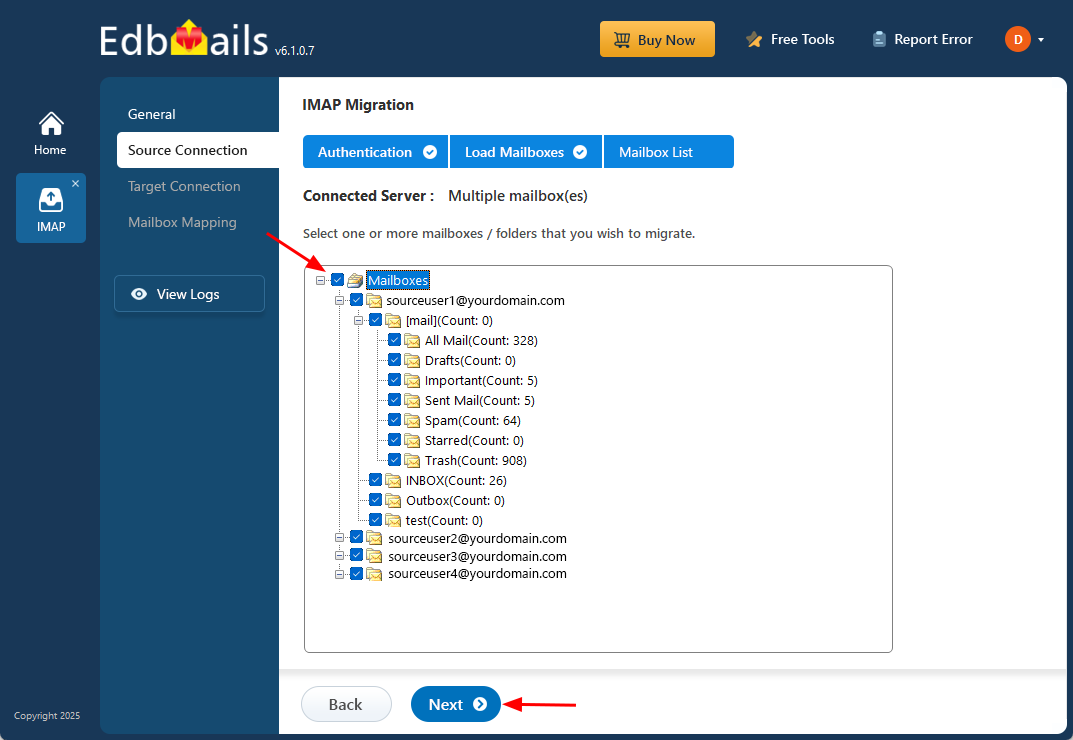
- Select the mailboxes or specific email folders you want to migrate from your BigPond account. You can choose all mail items or filter by folders such as Inbox, Sent Items, or Custom Folders based on your requirements. Once selected, click ‘Next’ to proceed with the migration process
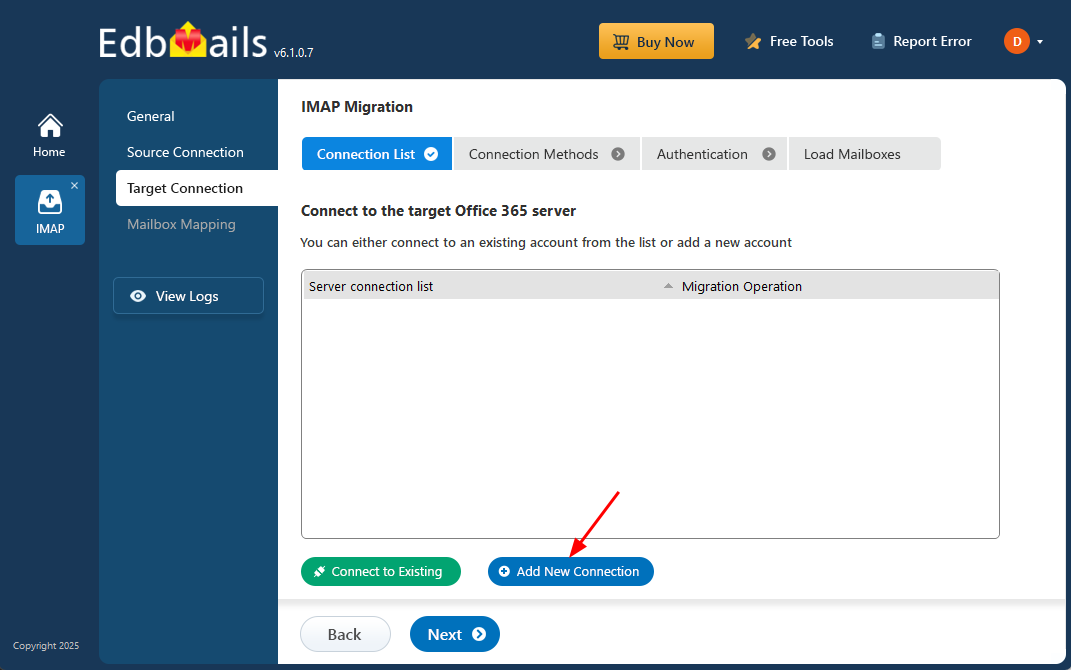
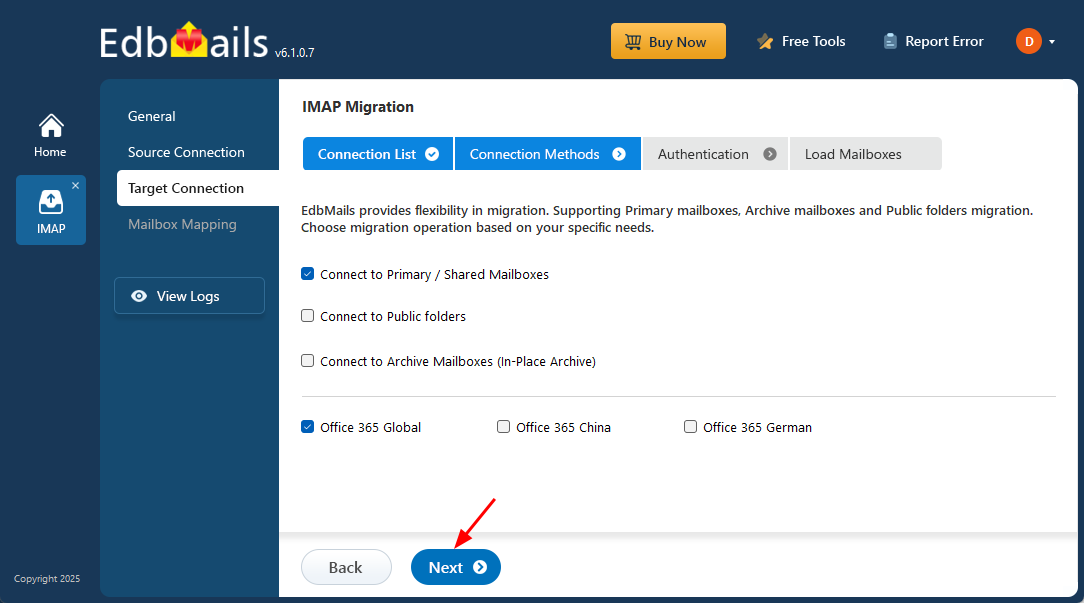
Step 4: Connect to target Office 365 server
- Click the ‘Add New Connection’ button to set up a new connection to your target Office 365 account. If you want to use an existing connection, simply select it from the list and click ‘Connect to Existing’
- Choose the necessary connection options and click ‘Next’ to continue.
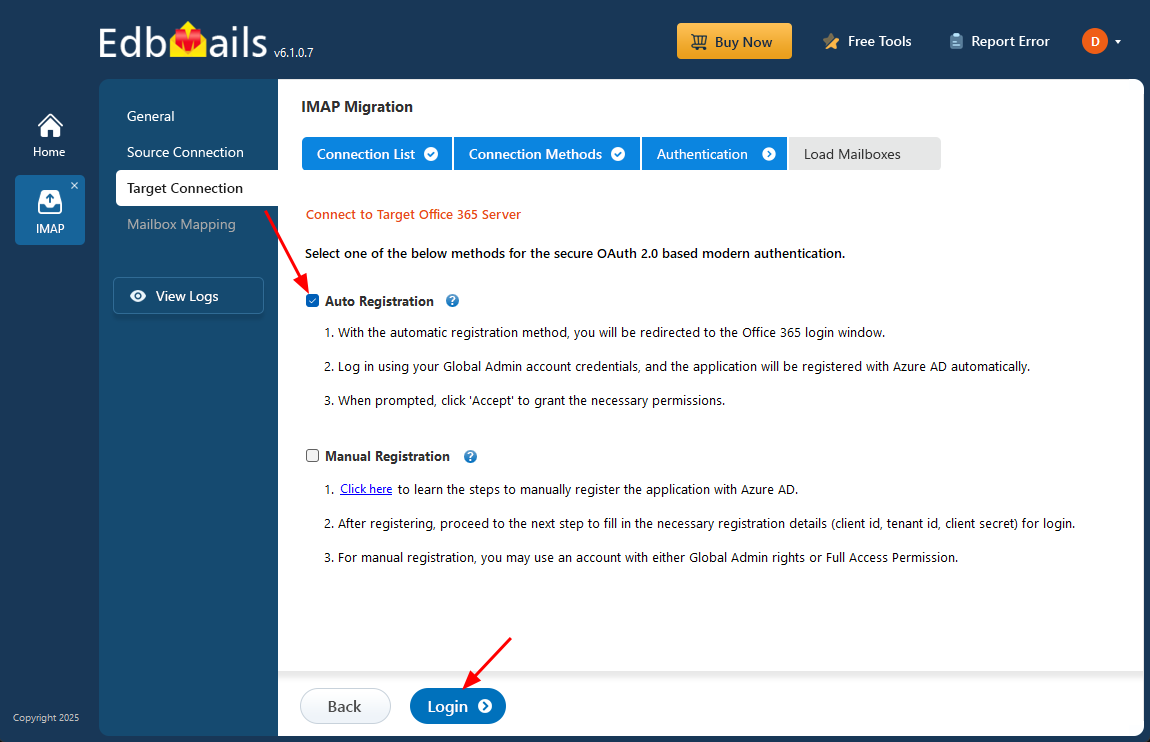
- Select any of the available options to establish a secure connection using OAuth 2.0 modern authentication:
- Choose Auto Registration for a fast and seamless setup. Sign in with a Global Admin account and grant the necessary permissions to automatically register the application in Azure AD.
- Alternatively, choose Manual Registration to enter the Azure AD application details manually. This option works with both Global Admin accounts and accounts that have Full Access permissions.
- Click the ‘Login’ button to continue.
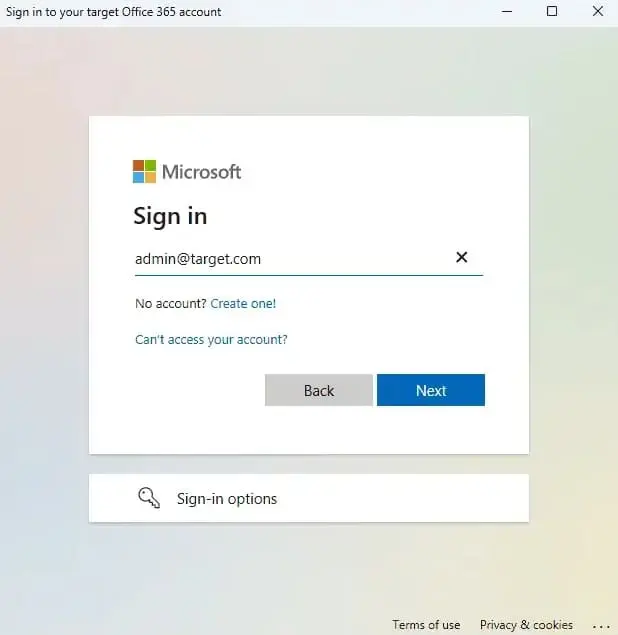
- Authenticate on the Microsoft sign-in page.
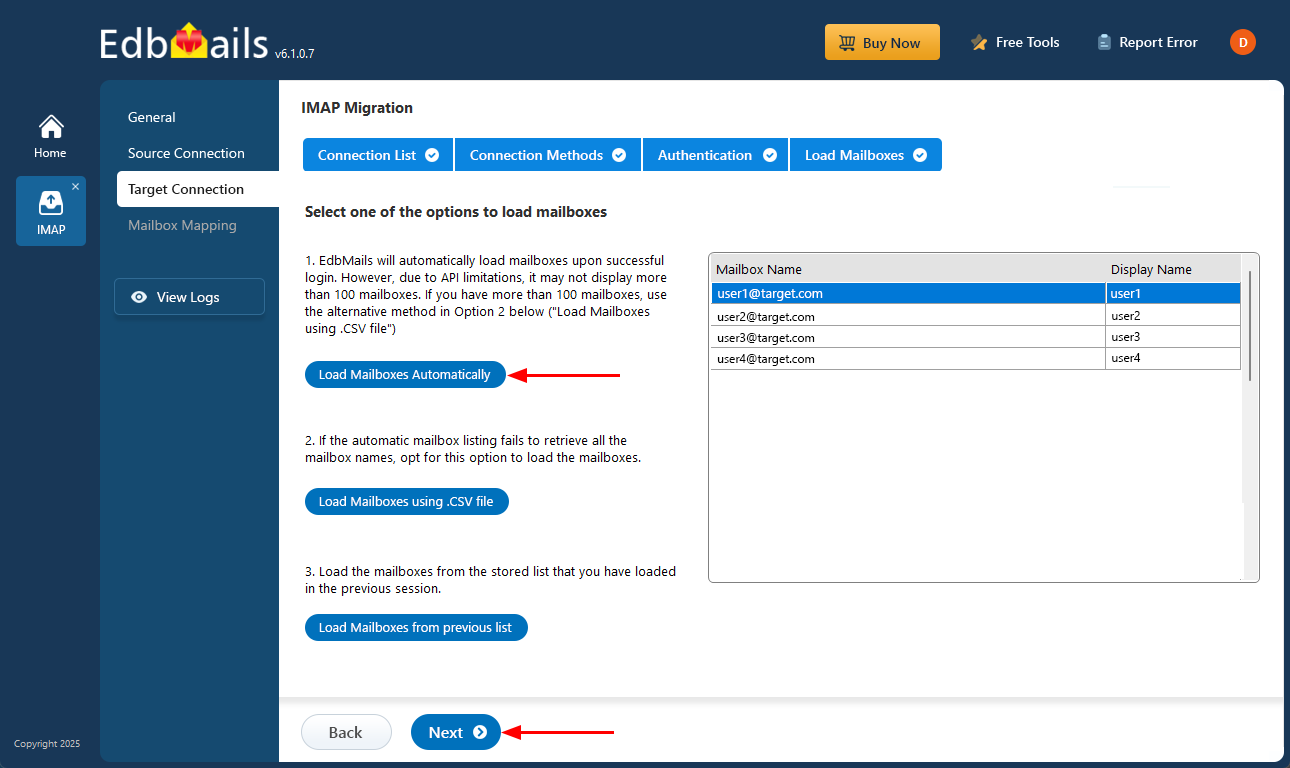
- After logging into your target Office 365 server, select how you’d like to load the mailboxes. EdbMails will automatically display the available mailboxes, but because of Microsoft API limitations, it may only show up to 100. If you have more than 100 mailboxes, choose the ‘Load Mailboxes using .CSV file’ option.
- Click the ‘Add New Connection’ button to set up a new connection to your target Office 365 account. If you want to use an existing connection, simply select it from the list and click ‘Connect to Existing’
Step 5: BigPond email to Office 365 mailboxes mapping
- Select a preferred option to map the source mailboxes and folders with their corresponding mailboxes and folders on the target Office 365 account.
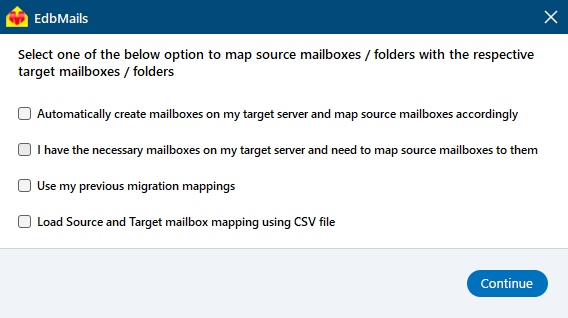
- EdbMails lets you automatically create the required mailboxes in your target Office 365 account.
- It also automatically maps your source Hostmonster mailboxes and folders to the matching ones in Office 365, making large migrations easier to manage.
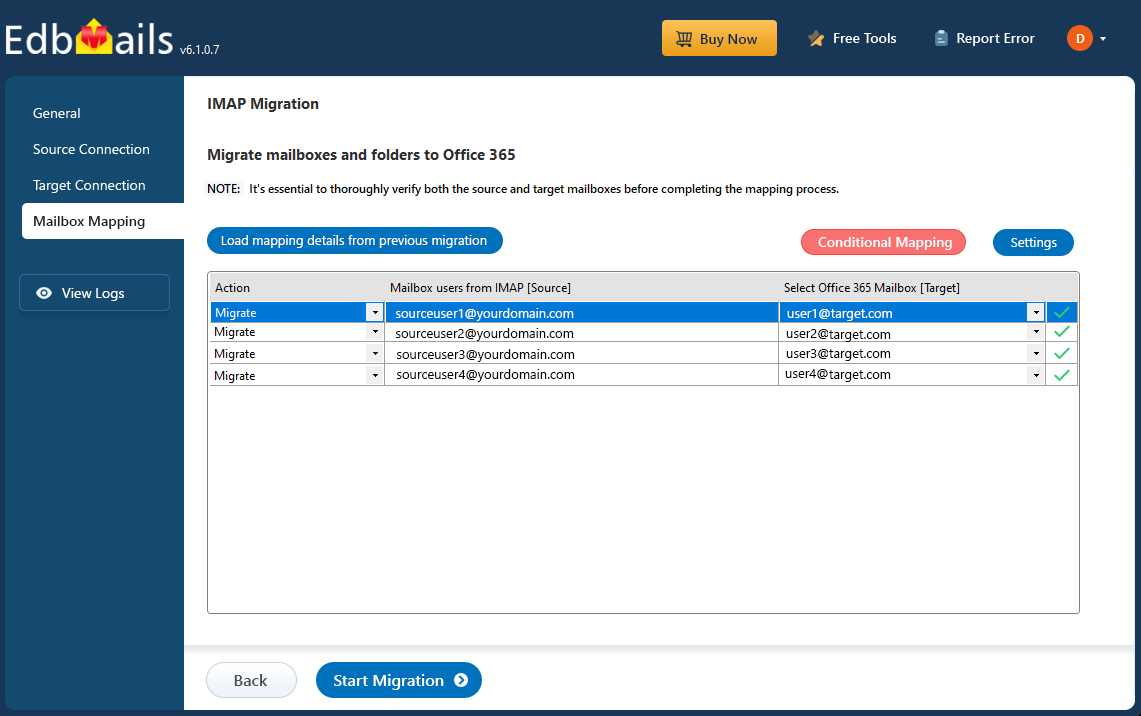
- Select a preferred option to map the source mailboxes and folders with their corresponding mailboxes and folders on the target Office 365 account.
Step 6: Start BigPond to Office 365 migration
- Verify the mailbox mapping, then click the ‘Start Migration’ button to begin the migration process.
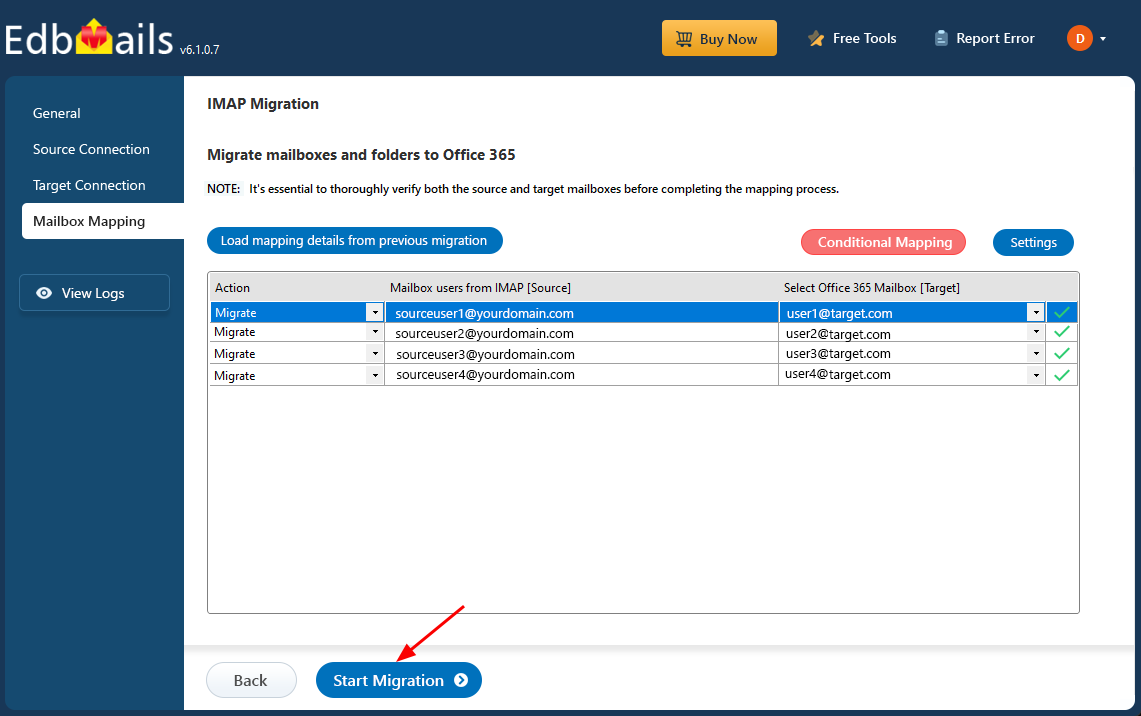
- Click the ‘View Logs’ button to access the full migration report. The report provides detailed information, including the mailbox mapping, an overall summary of the migration, and the item count for each mailbox and folder that was migrated.
- Verify the mailbox mapping, then click the ‘Start Migration’ button to begin the migration process.
BigPond email to Office 365 Post-migration Tasks
- Step 1: Update the MX records to point to Office 365
Ensure the MX records are updated to direct your email traffic to the Office 365 server, enabling smooth email flow. Alongside, make sure to configure the Autodiscover record so Outlook can automatically detect and connect to the newly migrated mailboxes, providing users with seamless email access.
- Step 2: Create a new Outlook profile for users in the new domain
In case users face issues connecting to Office 365 mailboxes, configure a new Outlook profile for each user within the new domain to restore proper functionality.
- Step 1: Update the MX records to point to Office 365
Troubleshooting Guide for BigPond email to Office 365 Migration
For troubleshooting, check out our knowledge base articles. If you have additional questions, browse the FAQs or engage with our customer care team for personalized assistance.
Advantages of EdbMails for BigPond email to Office 365 Migration
- EdbMails retains all email properties such as folder hierarchy, attachments, and metadata during the migration, ensuring data integrity.
- No Outlook installation is required, simplifying the migration process and reducing setup time.
- Bulk migration support allows you to transfer multiple BigPond mailboxes at once, making large-scale migrations efficient.
- Direct migration from BigPond to Office 365 eliminates intermediate steps, ensuring a smooth and hassle-free transition.
- EdbMails is fully compatible with all Windows server and client operating systems.