Tiscali email to Gmail Migration
If you’re experiencing limitations with the Tiscali email service and planning to switch to Gmail for its modern interface and advanced capabilities, this guide explains the complete migration process. Follow the step-by-step instructions to migrate your Tiscali emails to Gmail smoothly, ensuring a seamless transition with zero downtime.
Gmail offers several advantages compared to traditional email platforms, including generous storage space, strong spam filtering, powerful search functionality, and seamless integration with Google Workspace applications such as Drive, Meet, and Calendar. Whether you’re migrating for personal use or improving business communication, Gmail provides a secure, scalable, and easy-to-manage email environment.

To make the Tiscali to Gmail migration fast, accurate, and hassle-free, the EdbMails IMAP Migration Tool offers a complete automated solution. It allows you to directly migrate emails and attachments from Tiscali to Gmail while maintaining folder hierarchy and data integrity. The software supports multiple IMAP-based email platforms such as Gmail, Yahoo, and Office 365, providing flexibility for different migration needs.
Designed for simplicity, EdbMails requires no technical expertise or manual file exports. With its intuitive interface, you can easily migrate large volumes of mail data securely and efficiently. The tool ensures 100% accuracy, preventing data loss and preserving your mailbox structure throughout the migration.
User Query
This type of concern is quite common among users looking for better email solutions.
"I’ve been using Tiscali email for several years, but recently, I’ve found it lacking in terms of features and usability. I’m considering moving my email account to Gmail for better storage and easier access to Google services. Can someone guide me through the steps to transfer my Tiscali emails over to Gmail without losing any data?"
Why Migrate emails from Tiscali to Gmail?
- Expanded storage capacity:
Gmail offers a generous 15 GB of free storage, shared across Gmail, Google Drive, and Google Photos. This significantly exceeds Tiscali’s storage limits, giving you more space for emails, attachments, and files.
- Advanced email organization:
With Gmail, emails are automatically sorted into categories like Primary, Social, and Promotions, keeping your inbox organized. This feature reduces clutter and enhances the ease of finding important emails quickly.
- Seamless Google ecosystem integration:
Gmail is integrated with Google’s powerful suite of services such as Google Drive, Google Calendar, and Google Meet. This integration streamlines tasks like scheduling meetings, managing documents, and sharing files without leaving your inbox.
- Universal accessibility and device compatibility:
Gmail is fully accessible across all devices such as smartphones, tablets, and desktops ensuring that you can access your emails anytime, anywhere. Whether on the go or at your desk, Gmail adapts to your needs.
- Robust search capabilities and spam protection:
Gmail's advanced search functionality makes it easy to find emails, even those from years ago. Its highly effective spam filters block unwanted messages, keeping your inbox clean and secure.
- Enhanced security and privacy features:
Gmail offers state-of-the-art security measures, including two-step verification and real-time alerts for suspicious activity. By migrating to Gmail, you benefit from these protections, ensuring the safety and privacy of your data.
For all these reasons, users are choosing to migrate from Tiscali email to Gmail. EdbMails simplifies the process by offering a seamless, secure solution for transferring emails, ensuring that your migration is smooth, efficient, and without data loss.
- Expanded storage capacity:
Tiscali email to Gmail Migration Plan
- Assess your specific needs, including the number of users, data volume, and desired migration timeframe.
- Create a Gmail account or G Suite subscription, depending on your requirements. Configure the necessary settings and ensure that your Gmail account is ready to receive the migrated data.
- Create user mailboxes on Gmail that align with your organizational requirements, granting appropriate access and permissions.
- Configure IMAP migration settings: If you opt for an IMAP migration tool, configure the necessary settings, such as providing the source Tiscali Mail server details, target Gmail server details, authentication credentials, and migration options.
- Before migrating all data, perform a test migration to ensure that the process works smoothly. Verify that emails, contacts, and other data are successfully transferred from Tiscali to Gmail.
- Inform all users about the upcoming migration. Provide instructions on how to access their new Gmail accounts and any necessary setup steps.
- Once you have completed the necessary preparations and testing, initiate the full migration process. Monitor the progress to ensure that all data is transferred correctly.
- After the migration, carefully review the migrated data in Gmail to ensure that everything is intact and accurately transferred. Cross-check emails, contacts, and other important information to confirm their completeness.
- Once you have verified the successful migration and ensure data integrity, you can proceed to decommission your Tiscali Mail accounts.
Tiscali email to Gmail Migration: Pre-migration Activities
- Ensure that IMAP settings are enabled on both the source (Tiscali) and target (Gmail) servers to facilitate migration.
- Keep a record of the email addresses and passwords for all users you plan to migrate from the Tiscali server.
- Confirm that you have the email addresses for all users on Tiscali. If using Gmail, create an app password for the account.
Click here for steps to create an app password for a Gmail account.
Step-by-Step Guide to Migrate from Tiscali to Gmail
Download and install EdbMails IMAP migration software
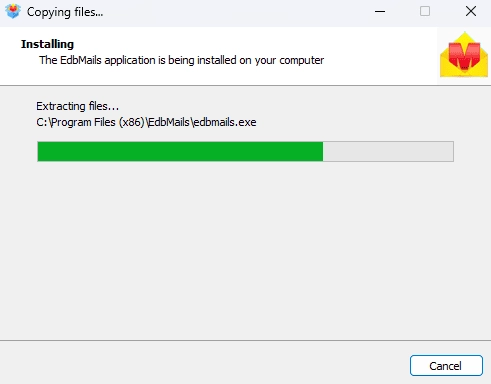
- Download and install EdbMails on your computer.
See EdbMails system requirements for Tiscali email to Gmail migration
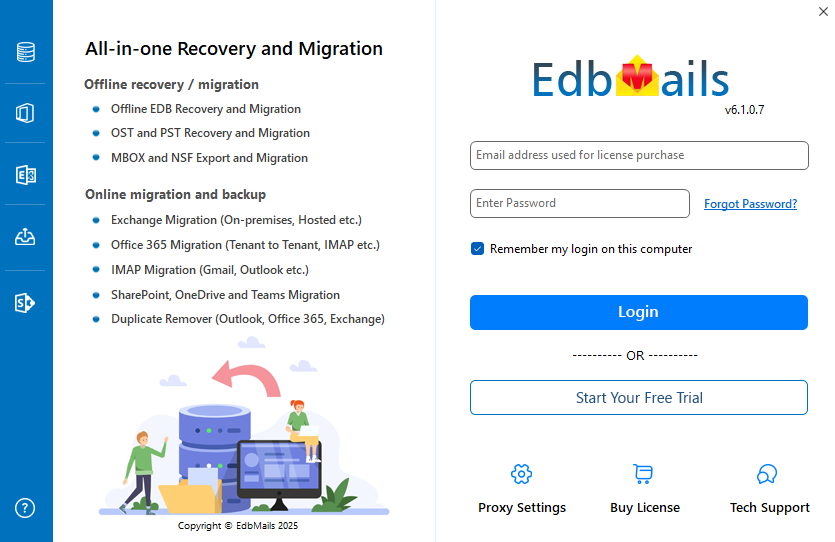
- Launch the EdbMails application on your system.
- Enter your registered email address and password, then click ‘Login’. If you’re using EdbMails for the first time, choose ‘Start Your Free Trial’ to proceed with the trial version.Note: The trial edition provides all major features and allows you to migrate up to 30 items per folder. For unlimited migration and purchase an IMAP Migration license from the official EdbMails website.
Click here to know IMAP Migration Pricing Details.
After completing the purchase, close and reopen the application, then log in again using the same email address and password you used to buy the license to ensure successful activation.
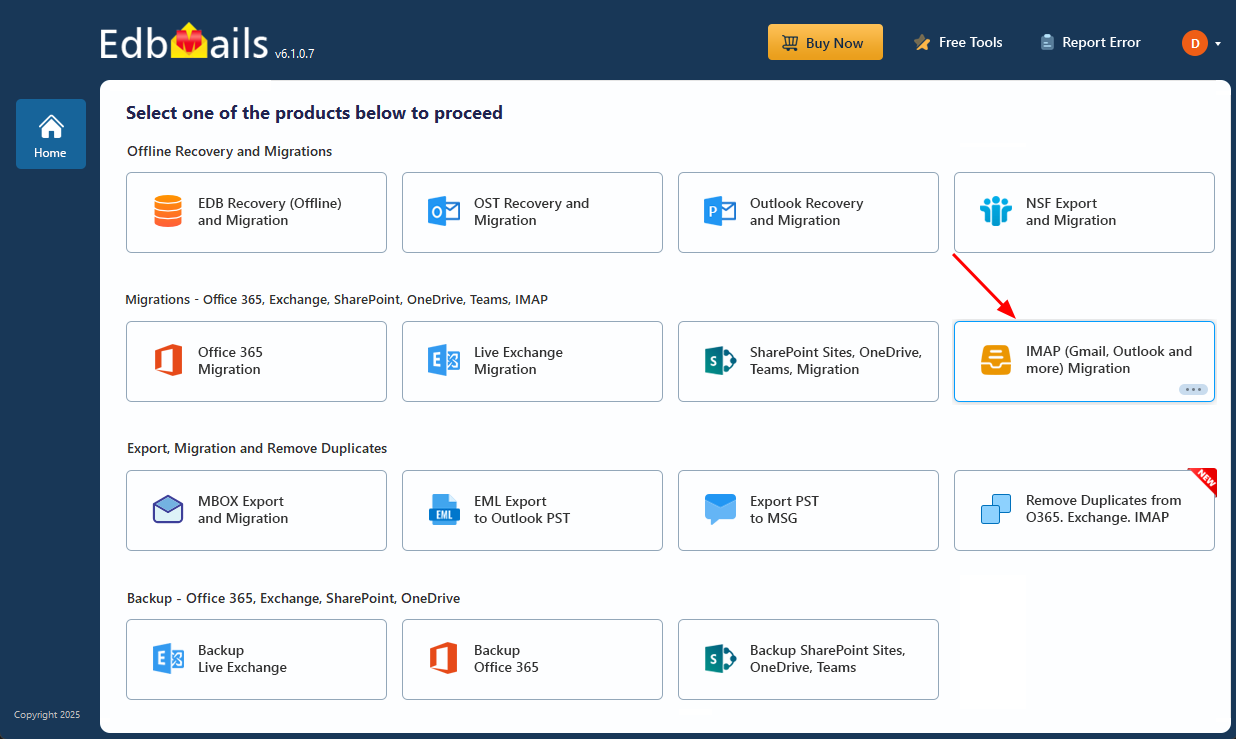
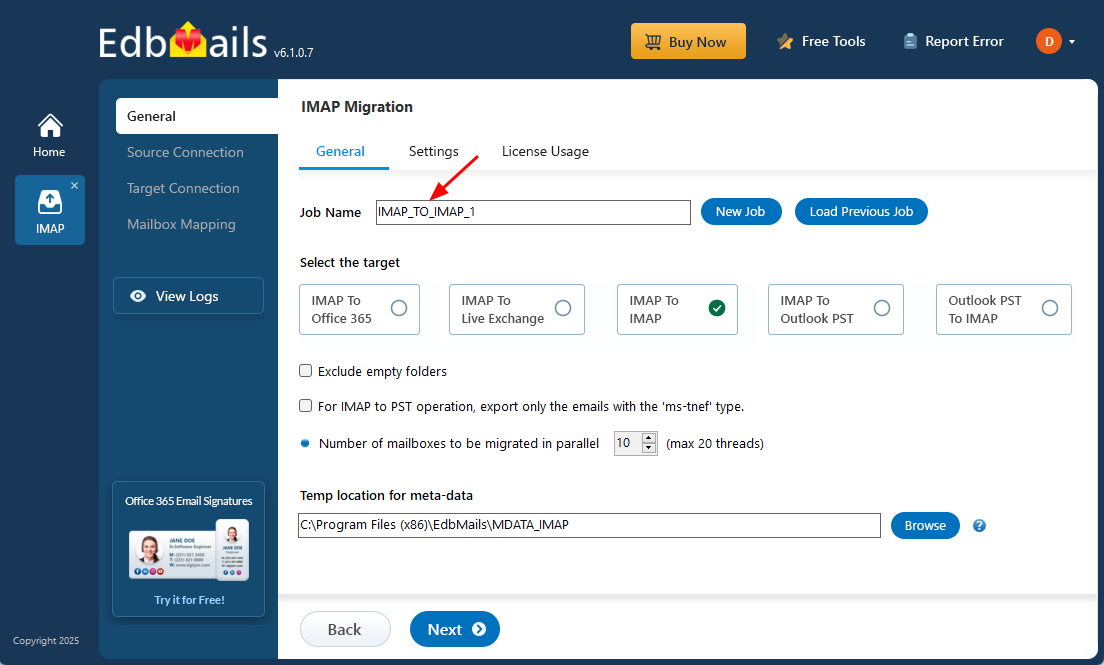
- Select the ‘IMAP (Gmail, Outlook & more) Migration’.
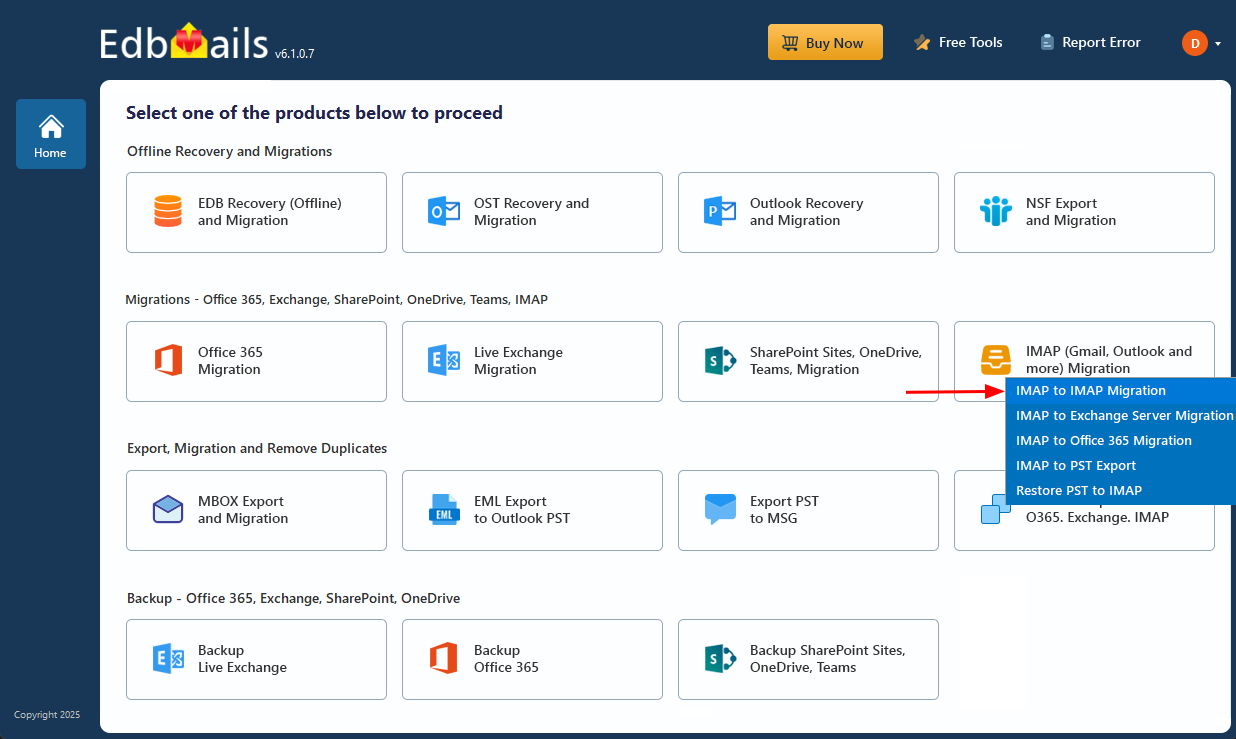
- Select ‘IMAP to IMAP Migration’.
- Continue with the default job name or select ‘New Job’ to assign a custom name, making it easier to identify the migration task before proceeding.
- Download and install EdbMails on your computer.
Step 2: Connect to the source Tiscali email server
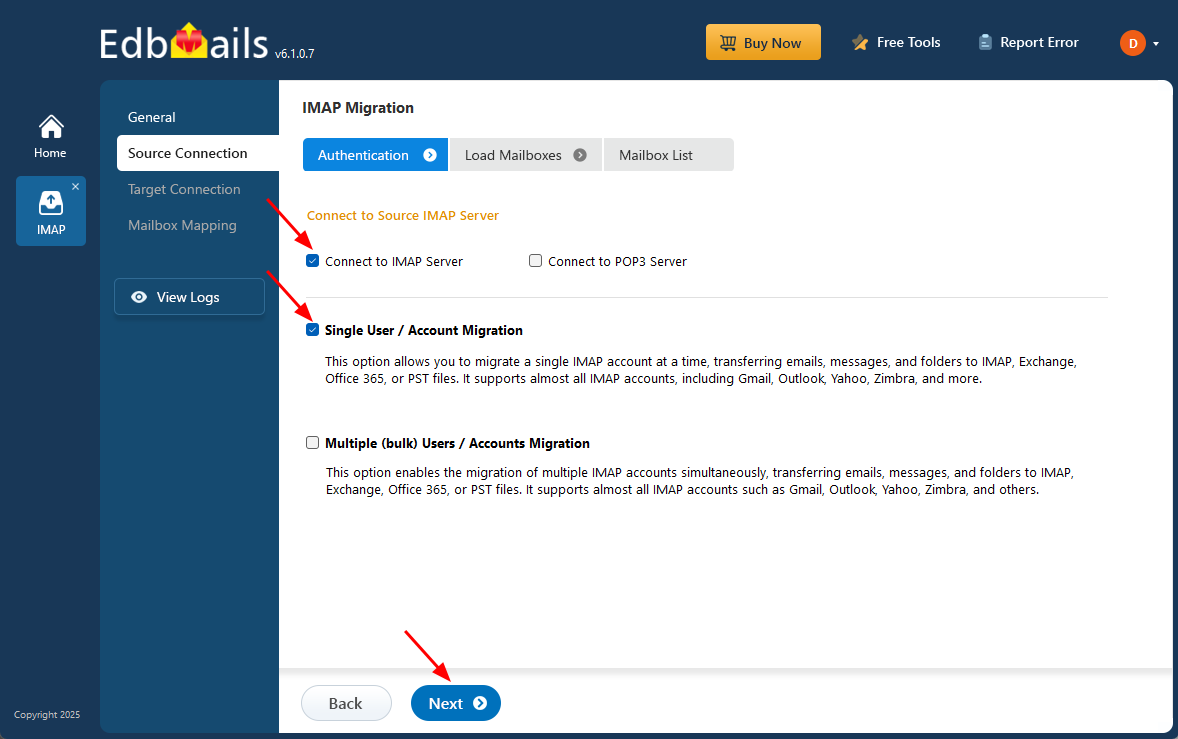
- To connect a single Tiscali account for migration, click ‘Single User / Account Migration’, choose the suitable connection option such as ‘Connect to IMAP Server’ or ‘Connect to POP3 Server’.
- Click ‘Next’ to proceed.
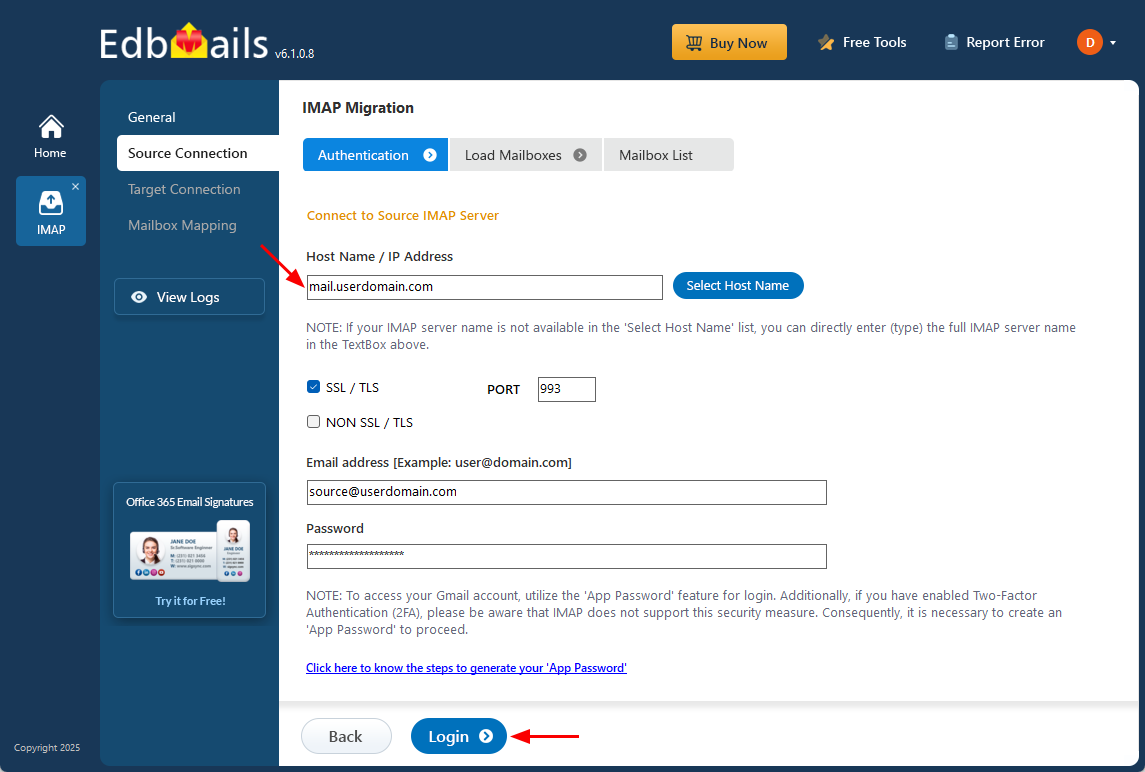
- Select the appropriate IMAP host name for your Tiscali server from the list, or manually enter it if it’s not available. In most cases, the hostname will be in the format mail.userdomain.com, and if needed, you may also use the server’s IP address.
- For IMAP connections, select port 993 and make sure SSL/TLS encryption is enabled to ensure a secure connection. Then enter the email address and password of your source account to connect successfully
- EdbMails does not save or store your credentials and relies on secure OAuth 2.0 authentication when logging in to Office 365.
- Click the ‘Login’ button to proceed.
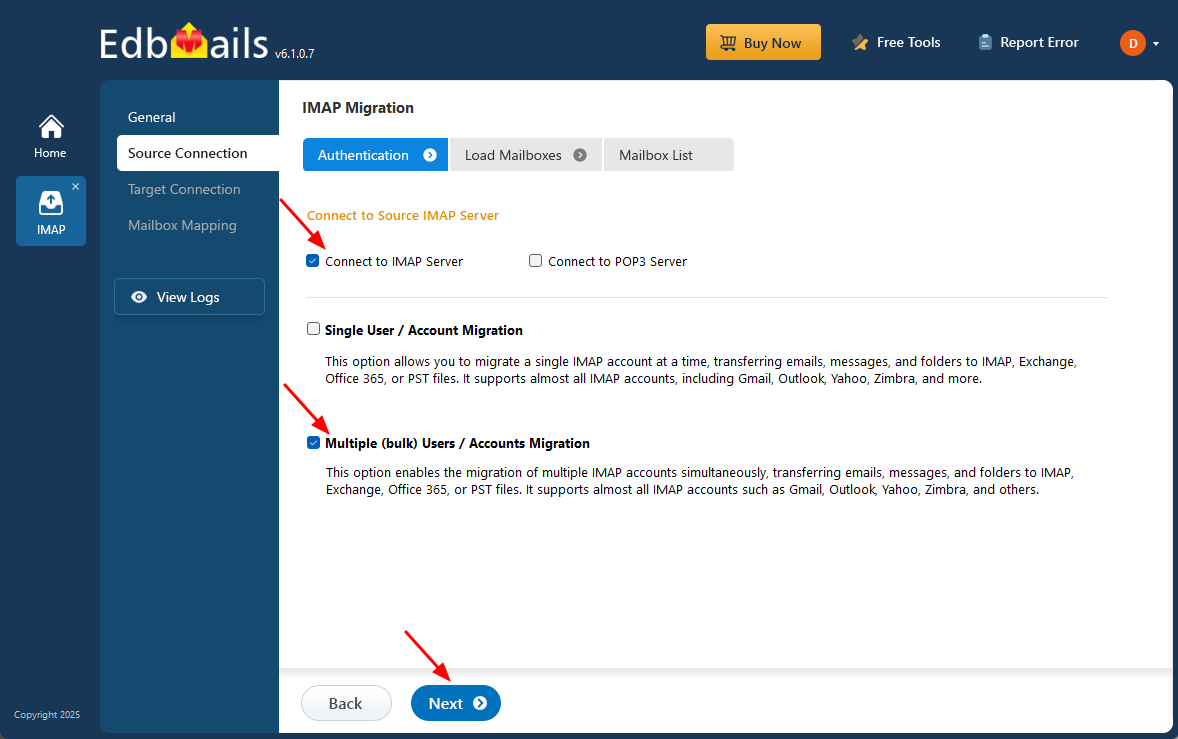
- For migrating multiple Tiscali mailboxes simultaneously, choose ‘Multiple (Bulk) Users/Accounts Migration’, then select the appropriate connection option such as ‘Connect to IMAP Server’ or ‘Connect to POP3 Server’.
- Click ‘Next’ to continue.
- Click ‘IMAP Migration CSV File’.
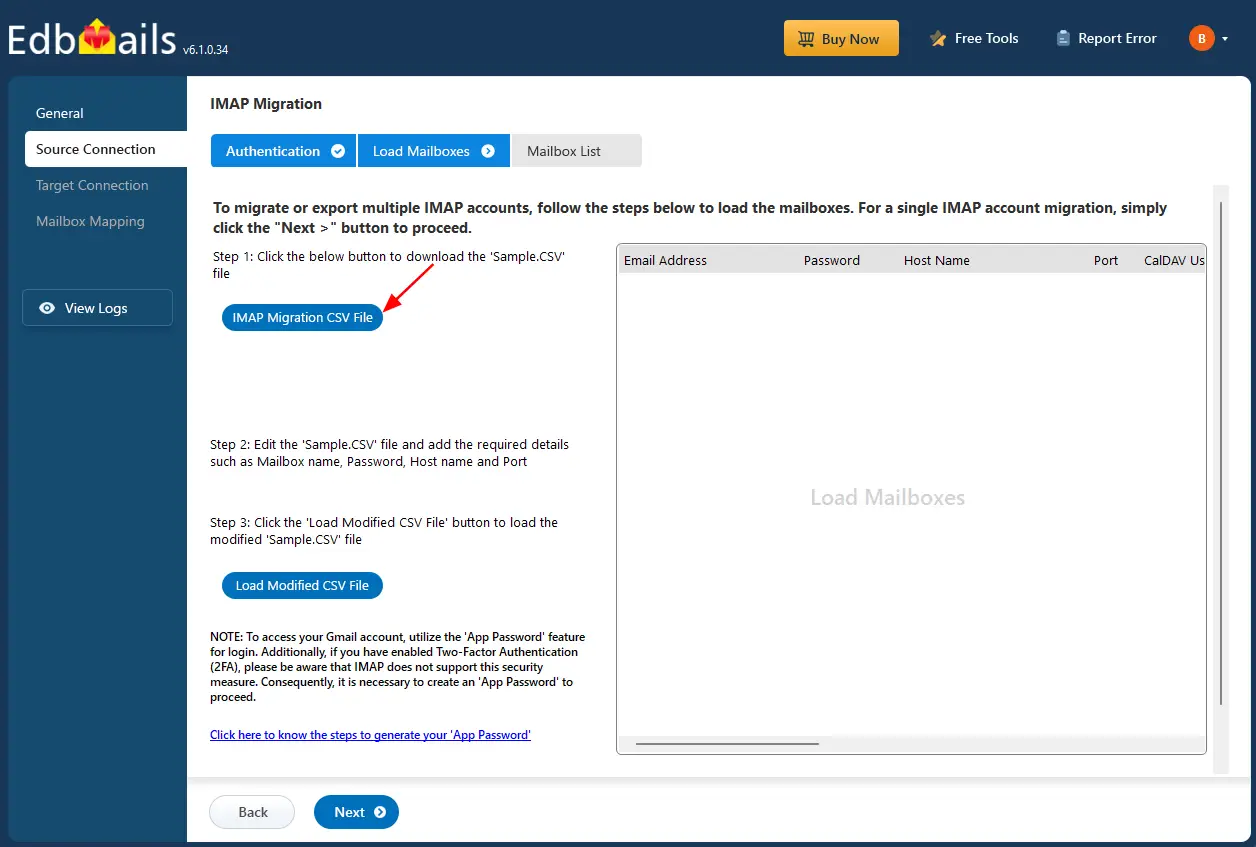
- Open the sample CSV file and enter the required details such as the email address, password, IMAP server name, and port number to prepare for the migration.

- Once you’ve added all the required information to the CSV file, save the changes and close the file to proceed with the next steps in the migration process.
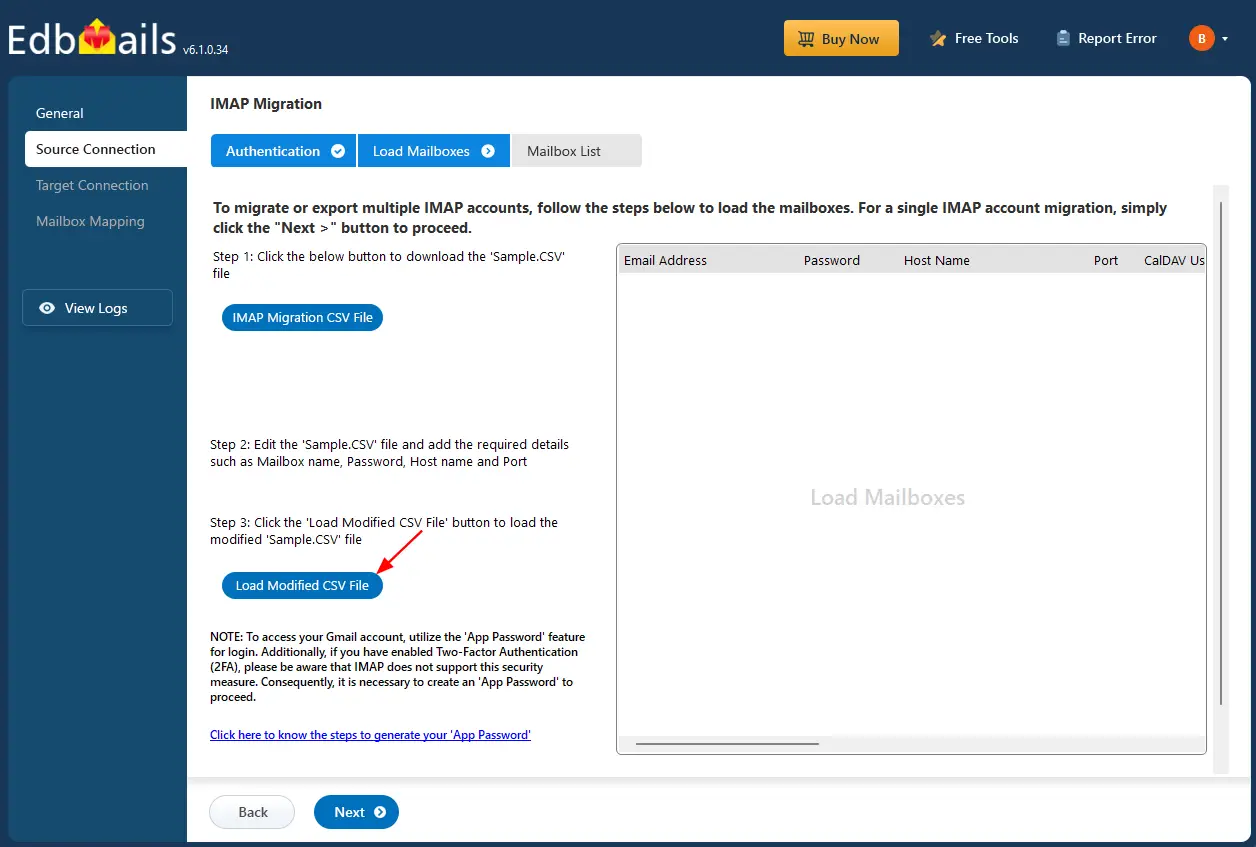
- Next, click the 'Load Modified CSV File' button, locate your updated CSV file, select it, and open it to proceed.
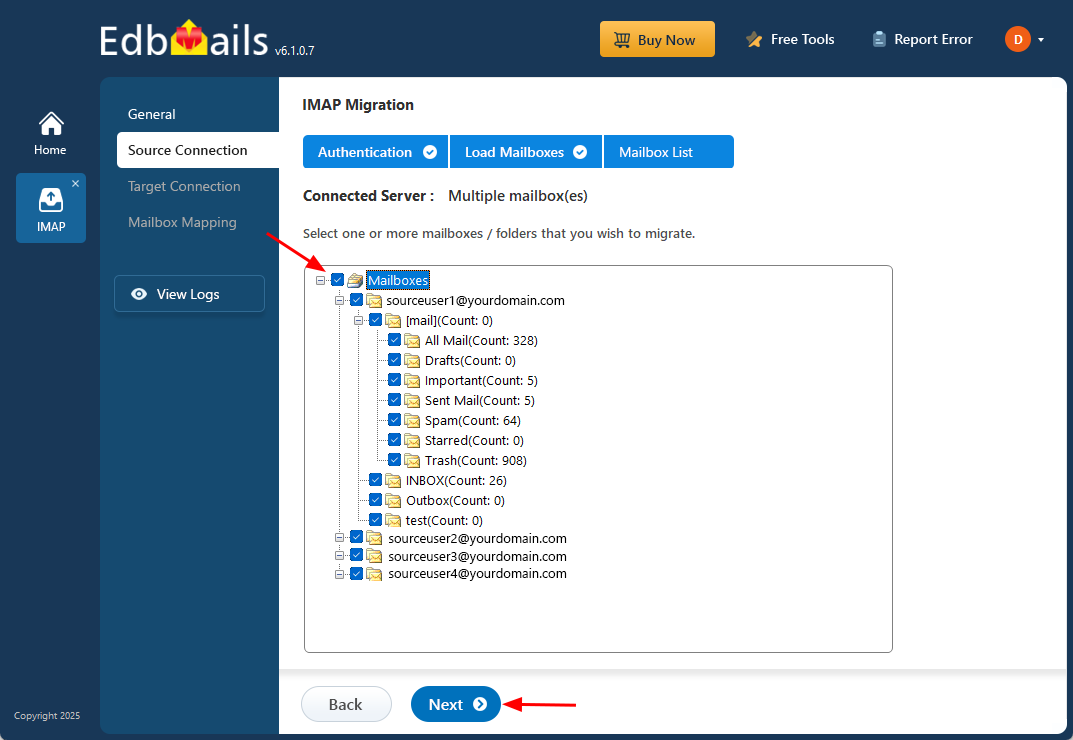
- Select the mailboxes or specific folders you want to include in the migration. After making your selection, click ‘Next’ to proceed.
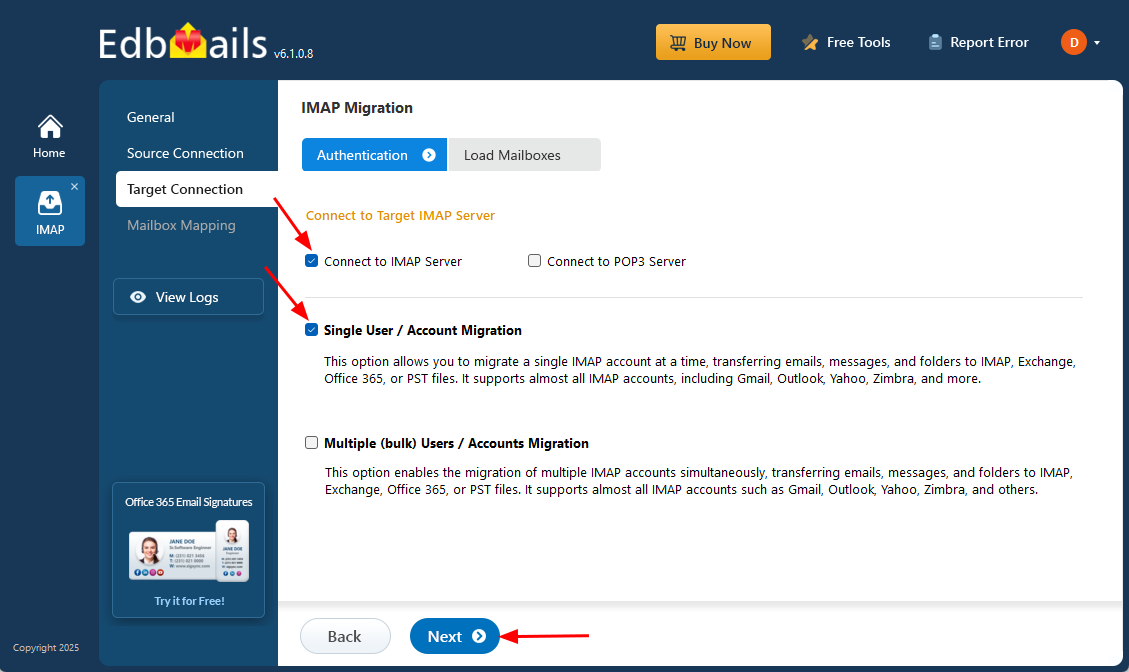
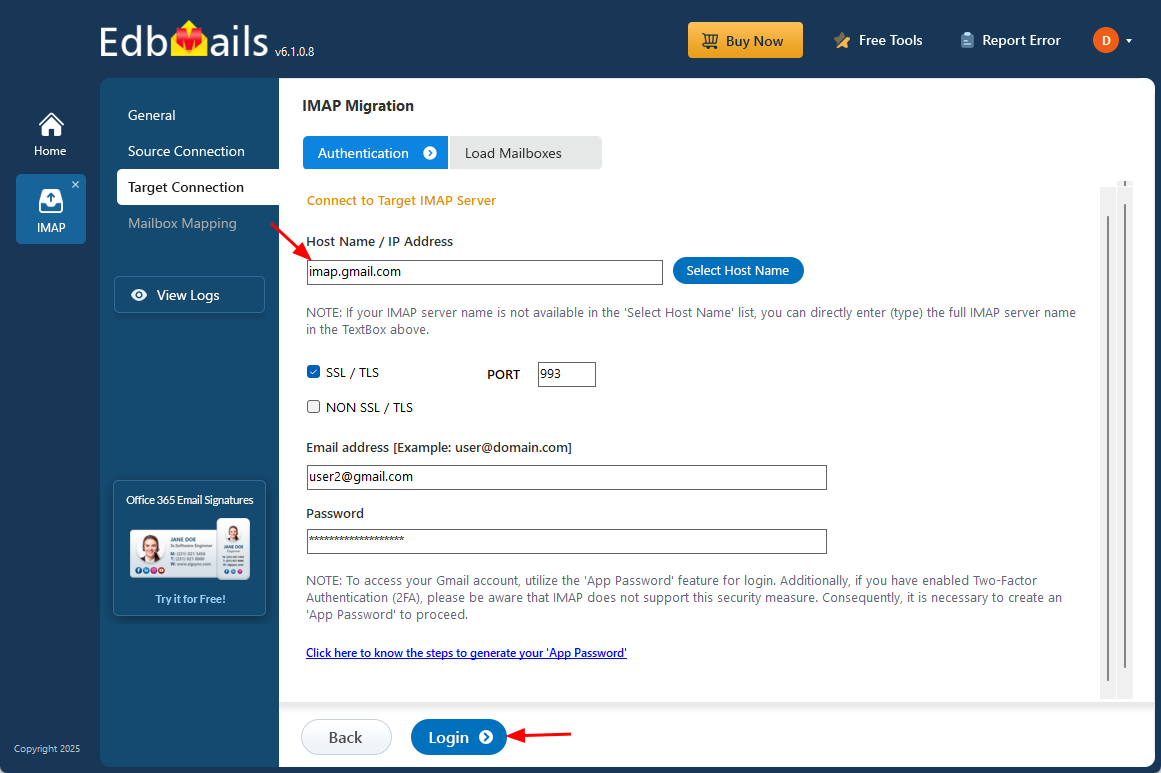
Step 3: Connect to the target Gmail server
- To connect a single user account, select ‘Single User / Account Migration’ Then, choose the required protocol, such as ‘Connect to IMAP Server’ or ‘Connect to POP3 Server’, and click ‘Next’ to proceed.
- For single-user authentication, choose the correct Gmail IMAP hostname (imap.gmail.com) from the available list or enter it manually. Then enter the Gmail email address along with the app password generated for the account (instead of the standard Gmail password).
- Click ‘Login’ to connect and begin the configuration.
- For migrating multiple mailboxes, select ‘Multiple (Bulk) Users/Accounts Migration and click ‘Next’.

- Click ‘IMAP Migration CSV File’.
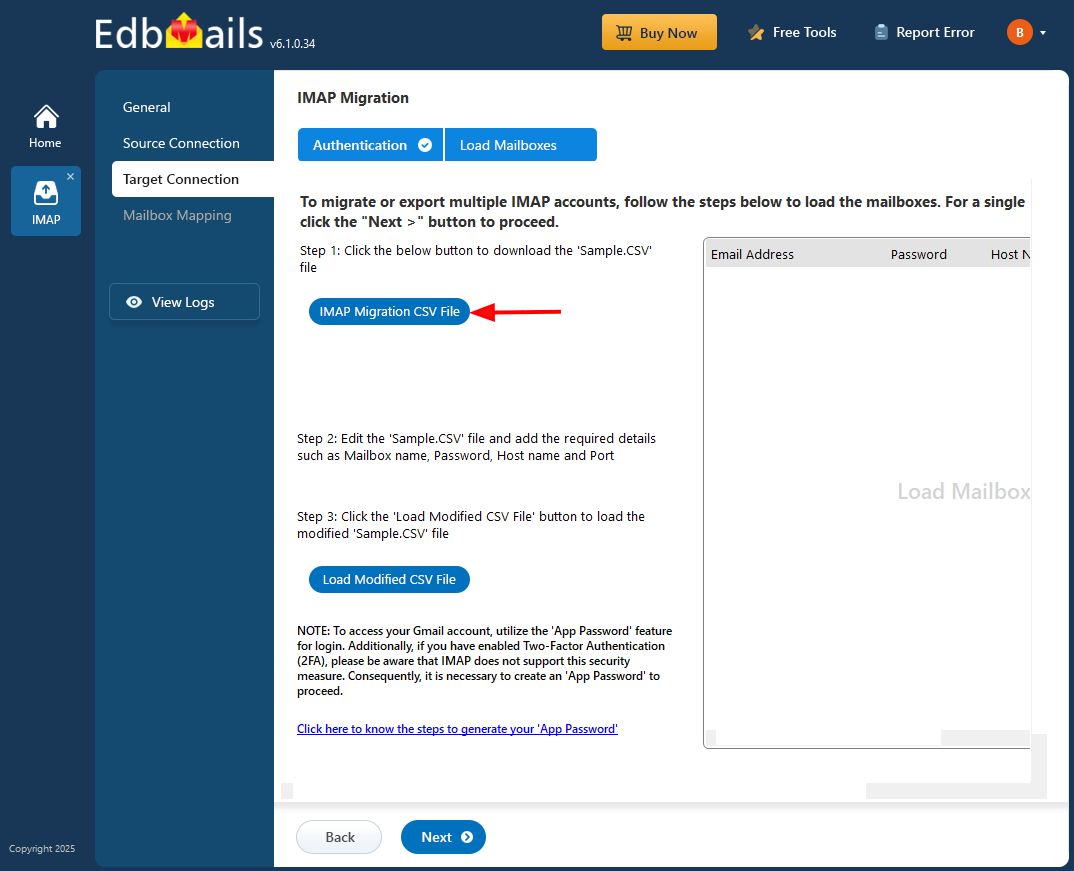
- Update the CSV file with the necessary details, including email address, password, IMAP host name, and port number then save the file to apply the changes.

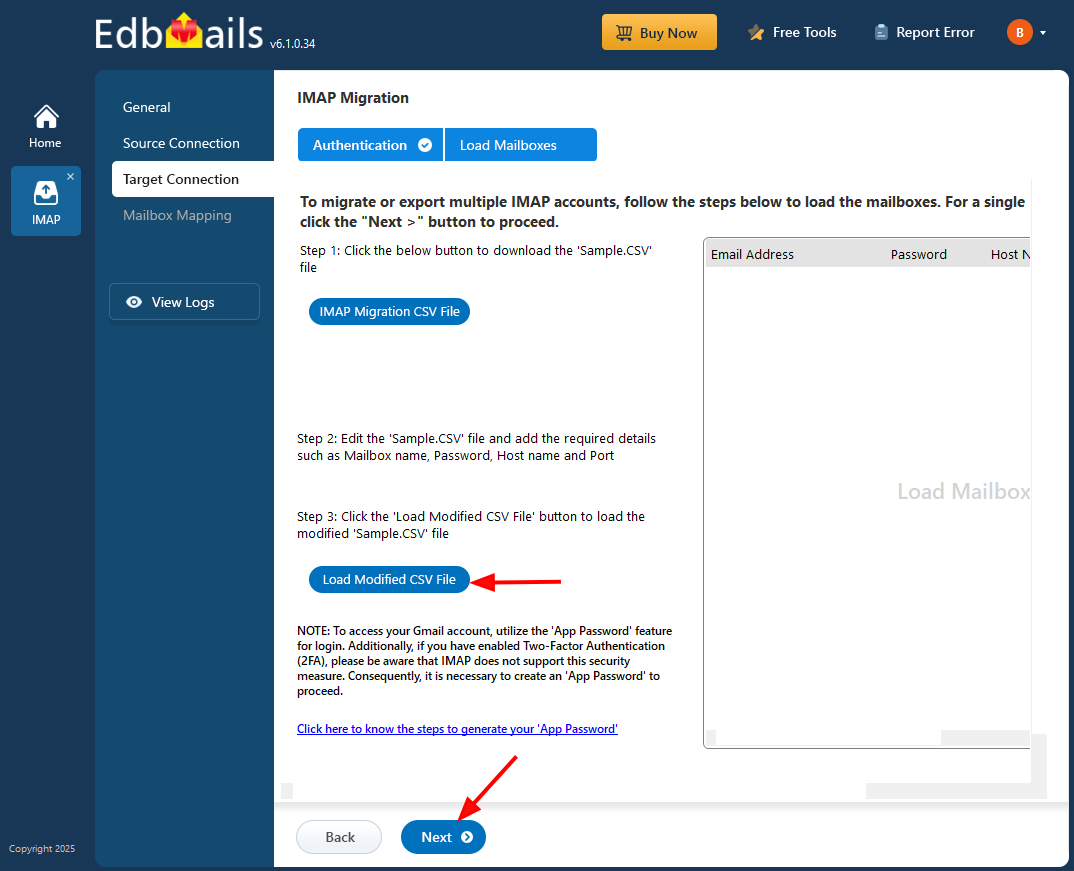
- Close the CSV file, click the 'Load Modified CSV File' button , select the modified CSV file .
- Verify the mailboxes, and click 'Next'.
- To connect a single user account, select ‘Single User / Account Migration’ Then, choose the required protocol, such as ‘Connect to IMAP Server’ or ‘Connect to POP3 Server’, and click ‘Next’ to proceed.
Step 4: Tiscali email to Gmail mailboxes mapping
- Select the appropriate mailbox mapping option to match source mailboxes with their Gmail counterparts. You can choose automatic or manual mapping based on your needs.
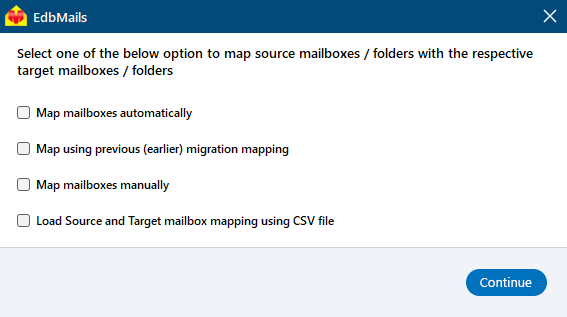
- EdbMails automatically maps source and target mailboxes. You can also manually map the mailboxes.

- Select the appropriate mailbox mapping option to match source mailboxes with their Gmail counterparts. You can choose automatic or manual mapping based on your needs.
Step 5: Start Tiscali email to Gmail migration
- Verify the mailbox mapping.
- Click the ‘Settings’ button to apply the filters. For example, you can set a date filter to migrate only the data within a certain date range.
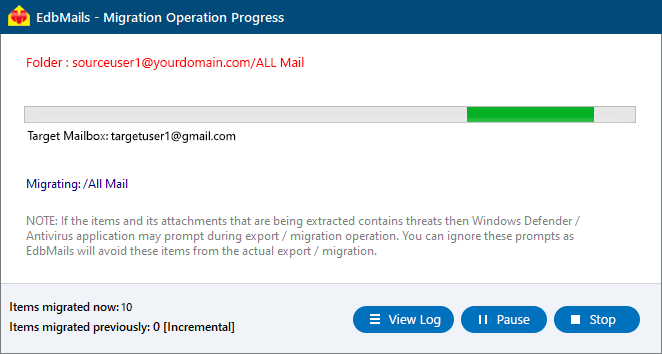
- Click the ‘Start Migration’ button and initiate the migration process.

- To view the migration report, click the ‘View Logs’ button. It provides a comprehensive summary showing the number of emails, folders, and mailbox items migrated, along with their respective counts.
Tiscali email to Gmail Post-migration Tasks
- Step 1: Updating MX Records
In order to redirect incoming email traffic to Gmail instead of Tiscali, you will need to make adjustments to the MX records in your DNS provider's portal. This crucial step ensures that emails are correctly routed to your Gmail account, ensuring smooth communication.
- Step 2: Configuring AutoDiscover (CName)
To facilitate the automatic configuration of email clients and ensure a seamless transition to Gmail, it is important to include the AutoDiscover (CName) setting in your DNS configuration. By correctly configuring this setting, email clients can effortlessly connect to the Gmail server without the need for manual configuration.
- Step 3: Setting up Tiscali Mail Forwarding
To avoid any email loss during the migration process, it is vital to set up mail forwarding in your Tiscali account. This ensures that any incoming messages are forwarded to your Gmail account until the transition is fully completed. By enabling mail forwarding, you can remain connected and receive all your emails without interruption throughout the migration period.
- Step 1: Updating MX Records
Troubleshooting Guide for Tiscali email to Gmail Migration
For common migration issues, check the knowledge base articles. For more information on EdbMails IMAP migration, visit the frequently asked questions (FAQs) section or contact our support team for personalized assistance.
Why choose EdbMails for Tiscali to Gmail migration?
- Simple User Interface
EdbMails offers an intuitive and user-friendly interface, making it easy for anyone to migrate emails from Tiscali to Gmail. You don’t need to be a tech expert to use the tool. Its step-by-step guidance ensures that even beginners can complete the migration process with ease.
- Windows-based Application
EdbMails is a Windows-based application on Windows 10, 8.1, 8, and other editions, ensuring compatibility with your system for a smooth migration process. It eliminates the need for complex setups or additional configurations and provides a seamless experience for users without any performance issues.
- High-speed Migration
EdbMails ensures a high-speed migration process for transferring Tiscali emails to Gmail. With its optimized migration engine, it significantly reduces the time required to transfer large volumes of emails, making the entire process faster and more efficient. You can move your data without unnecessary delays.
- Data Security
EdbMails prioritizes the security of your data during the migration process. It uses advanced encryption protocols to ensure your emails and attachments are transferred securely without any risk of data breaches. Your privacy and sensitive information remain safe throughout the entire migration.
- Detailed Log Reports
EdbMails generates detailed log reports for every migration. These reports provide insights into the progress of the migration, including the number of items migrated and any potential issues encountered. You can track every step of the migration and ensure a flawless transfer.