Mimecast to Office 365 Migration
Mimecast is a well-known provider of advanced email security solutions that protect organizations from threats such as spam, phishing, ransomware, and other cyber attacks. The platform provides a wide range of capabilities, including data governance, email continuity, web security, and archiving, which makes it a reliable choice for many enterprises. One of its key features is mailbox continuity, which allows users to access their emails even during server outages, helping organizations continue their work without disruption and maintain overall productivity.
Even with these advantages, many organizations are choosing to migrate their Mimecast archives to Microsoft 365 (formerly Office 365) to consolidate their email systems within a single platform. Microsoft 365 provides an integrated environment with built-in compliance, security, and productivity features that simplify email administration and help reduce operational complexity. However, migrating large volumes of archived data can be challenging, as it requires maintaining data integrity, preserving metadata, ensuring format compatibility, and avoiding unnecessary downtime during the migration process.

The EdbMails PST Migration Tool is a Microsoft-partnered solution designed to make the migration from Mimecast to Office 365 simple and efficient. It enables smooth migration of user mailboxes, shared mailboxes, public folders, and archive mailboxes without complications. With advanced capabilities such as concurrent migration, multiple mailboxes can be migrated at the same time, helping reduce the overall migration duration. Automated mailbox mapping and loading further minimize manual work while ensuring accurate data transfer. EdbMails also protects your data with AES 256-bit encryption during the entire migration process. Its intuitive interface combined with powerful features makes it a reliable option for businesses looking for a secure, efficient, and hassle-free Mimecast to Office 365 migration.
User Query
"Previously, we used Mimecast, but our company has decided to discontinue its use. We have over 1TB of email archives and have no idea how to export them all into a suitable format. We are even more confused after reading articles that mention exporting to EML, PST, and then converting the format before migrating to Office 365. Has anyone successfully migrated their email archives, or is there a software tool that can directly migrate our archives to Microsoft 365?"
Benefits of Migrating from Mimecast to Office 365
Without a doubt, Mimecast provides enhanced security and serves as an additional layer of data protection. However, during mergers, acquisitions, or infrastructure consolidation, organizations often prefer to centralize their email and archiving in one platform. Here’s why migrating to Office 365 makes sense:
- Cost Efficiency: Office 365 includes in-place archiving, eDiscovery, search, and export features, helping businesses avoid extra licensing or third-party costs.
- Integrated Security: With Microsoft Defender, Exchange Online Protection, advanced spam filters, and built-in security, Office 365 provides robust email protection without relying on external services.
- Simplified email Flow: Mimecast can sometimes block certain messages when integrated with Office 365, causing delivery issues, whereas Office 365’s native security avoids such conflicts.
- Immediate Access to Archives: Accessing archived data in Mimecast can be cumbersome, while Office 365 ensures quick, straightforward access whenever needed.
Migrating to Office 365 helps organizations consolidate infrastructure, reduce complexity, and maintain secure, efficient email operations.
Mimecast to Office 365 Migration Plan
Planning is one of the most important steps before you begin the Mimecast to Office 365 migration. Here is a checklist of points to consider before you migrate.
- Determine the size of the data and the number of mailboxes you want to migrate.
- Make a list of all the data and permissions from the Mimecast that you want to transfer.
- Create appropriate user mailboxes on Office 365 and assign licenses to them.
- Ensure you have enough network capacity and bandwidth to migrate.
- Communicate the migration plan and flow to your end users.
Mimecast Migration to Office 365 Prerequisites
- Create Office 365 mailboxes and assign licenses to them
- If you plan to migrate the Mimecast archive to Office 365 Public folders, ensure that you create and configure the Public folder mailboxes on the target server.
- Similarly, if you want to migrate to the Office 365 In-Place archive, enable them from the admin center.
- If you have a custom email domain from the source which you want to retain and receive emails to, you must add and verify the domain on Office 365.
Steps to add a custom domain to Office 365 and Steps to add DNS records to connect your domain.
- Configure Office 365 to send and receive large messages.
Follow the steps to increase the message size on Office 365 to 150MB. See message size limits on Office 365 for more information.
Steps to Migrate Mimecast archive to Office 365
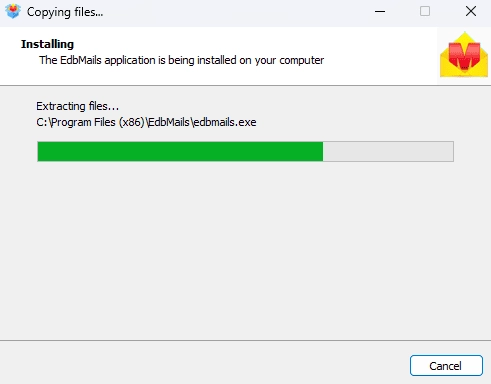
Step 1: Download and install the EdbMails software
- Download and install the EdbMails application on a Windows-based computer to begin the migration process.
- See a detailed list of EdbMails system requirements for PST to Office 365 migration.
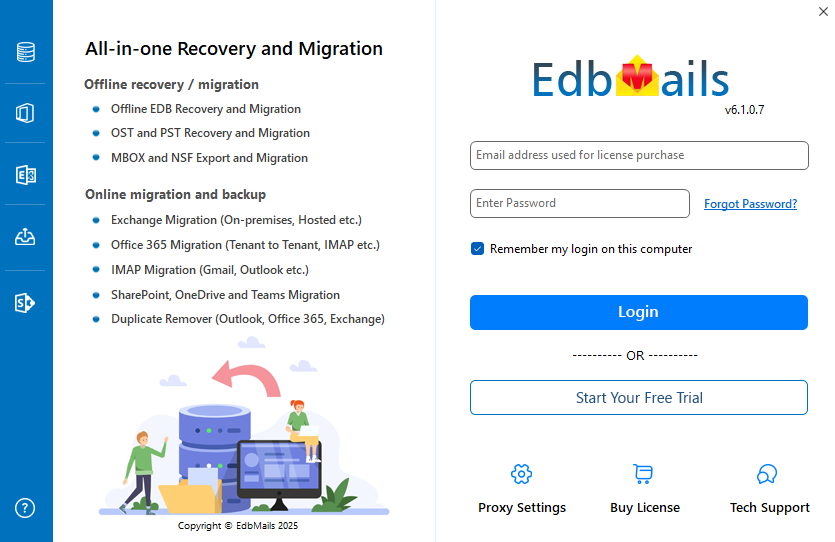
- Launch the EdbMails application on your computer.
- Enter your registered email address and password, then click ‘Login’. If you are opening EdbMails for the first time, choose ‘Start Your Free Trial’ to continue with the trial version.Note: The trial version lets you explore all key features and migrate up to 30 items per folder. For unlimited migrations, you need to purchase PST Recovery and Migration Corporate Premium or Technical Edition License from the official EdbMails website.Once the purchase is completed, close the application and reopen it. Then log in using the same email address and password used during the purchase to successfully activate your license.
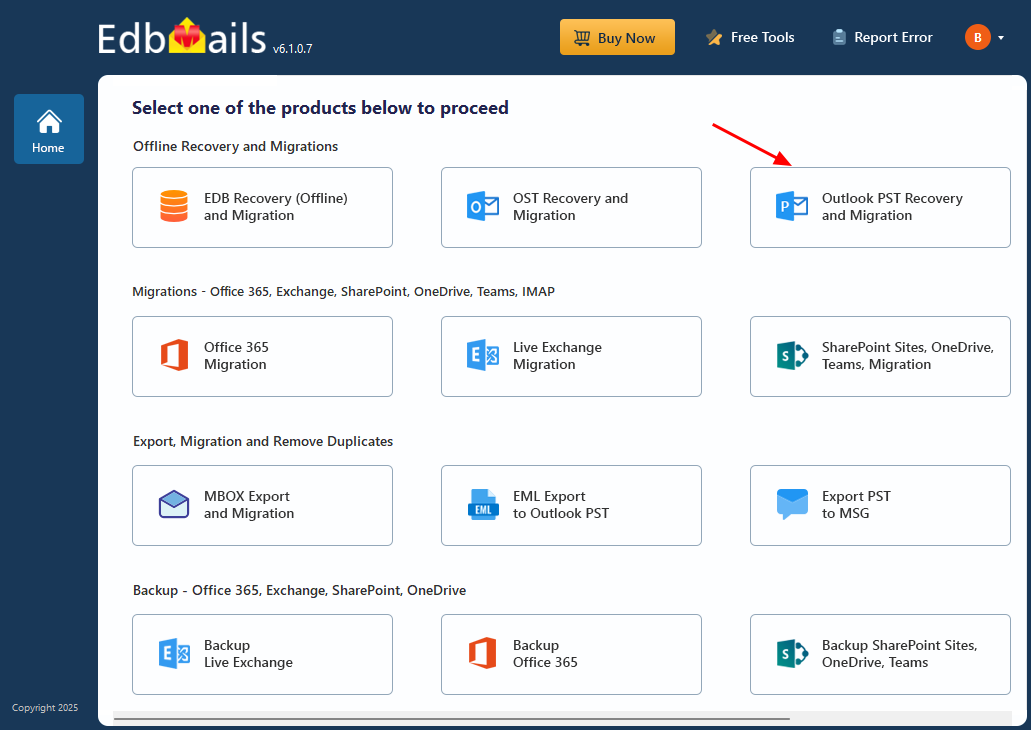
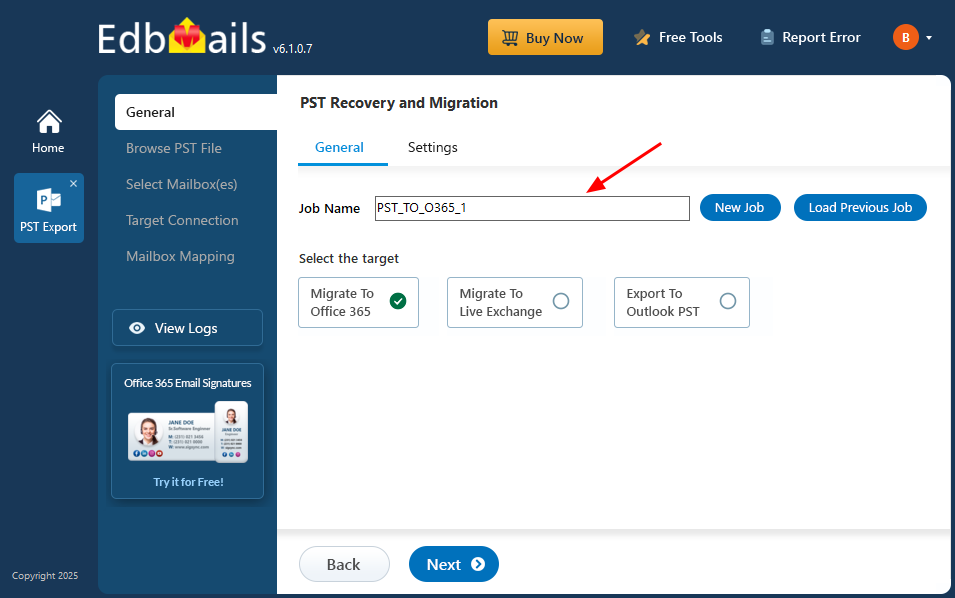
- Select ‘Outlook PST Recovery and Migration'.
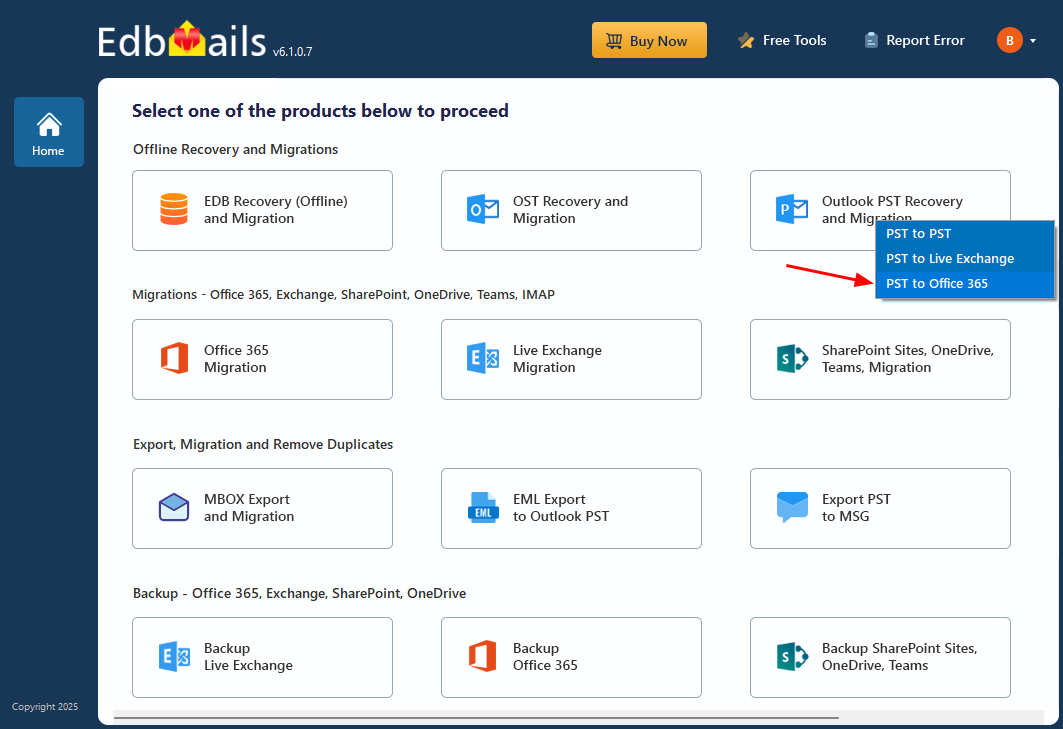
- Select ‘PST to Office 365’.
- You can either proceed with the default job name or click ‘New Job’ to assign a custom name for easier identification. Once done, click ‘Next’ to continue.
- Download and install the EdbMails application on a Windows-based computer to begin the migration process.
Step 2: Select the offline PST file and connect to the source
- Before starting the migration, make sure your mailbox data from Mimecast has been exported in PST format.
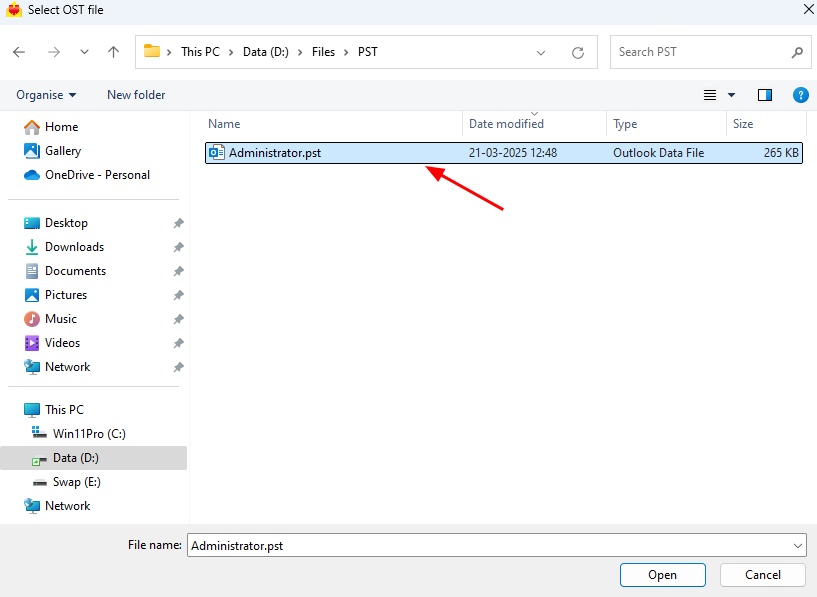
- To add a PST file that you want to migrate in EdbMails, select the ‘Browse for PST file’ option.
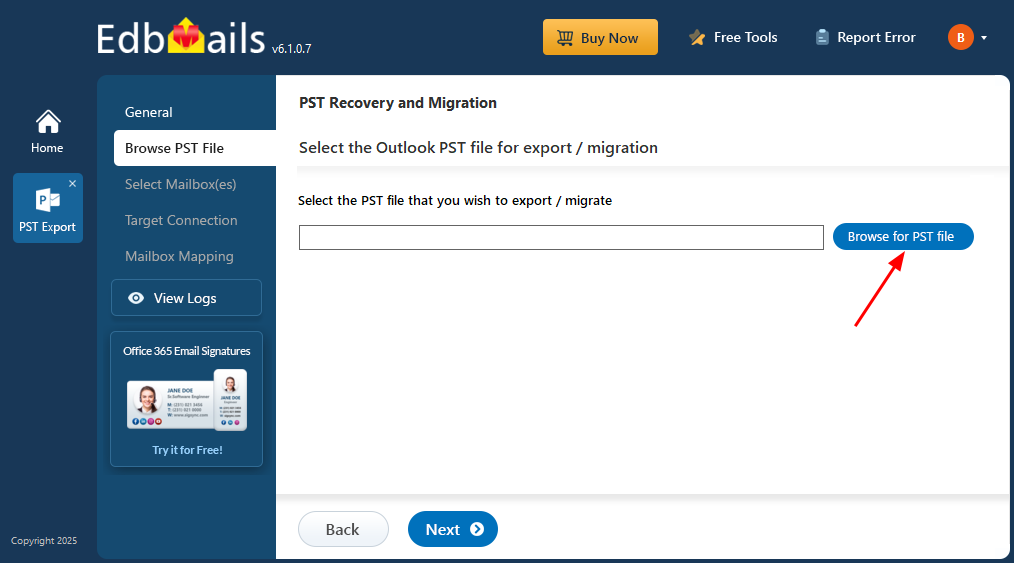
- Select the offline PST file from your local drive that you want to migrate.
- After choosing the file, click ‘Next’ to continue with the migration process.
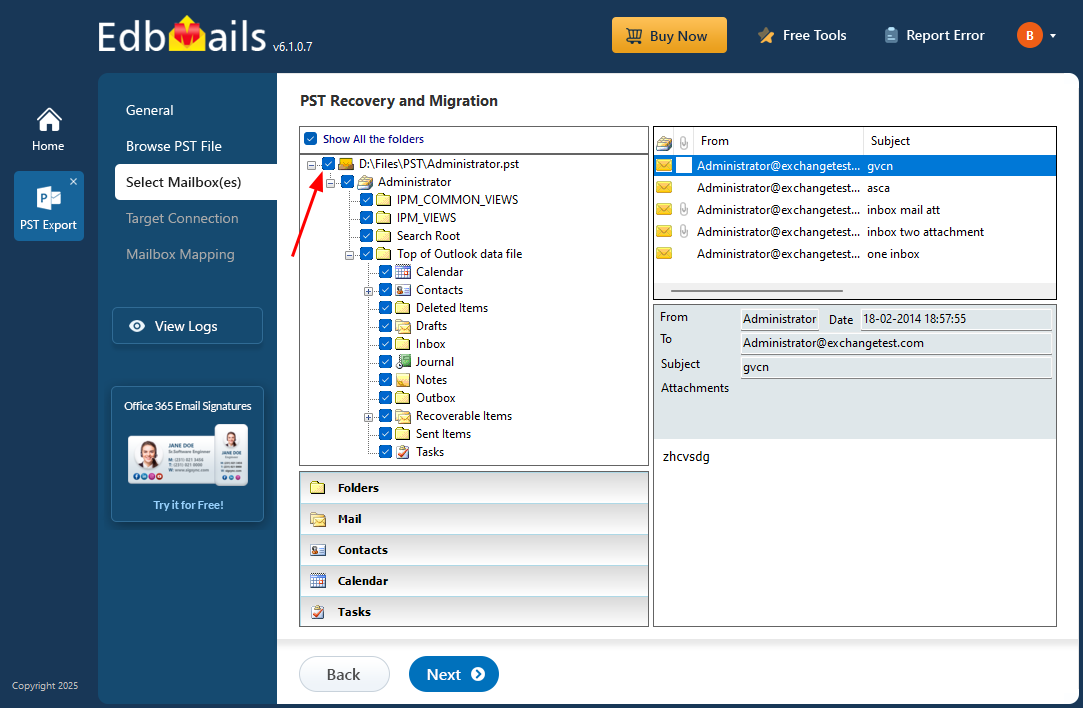
Step 3: Preview and select the Mimecast mailboxes
- EdbMails automatically scans the PST file and recovers data even if the file is partially corrupted, ensuring a reliable and complete migration.
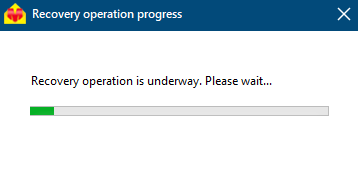
- Once the recovery process finishes, the complete mailbox folder hierarchy appears in the left pane. You can browse through the folders and subfolders to access the recovered data. The built-in preview feature in EdbMails lets you view emails, contacts, calendars, and other mailbox items directly within the application, helping you verify the data before proceeding with migration.
- Select the required mailboxes/folders for migration and click the ‘Next’ button.
- EdbMails automatically scans the PST file and recovers data even if the file is partially corrupted, ensuring a reliable and complete migration.
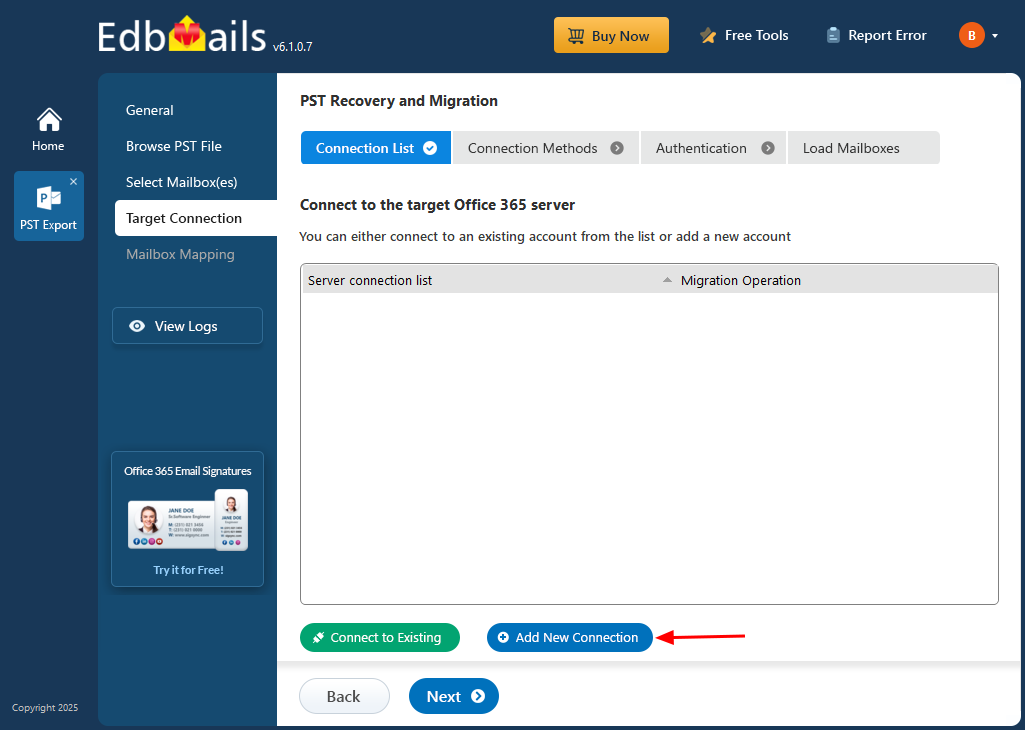
Step 4: Connect to the target Office 365 server
- Select the ‘Add New Connection’ option to establish a connection with your target Office 365 account.
- If you have previously set up a connection, you can choose it from the available list and click ‘Connect to Existing’ to proceed.
- Choose the appropriate connection settings based on your migration needs, then click ‘Next’ to proceed.
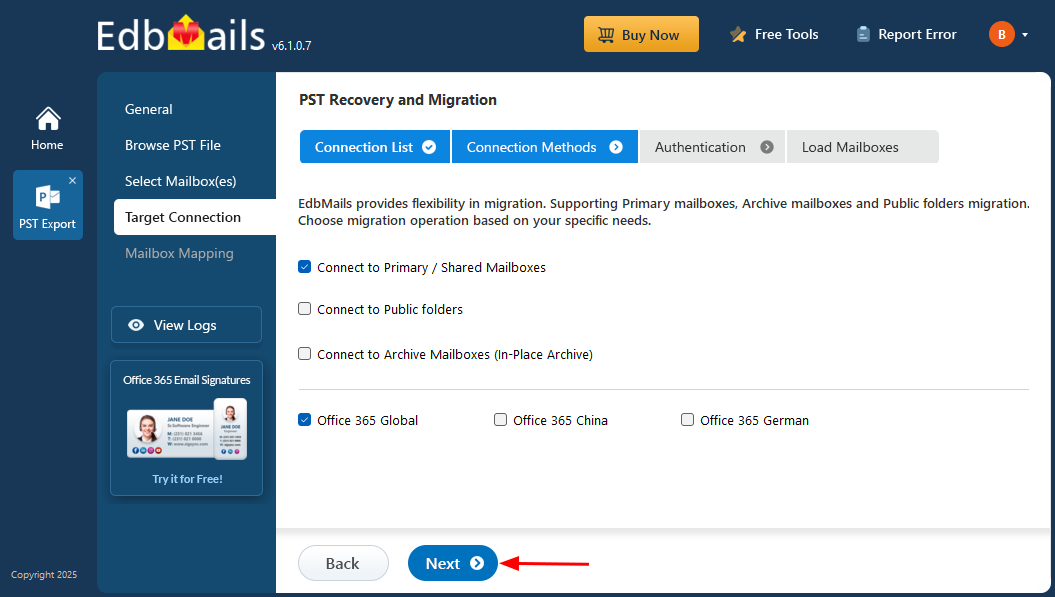
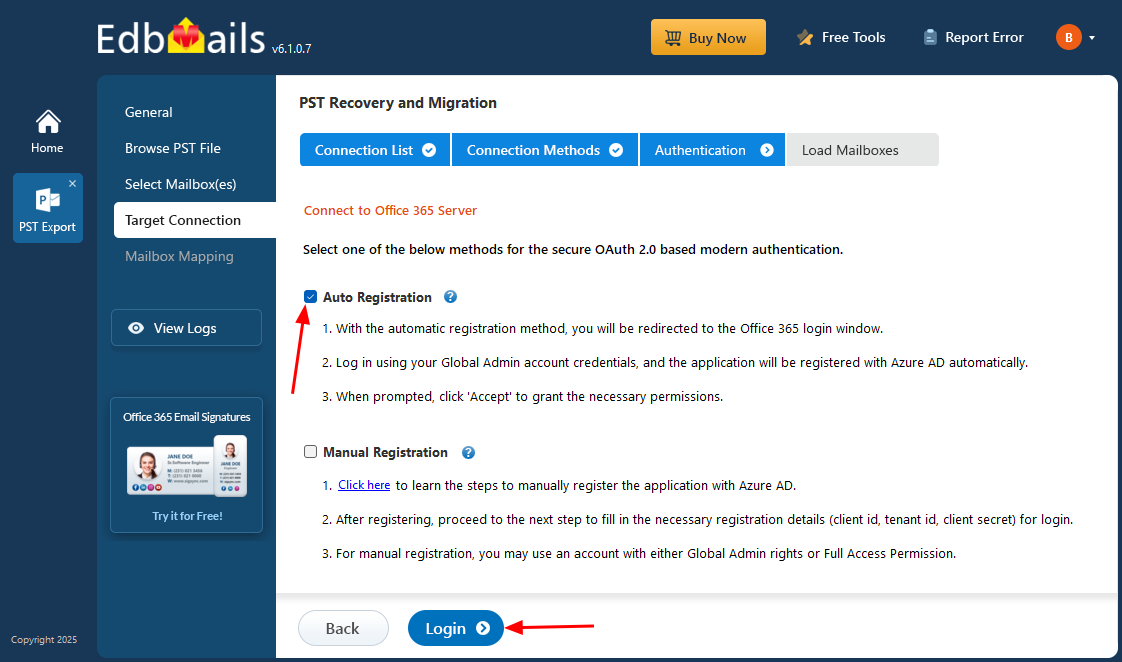
- Choose any of the available options to create a secure connection using OAuth 2.0 modern authentication.
- Select Auto Registration for a fast and simple setup. Sign in with a Global Admin account and allow the required permissions to automatically register the application in Azure AD.
- You can also choose Manual Registration if you want to provide the Azure AD application details manually. This option works with both Global Admin accounts and accounts that have Full Access permissions.
- Click ‘Login’ to continue.
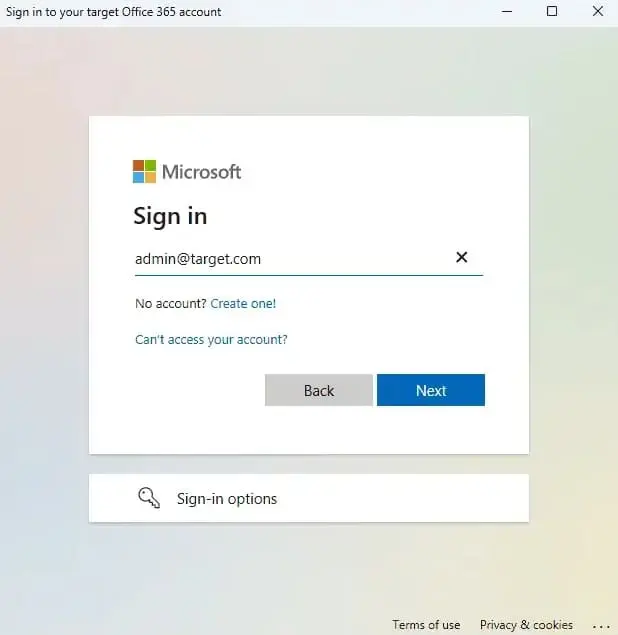
Connect to Office 365 server using secure modern authentication
- Authenticate on Microsoft sign-in page.
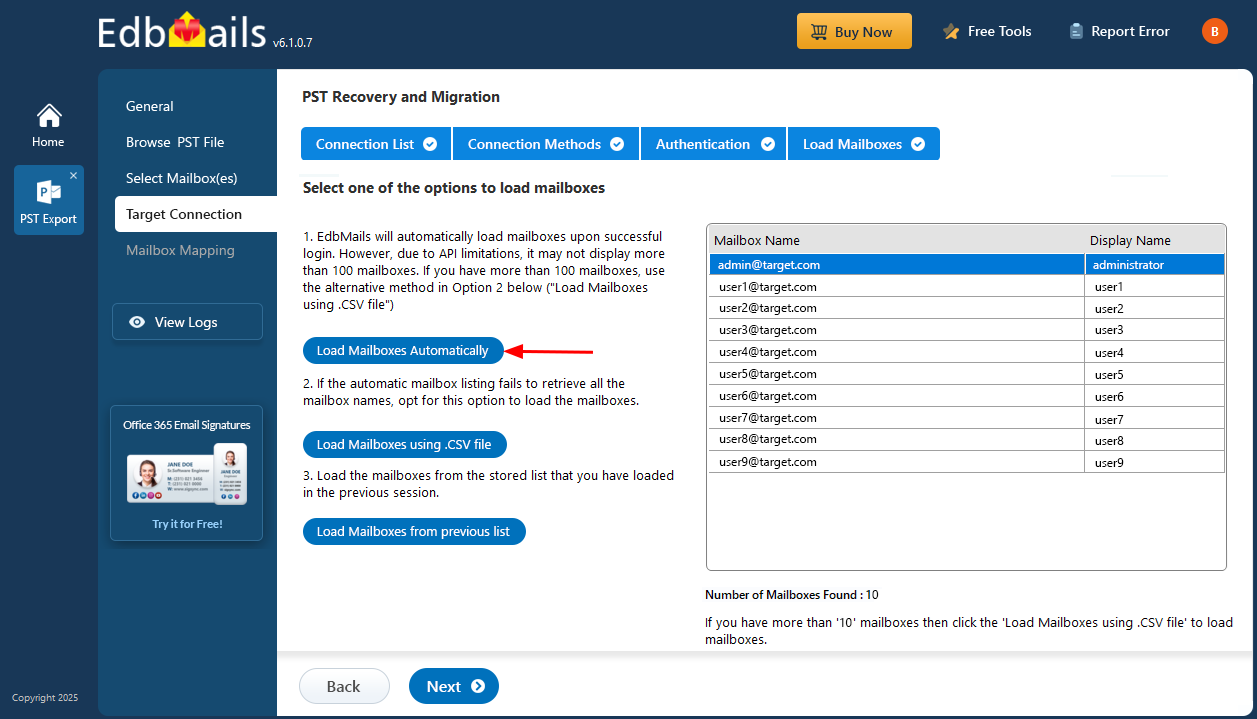
- After successful authentication, select one of the following options to load the mailboxes:
i) Load Mailboxes Automatically: Once you sign in, EdbMails automatically retrieves and displays the mailboxes, making the process quick and simple. Due to Microsoft API limitations, only up to 100 mailboxes can be listed. If your organization has more than 100 mailboxes, use the alternative option below.
ii) Load Mailboxes using CSV file: If the automatic method does not retrieve all mailbox names, choose the ‘Load Mailboxes using .CSV file’ option to manually import and load the required mailboxes.
iii) Load Mailboxes from previous list: This option lets you load mailboxes directly from a list that was previously imported and saved during an earlier session.
- Select ‘Load Mailboxes Automatically’ and click ‘Next’ to proceed.
Step 5: Mimecast to Office 365 source and target mailboxes mapping
- Choose the required mailbox mapping option.
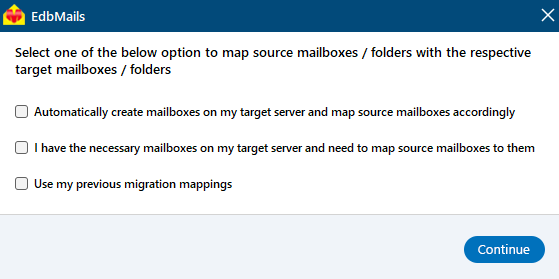
- EdbMails automatically creates mailboxes on your target Office 365 server and assigns the necessary licenses.
Learn more about the automatic mailbox creation process on the target Office 365 server.
- By default, EdbMails automatically maps the mailboxes and folders between the source and the target server. You can also manually map the source mailboxes to the required target mailboxes.

- Choose the required mailbox mapping option.
Step 6: Start Mimecast to Office 365 migration
- Click the 'Start Migration’ button to initiate the migration process.
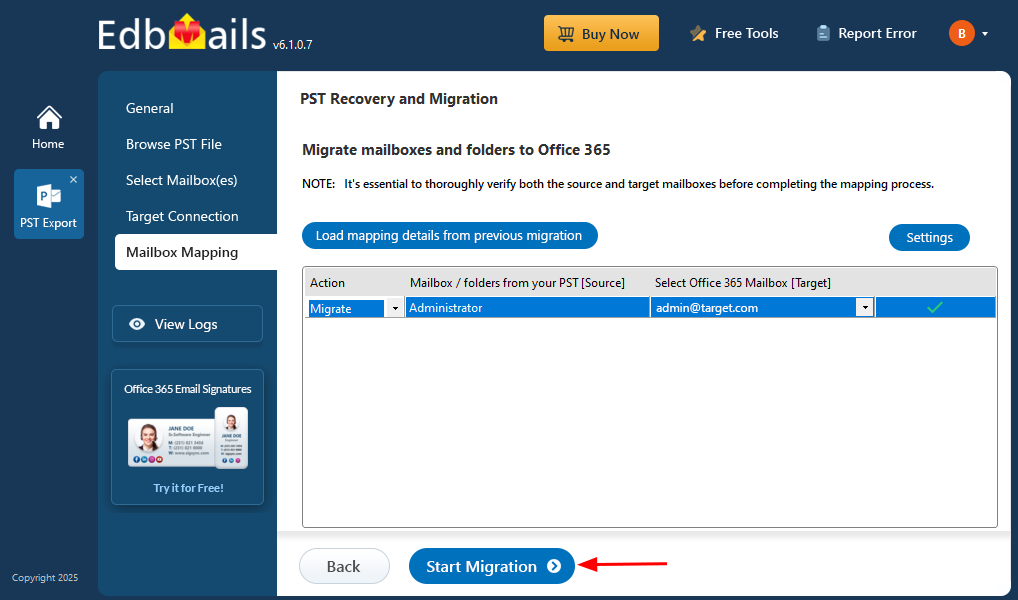
- The migration will now start, and you can monitor its progress through the status bar. EdbMails allows you to pause and resume the process at any time. Once completed, a confirmation message will appear indicating a successful migration.
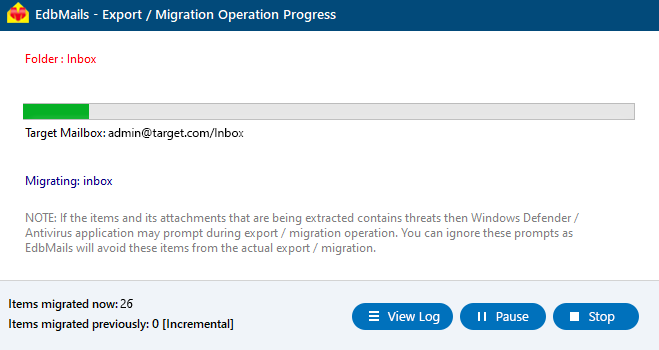
- You can verify the list of migrated folders and mailbox items with EdbMails text-based migration log report.
- Once the migration is completed, log in to your target Office 365 account and verify that all the mailbox items have been migrated correctly.
- Click the 'Start Migration’ button to initiate the migration process.
Mimecast to Office 365 Post-migration Tasks
Step 1: Update the MX records to point to Office 365
If you have not done this step previously, change the DNS records known as MX records to enable email and receive messages on the target Office 365 server. In addition, configure the Autodiscover record to allow Outlook to connect to the migrated mailboxes.
Step 2: Create a new Outlook profile for users in the new domain
Configure the Outlook profile for each user in your domain if Outlook has problems connecting to Office 365 mailboxes.
Troubleshooting Guide for Mimecast to Office 365 Migration
Refer to the knowledge base articles for solutions to common issues. For additional details on EdbMails PST to Office 365 migration, check the frequently asked questions or reach out to our customer support team.

Benefits of EdbMails to Migrate from Mimecast to Office 365
- Supports Folder Mapping
EdbMails ensures seamless folder mapping during Mimecast to Office 365 migration. It automatically matches source folders with their corresponding destination in Office 365, eliminating manual configuration. This feature ensures a precise migration with accurate folder structures, preserving organizational hierarchy and reducing errors.
- Complete Data Migration
EdbMails offers comprehensive data migration from Mimecast to Office 365, supporting all mailbox types, including user mailboxes, public folders, shared mailboxes, and archive mailboxes. It migrates every piece of data, including emails, attachments, calendars, contacts, and metadata, ensuring no data loss throughout the process.
- Folder Hierarchy Preservation
EdbMails preserves the original folder hierarchy during Mimecast to Office 365 migration process. By maintaining the folder structure intact, users can continue to navigate their emails just as they did in Mimecast. This ensures a smooth transition, retaining user familiarity and enhancing productivity post-migration.
- Advanced Filter Options
EdbMails features advanced filtering options that allow users to customize their migration based on specific criteria. Users can filter by date, email size, folder type, making the migration process more efficient and tailored to meet organizational needs without migrating irrelevant data.
- Compatible with all Windows OS Versions
EdbMails is fully compatible with all versions of Windows OS, ensuring seamless operation across different systems. Whether on Windows 7, 8, 10, or 11, EdbMails provides a consistent and reliable migration experience. This compatibility enhances flexibility, ensuring businesses can migrate without worrying about system limitations.