Migrate email from IONOS to Office 365
IONOS is a widely recognized internet service provider that delivers a range of cloud-based solutions designed for small and medium-sized businesses. Its email hosting service enables users to manage their messages through webmail, allowing them to access and send emails easily from any web browser. While this setup offers convenience, IONOS email does not include several advanced capabilities that modern organizations require, particularly in areas such as security and collaboration.
As a result, many businesses are choosing to migrate from IONOS to Office 365 to benefit from stronger security, better integration with productivity applications, and improved collaboration through Microsoft Teams, OneDrive, and Outlook. Although Office 365 delivers a more complete and modern email environment, the migration process may include certain challenges such as handling mailbox data migration, configuring DNS settings, and ensuring proper email synchronization.

EdbMails IMAP migration tool, a Microsoft-partnered solution, simplifies the challenges involved in IONOS to Office 365 migration with a reliable and accurate approach. It performs mailbox migration while maintaining the original folder hierarchy and ensures zero data loss, which provides an advantage over many tools that may result in partial migrations. With a script-free migration, EdbMails enables even non-technical users to complete the migration process easily. The software can automatically create target mailboxes in Office 365, reducing manual effort and streamlining the overall setup. Its capability to support large-scale mailbox migrations makes it a dependable choice compared to many other available tools.
EdbMails also provides a free demo version so businesses can evaluate its functionality before choosing the full solution. With EdbMails, IONOS to Office 365 migration becomes simple and efficient, helping organizations shift to a more advanced and feature-rich platform with confidence.
User Query
I am currently using IONOS for email hosting, but I’m considering switching to Office 365 for its advanced features and better collaboration tools. Can someone guide me on how to migrate my emails from IONOS to Office 365? What are the steps involved, and are there any tools that can simplify the process?
Why do Users want to migrate emails from IONOS to Office 365?
- Advanced features: IONOS offers basic email services, but Office 365 provides a business-class email solution along with productivity tools like Excel, Word, SharePoint, and Microsoft Teams, enhancing workflow and collaboration.
- Scalability: Office 365 provides 1TB of cloud storage per user, significantly surpassing the limited storage offered by IONOS, making it an ideal solution for businesses with expanding data storage needs.
- Enhanced security: Office 365 includes advanced security features like encryption, data loss prevention (DLP), and SSL/TLS protocols, offering superior protection compared to IONOS’s basic spam filters and security measures.
- Seamless integration: Office 365 integrates smoothly with other Microsoft services, such as OneDrive and Outlook, creating a unified and efficient ecosystem for managing emails and files.
- 24/7 Technical support: Unlike IONOS, Office 365 provides round-the-clock technical support, ensuring reliable assistance whenever businesses need it.
Let’s explore the simple and effective solutions available to migrate emails from IONOS to Office 365 effortlessly.
Plan to Migrate email from IONOS to Office 365
Planning is one of the most important steps before you begin to Migrate email from ionos to Office 365. Prepare the environment and have a backup plan in place to avoid potential risks and data loss. Here is a checklist of points to consider before you migrate.
- Determine the size of the data and the number of mailboxes you want to migrate.
- Compile a list of all data, folders, and permissions from your IONOS email account that need to be transferred.
- Create appropriate user mailboxes on Office 365 and assign licenses to them.
- Ensure you have enough network capacity and bandwidth to migrate.
- Communicate the migration plan and flow to your end users.
Pre-migration activities to Migrate email from IONOS to Office 365
- Find the IMAP server name of your Ionos email server. You can find this information from your server’s dashboard settings or by connecting your email system to Outlook.
- Before you migrate Ionos email to Office 365, ensure that you create mailboxes for your users in your organization and assign suitable licenses to them.
- If you plan to migrate the source Public folders to Public folders on Office 365, ensure that you create and configure the Public folder mailboxes on the target server.
Create Office 365 Public folder and assign mailbox user. - Ensure that the admin account on the target Office 365 server has the impersonation rights to migrate mailboxes and Public folders.
- If you have a custom email domain from your hosting provider to which you want to migrate and receive emails, you must add and verify the domain on Office 365.
Steps to add a custom domain to Office 365 and Steps to add DNS records to connect your domain. - Configure Office 365 to send and receive large messages.
Follow the steps to increase the message size on Office 365 to 150MB and see tips to optimize IMAP migration to Exchange online.
Steps to Migrate from IONOS to Office 365
Step 1: Download and install EdbMails IMAP migration software
- Download EdbMails and install the application on any computer running on Windows OS that is connected to the source and target environment.
See a detailed list of EdbMails system requirements for IMAP migration.
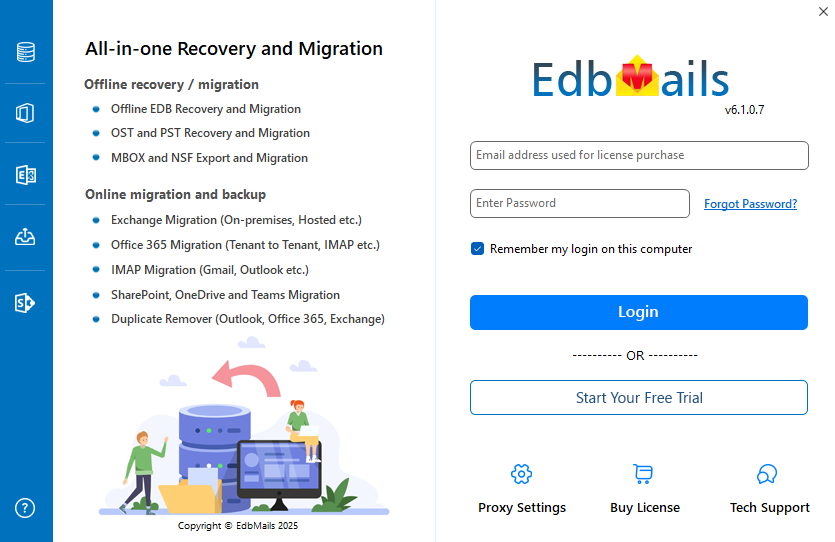
- Start the EdbMails application on your computer.
- Provide your registered email address and password, then click ‘Login’. If you are new to EdbMails, select ‘Start Your Free Trial’ to continue with the trial edition.Note: The trial version includes all essential features and permits migrating up to 30 items per folder. To enable unlimited migration, purchase an IMAP Migration license from the EdbMails website
Click here to view IMAP Migration pricing details.
Once the purchase is completed, restart the application and sign in again with the same email address and password used during the purchase to activate the license successfully.
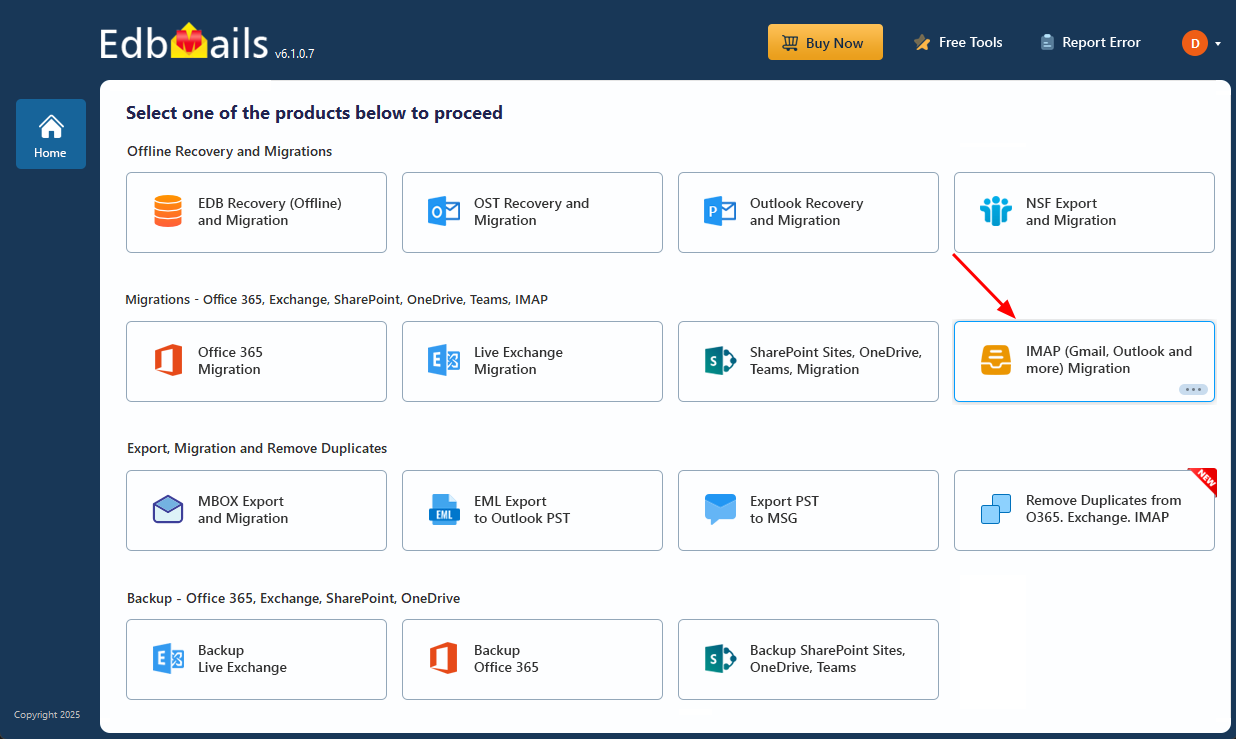
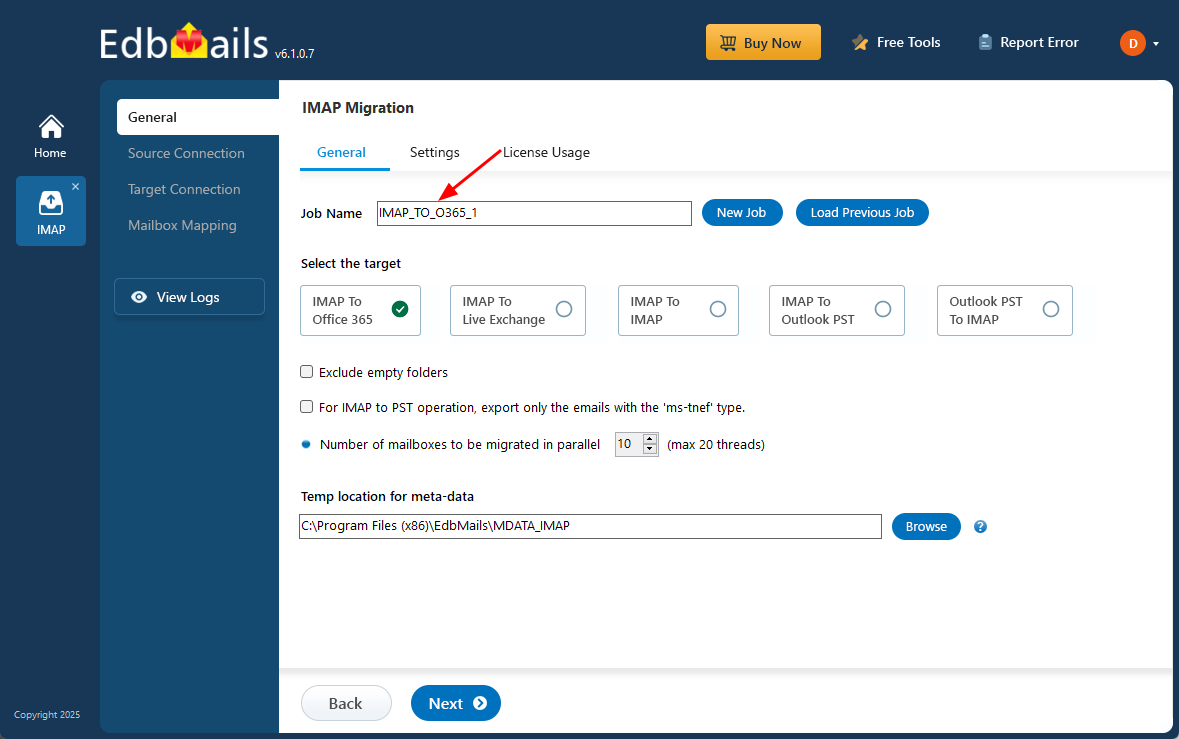
- Select the option ‘IMAP (Gmail, Outlook & more) Migration’.
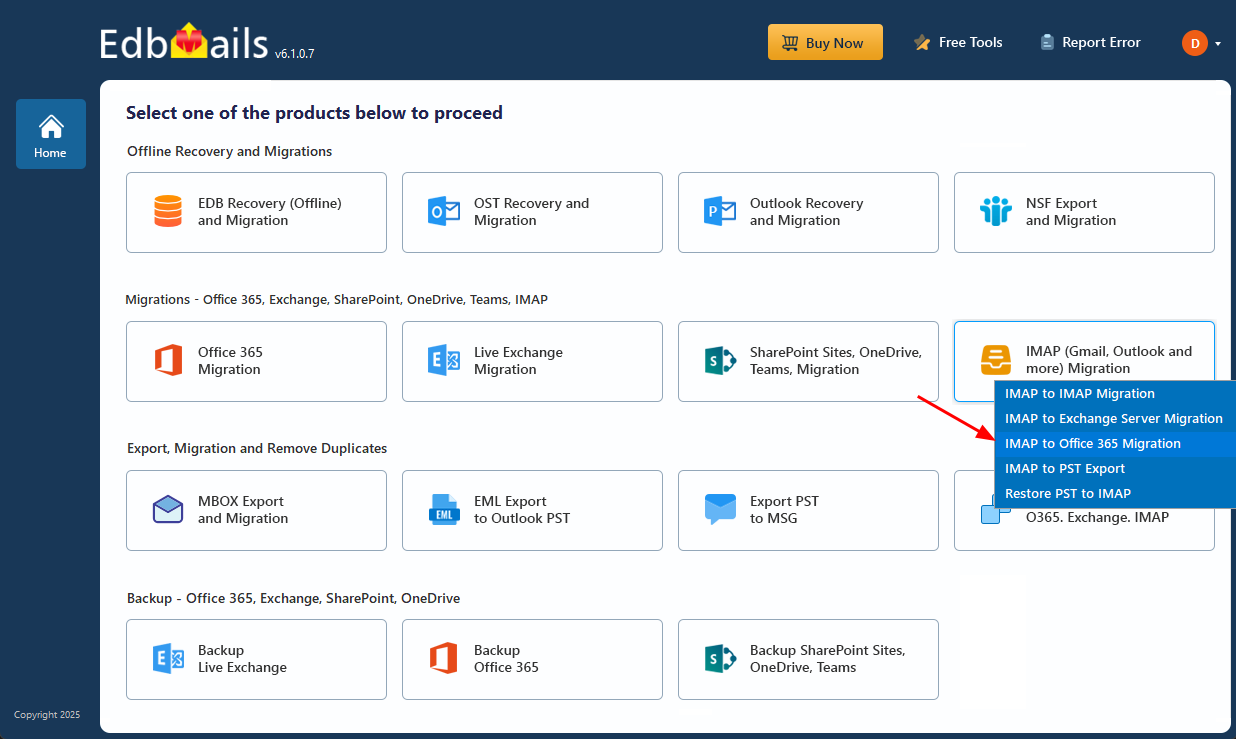
- Select ‘IMAP to Office 365 Migration’.
- You can proceed with the default job name automatically assigned by EdbMails or click ‘New Job’ to create a custom name. Assigning a clear job name helps you easily identify and organize multiple migration tasks, making overall migration management more efficient.
- Download EdbMails and install the application on any computer running on Windows OS that is connected to the source and target environment.
Step 2: Connect to source IONOS server
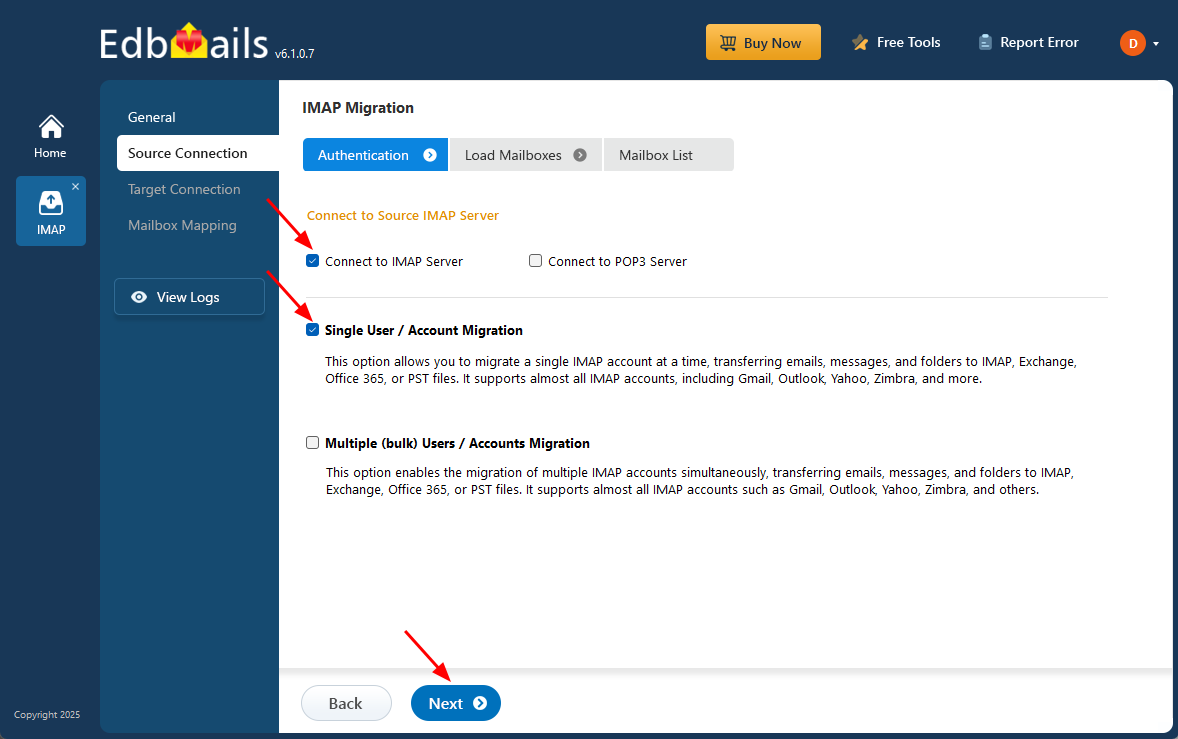
- To migrate a single IONOS account, select ‘Single User / Account Migration’, choose the suitable connection option such as ‘Connect to IMAP Server’ or ‘Connect to POP3 Server’, and click ‘Next’ to proceed.
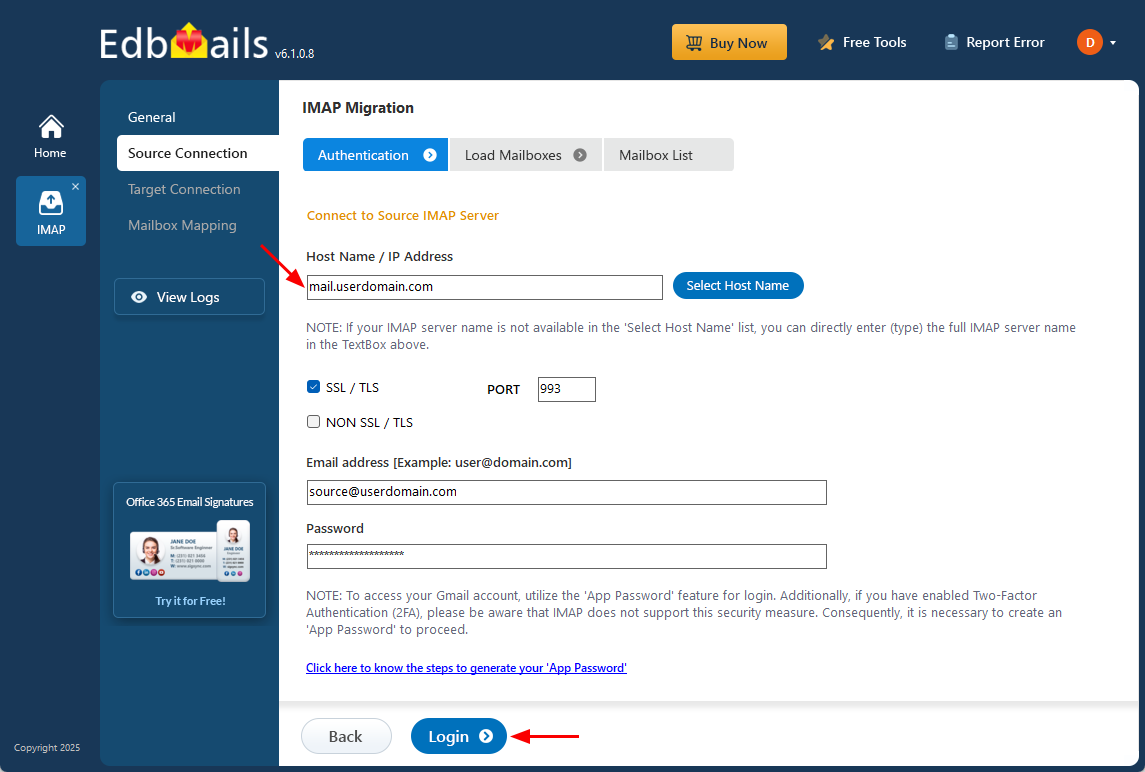
- For migrating a single user, provide the IONOS IMAP hostname (e.g., mail.userdomain.com), the port number (993 for SSL)
- Fill the user’s email login credentials to create a secure and authenticated connection for the migration process.
- Click the ‘Login’ button.
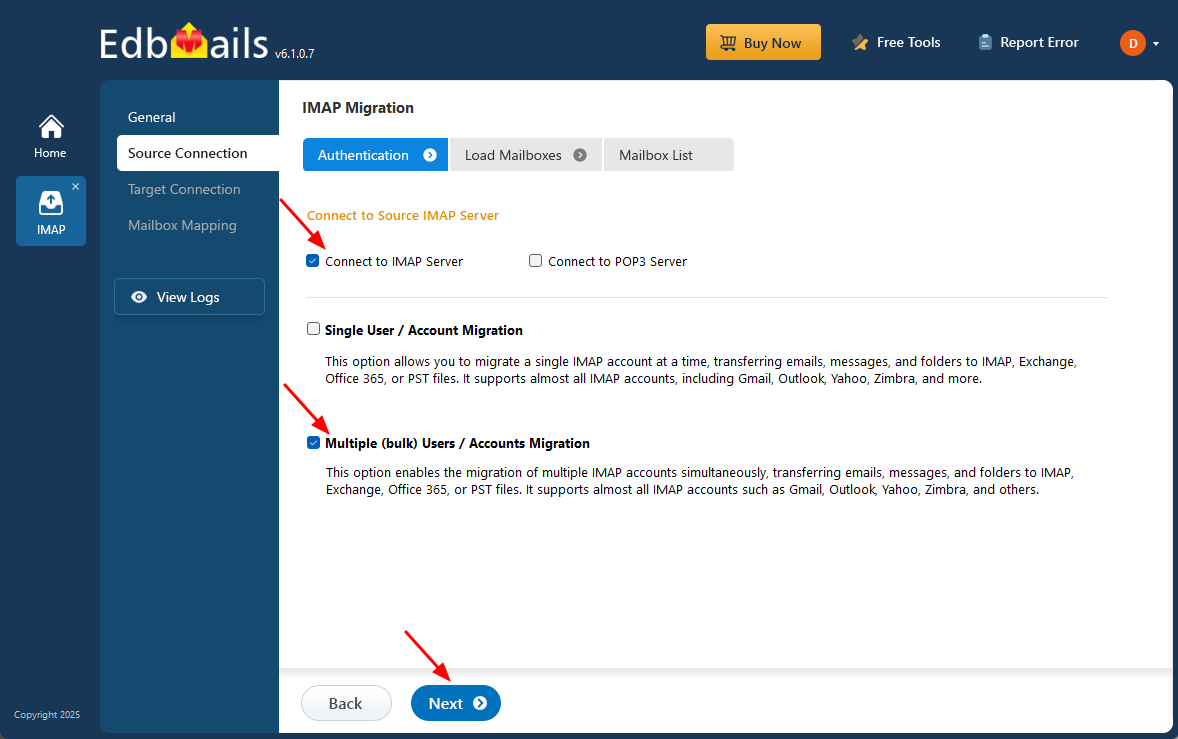
- To connect and migrate multiple IONOS user mailboxes at once, select ‘Multiple (bulk) Users/Accounts Migration’, choose the suitable connection method such as ‘Connect to IMAP Server’ or ‘Connect to POP3 Server’.
- Then proceed by clicking ‘Next’.
- Click ‘IMAP Migration CSV File’. It will load the sample CSV file to your local drive.
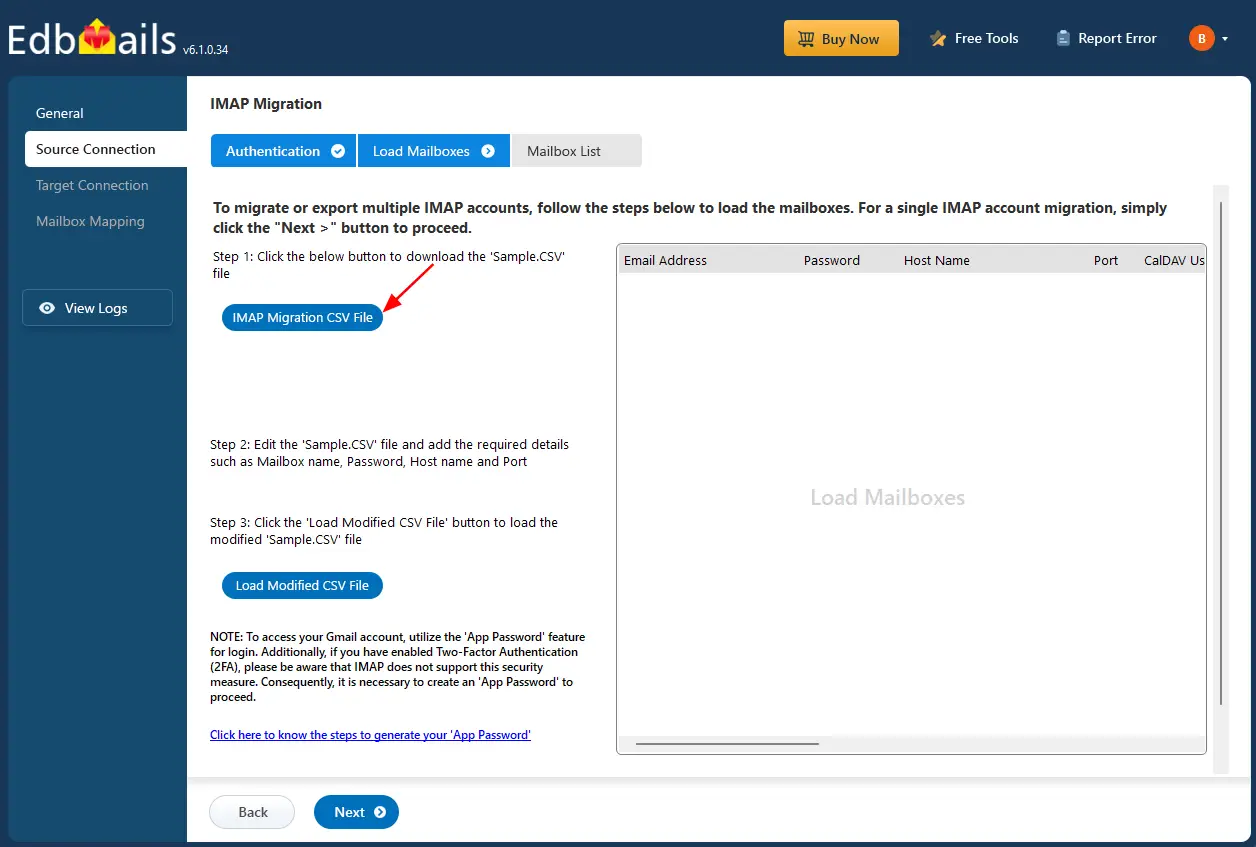
- Open the CSV file and fill in the necessary details, including the email address, password, IMAP server hostname, and port number for each mailbox. After completing the entries, save the file to proceed with the migration.

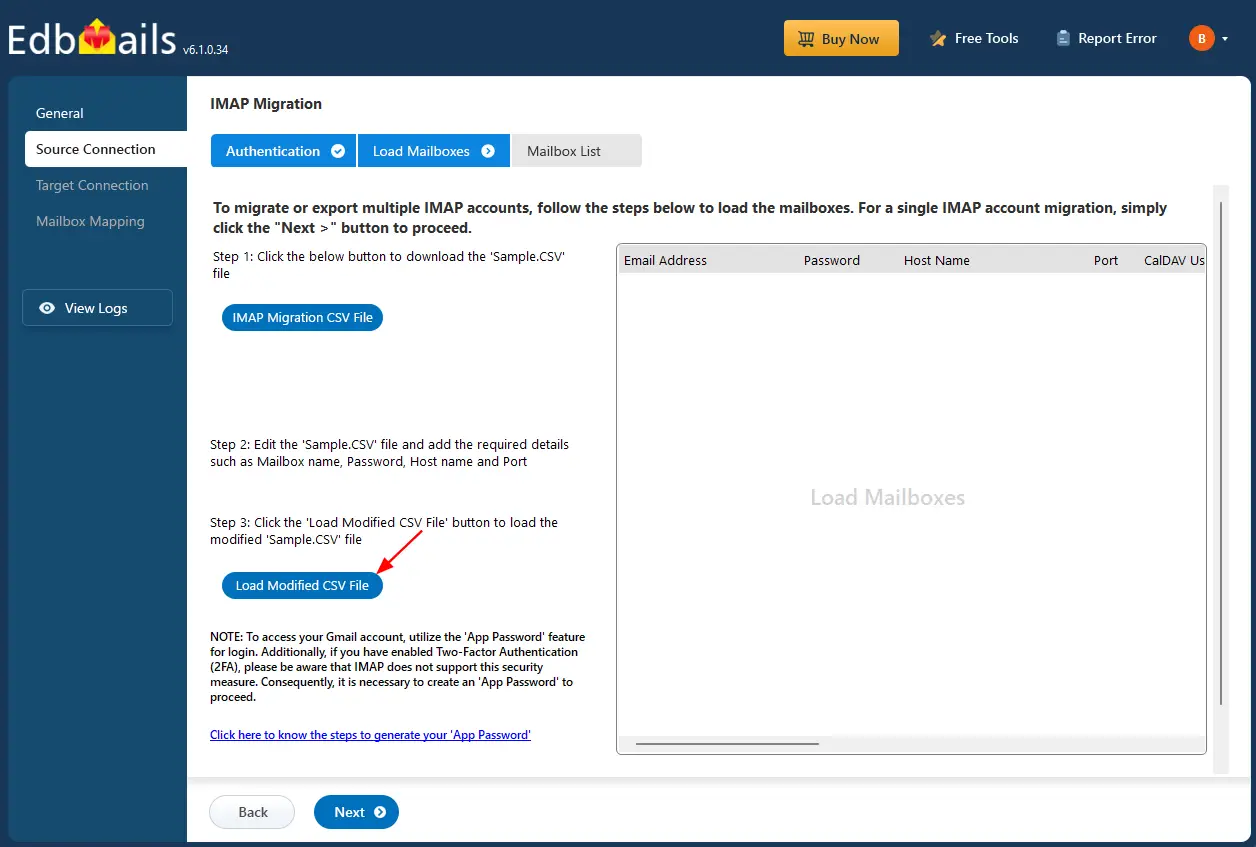
- Once you've made the necessary changes to the CSV file, save and close it.
- Then, click the 'Load Modified CSV File' button, open the CSV file and click ‘Next’ to proceed.
- To migrate a single IONOS account, select ‘Single User / Account Migration’, choose the suitable connection option such as ‘Connect to IMAP Server’ or ‘Connect to POP3 Server’, and click ‘Next’ to proceed.
Step 3: Select source IONOS server mailboxes
- Select the mailboxes or specific folders you want to migrate, then click ‘Next’ to proceed with the migration process.
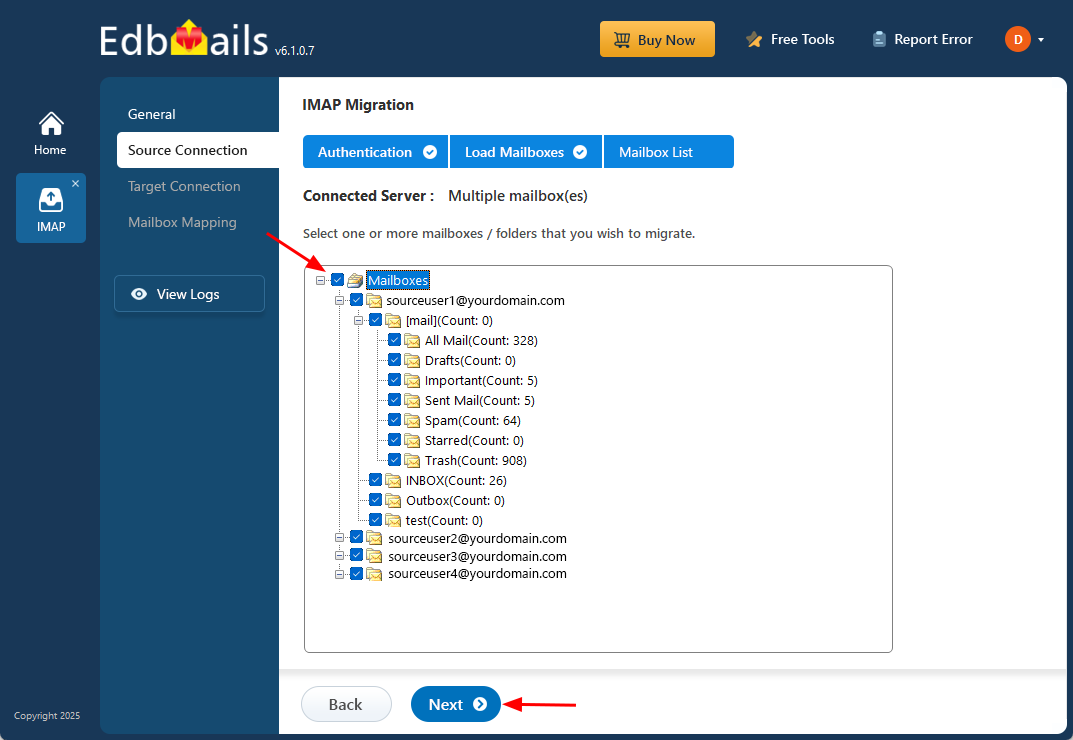
- Select the mailboxes or specific folders you want to migrate, then click ‘Next’ to proceed with the migration process.
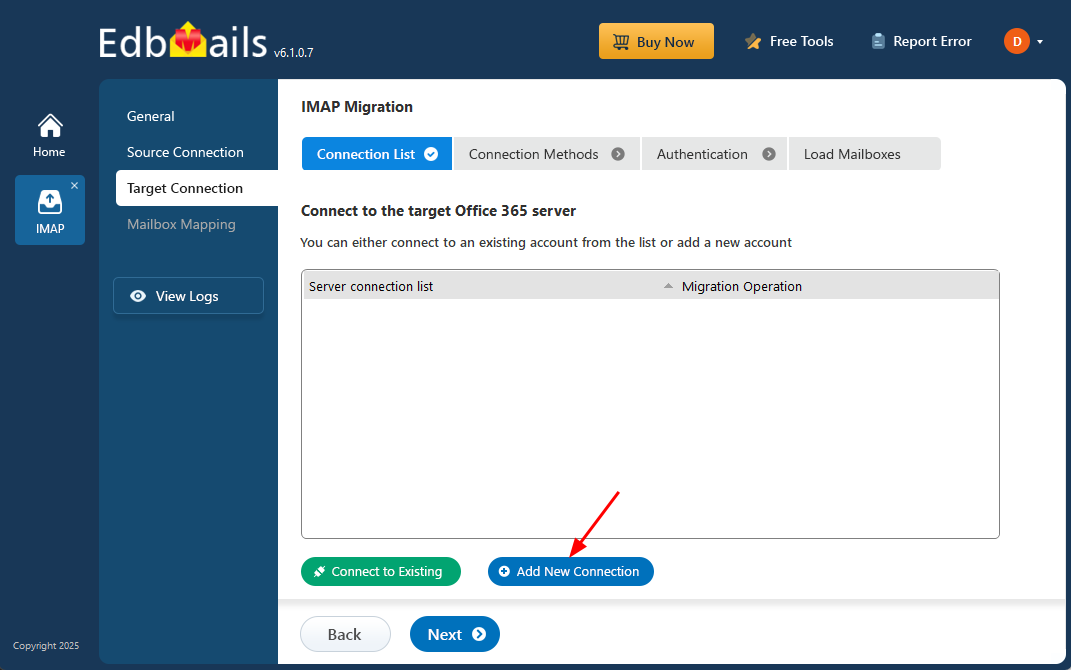
Step 4: Connect to target Office 365
- Click the ‘Add New Connection’ button to establish a new connection to the target Office 365. To use the previous connection, select it from the connection list and click the ‘Connect to Existing’ button to proceed.
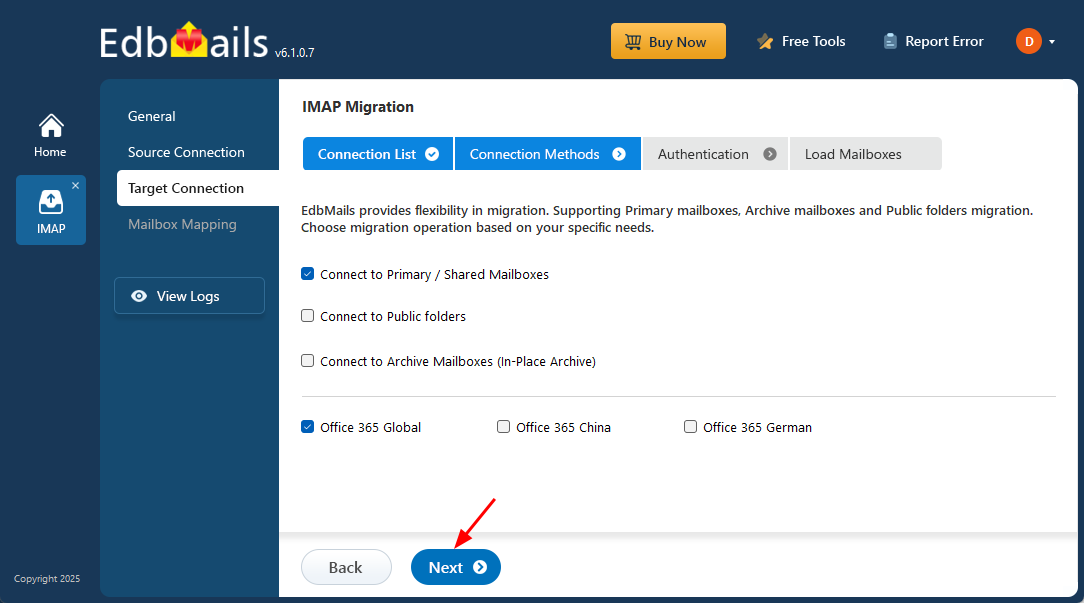
- Select the required migration / connection operation (Primary / Shared, Public folders, Archive mailboxes).
- Click ‘Next’ to proceed with the setup.
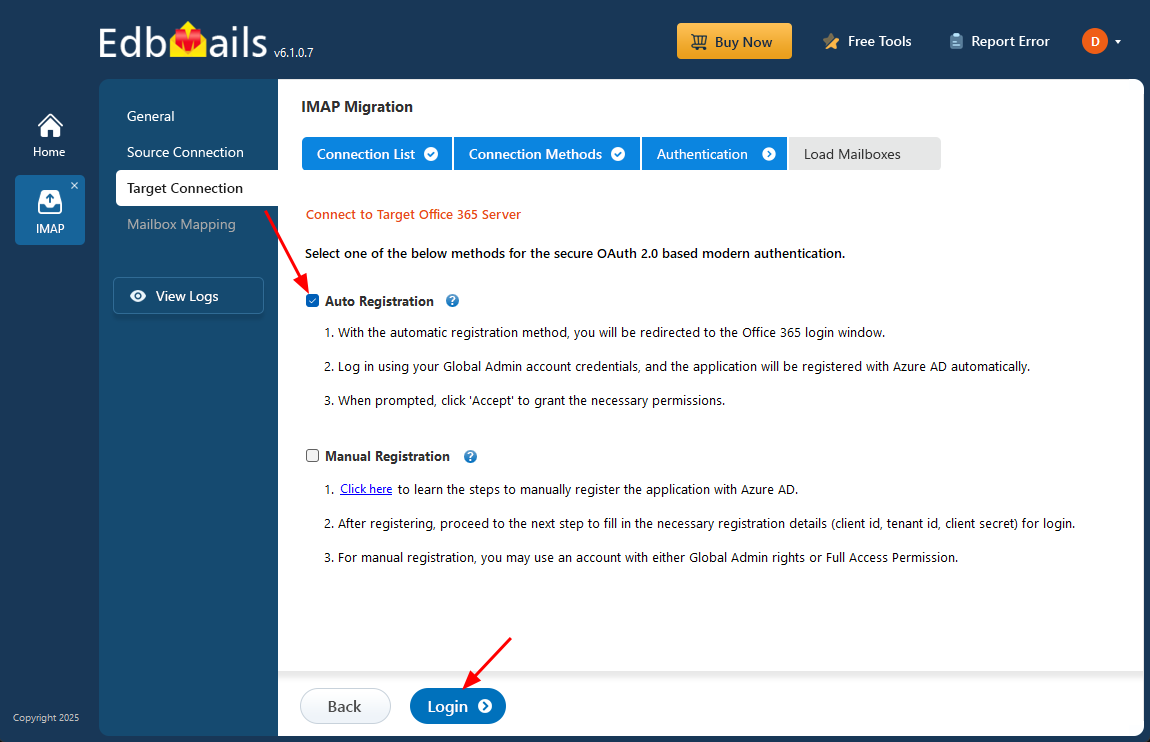
- Select any of the available options to establish a secure connection using OAuth 2.0 modern authentication.
- Choose Auto Registration for a quick setup. Sign in with a Global Admin account and grant the required permissions to automatically register the application in Azure AD.
- Alternatively, select Manual Registration if you prefer to enter the Azure AD application details yourself. This method supports both Global Admin accounts and accounts with Full Access permissions.
- Click ‘Login’ to proceed.
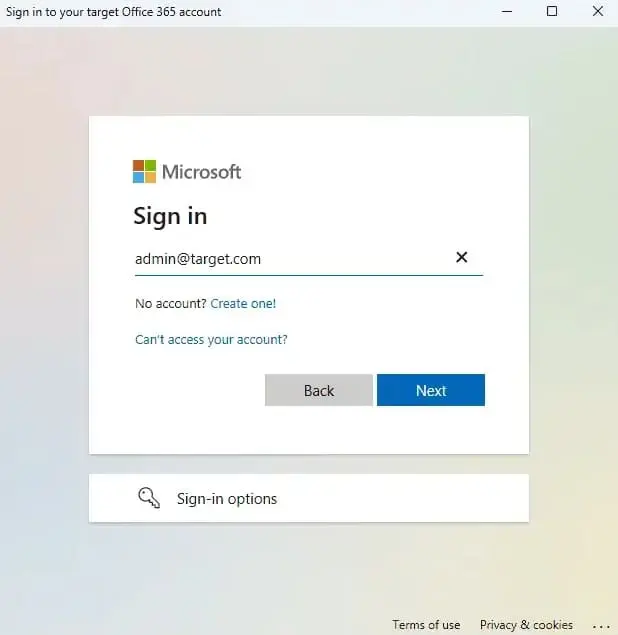
- Sign in through the official Microsoft login page to authenticate your account and proceed with the migration.
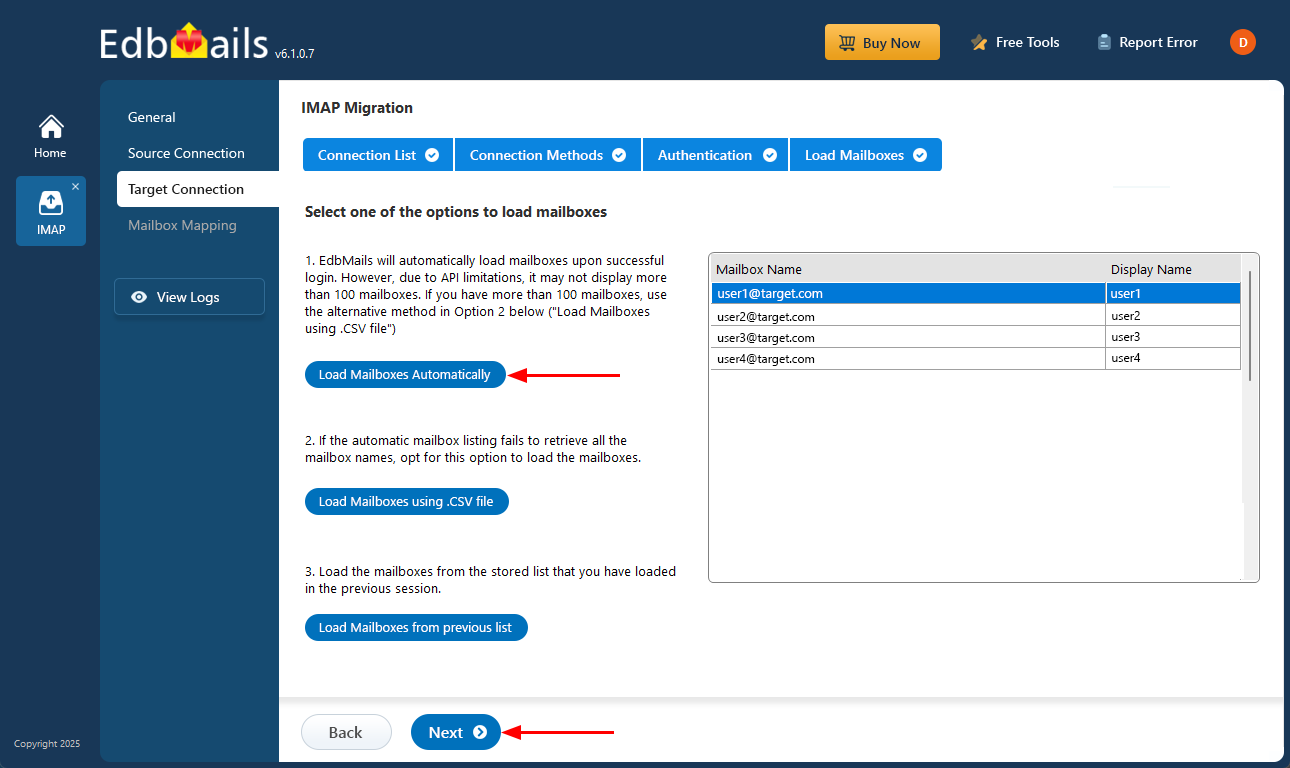
- EdbMails enables automatic mailbox loading, making the process quick and convenient. However, due to Microsoft API limitations, the automatic option can display up to 100 mailboxes at a time. In larger environments or when you need to include specific mailboxes beyond this limit, you can use the CSV file method to load mailboxes manually, allowing you to select and manage the required mailboxes with greater control.
- Click the ‘Next’ button to continue.
- Click the ‘Add New Connection’ button to establish a new connection to the target Office 365. To use the previous connection, select it from the connection list and click the ‘Connect to Existing’ button to proceed.
Step 5: IONOS to Office 365 mailboxes mapping
- Choose the appropriate mailbox and folder mapping option based on your migration preferences.
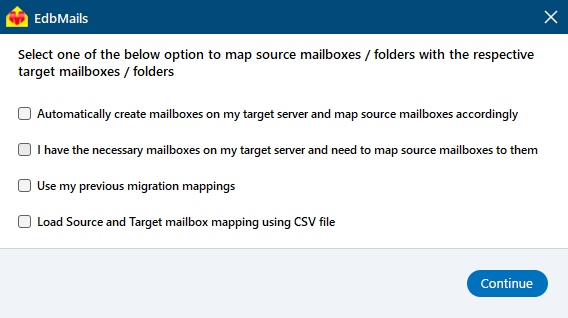
- You can choose to let EdbMails automatically create mailboxes in Office 365 and map them between the source and target servers. This feature is especially useful for large-scale migrations, saving time, reducing manual effort.
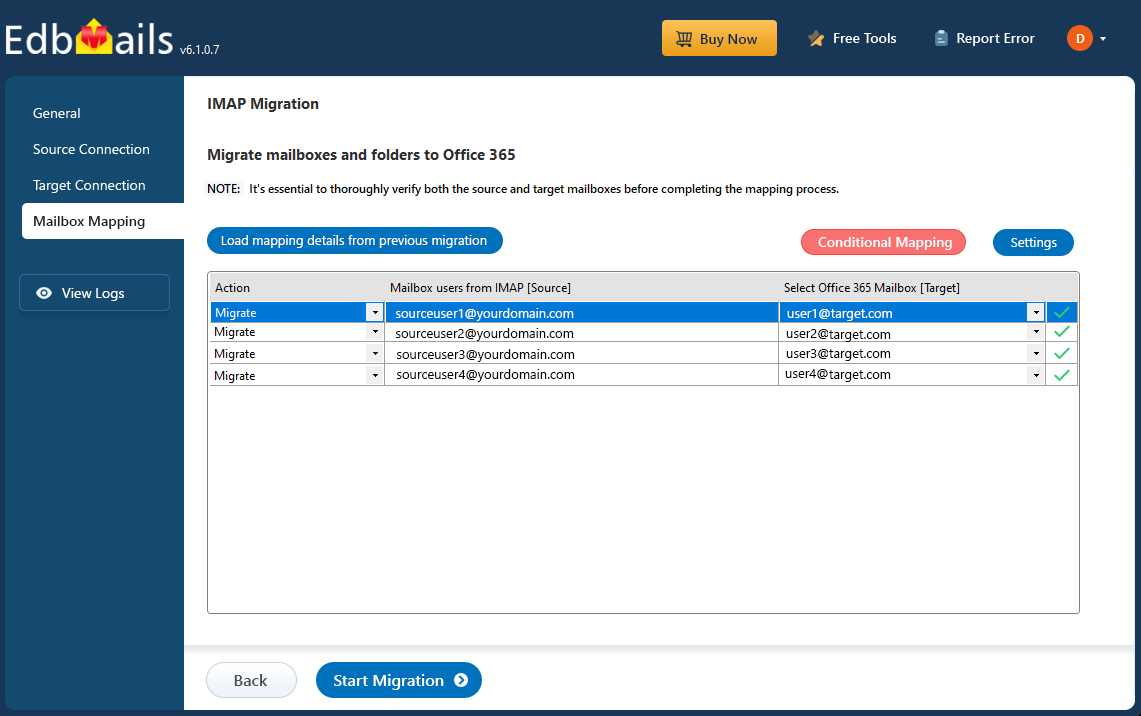
- Choose the appropriate mailbox and folder mapping option based on your migration preferences.
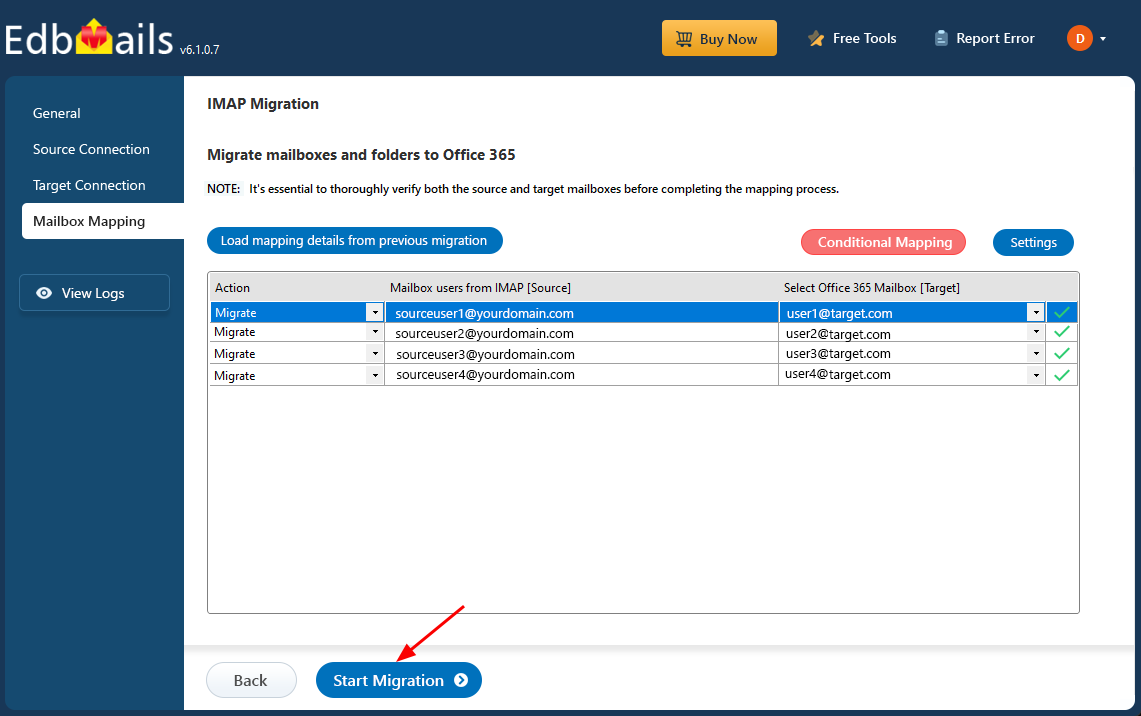
Step 6: Start IONOS to Office 365 migration
- After mapping the mailboxes, click the ‘Start Migration’ button to initiate the migration process.
- Click the ‘View Log’ button to view the migration report, which includes mapping details and the total count of migrated emails.
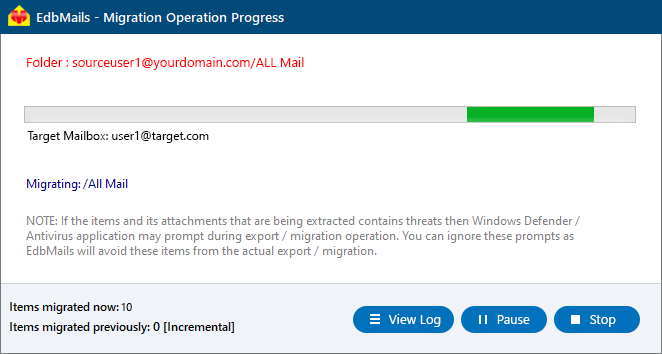
- Login to your target server and verify the items.
- After mapping the mailboxes, click the ‘Start Migration’ button to initiate the migration process.
IONOS email to Office 365 Post-migration Tasks
- Step 1: Update the MX records to point to Office 365
If you have not done this step previously, change the DNS records known as MX records to enable email and receive messages on the target Office 365 server. In addition, configure the Autodiscover record to allow Outlook to connect to the migrated mailboxes.
- Step 2: Create a new Outlook profile for users in the new domain
Configure the Outlook profile for each user in your domain if Outlook has problems connecting to Office 365 mailboxes.
- Step 1: Update the MX records to point to Office 365
Troubleshooting Guide for IONOS email to Office 365 Migration
For troubleshooting, check out our knowledge base articles. If you have additional questions, browse the FAQs or contact our dedicated support team for personalized assistance.
Advantages of EdbMails to Migrate from IONOS to Office 365/h2>
- Advanced Filters for Precise Migration EdbMails offers advanced filtering options, allowing users to selectively migrate emails based on criteria such as date range, subject, and attachment size. This feature ensures that only the necessary data is transferred, saving time and reducing the risk of unnecessary clutter in the target mailbox.
- Transfer Multiple Accounts Efficiently
With EdbMails, businesses can migrate multiple IONOS accounts to Office 365 in a single operation. This capability streamlines the process, making it easier to manage and reducing the complexity involved in migrating multiple users, without requiring separate migrations for each account.
- Fast and Safe email Transfer
EdbMails ensures a fast and secure email migration process from IONOS to Office 365, with encryption protocols that safeguard data during the transfer. This combination of speed and safety gives users peace of mind, knowing their critical business information is protected throughout the migration.
- Preserves email Items and Folder Structure
A key advantage of EdbMails is its ability to preserve the original folder structure and email metadata during migration. This ensures that users can seamlessly access their emails in the same format as before, without the risk of data loss or misplaced information.
- Lifetime License with Free Software Updates
EdbMails provides a lifetime license, giving users access to the software without recurring subscription costs. In addition, free software updates ensure that users benefit from the latest features and enhancements, keeping the migration tool up-to-date with evolving technology and requirements.