Exchange Hybrid Migration
A hybrid migration is used when an on-premises Exchange server works together with Exchange Online while user identities remain synchronized across both environments. In this setup, some mailboxes stay on the local Exchange server and others are hosted in Microsoft 365. Since directory synchronization is involved and administrators must maintain connectivity between the on-premises environment and the cloud, hybrid migration requires additional planning and configuration compared to cutover or staged migration methods.
EdbMails Exchange Migration Software simplifies mailbox migration in hybrid environments with secure server connectivity, easy mailbox selection, and automatic user mapping. Its reliable migration engine ensures smooth data processing while maintaining complete data integrity. The software supports consistent performance and dependable migration results, even in complex hybrid Exchange setups.
With EdbMails you can:
- Connect to on-premises Exchange servers (2007–2019).
- Connect to Exchange Online using secure modern authentication.
- Automatically map users between source and target servers (manual override also available).
- Migrate mailboxes, shared mailboxes, and archive mailboxes between hybrid endpoints with full control over folders and filters.
Data Migration in a Hybrid Environment
In a Hybrid Exchange configuration, data can be moved from on-premises Exchange to Microsoft 365, from Microsoft 365 back to on-premises, or between servers within the same hybrid directory.
Before starting, ensure that you are using Azure AD Connect or another approved identity synchronization tool and verify that directory synchronization is functioning correctly.
Note: The attribute msExchMailboxGuid must not be synchronized across environments when performing mailbox migration that rely on cloud mailbox provisioning. If this attribute is synced, the target mailbox may fail to provision or may cause migration conflicts. Ensure msExchMailboxGuid is disabled or excluded.
Explore the steps to disable msExchMailboxGuid
Additionally:
- Avoid maintaining a mailbox for the same user in both cloud and on-premises simultaneously, as it may create mail routing issues depending on hybrid mail flow.
- Complete DNS updates, MX record changes, and mailbox cut-over steps promptly once migration is finalized.
Public Folder Considerations:
In a hybrid setup, you can’t have public folders active in both your on-prem Exchange and Office 365 environments. This is why their migration requires some extra steps.
Explore the steps migrate public folders in hybrid environment
Pre-migration Activities for Hybrid Deployment
Before beginning the hybrid migration, ensure that your environment meets all the required prerequisites. The following resources provide important background information:
- Learn about Exchange Server hybrid deployment.
- Review the prerequisites for Hybrid deployment.
- See the overview of requirements for Hybrid Exchange migration.
If your source mailbox uses a non-English folder structure (for example, the Inbox is named ‘Boîte de réception’ in French), the destination server may not automatically map these folders during migration. To ensure proper folder mapping, update the regional and language settings on the target server to match the source mailbox’s language.
Click here to view the steps for changing the language and regional settings in Exchange Server.
EdbMails also supports mailbox mapping using a CSV file, which can be helpful when managing multiple mailboxes.
How to perform the Exchange Hybrid Migration to Office 365
Step 1: Download and install EdbMails Exchange server migration software setup
- Download EdbMails and install the application on any computer connected to the source on-premise Exchange server.
- Launch the EdbMails application on your computer.
- Enter your registered email ID and password, then click ‘Login’. If you do not have an account yet, select ‘Start Your Free Trial’ to continue with the trial version.Note: The trial version includes all essential features and allows migration of up to 30 items per folder. To perform unlimited migration, purchase an Exchange Migration license from the EdbMails website.After purchasing the license, close and reopen the application. Then sign in with the same email ID and password used during the purchase to activate the license successfully.
See the system requirements for Exchange Hybrid migration.
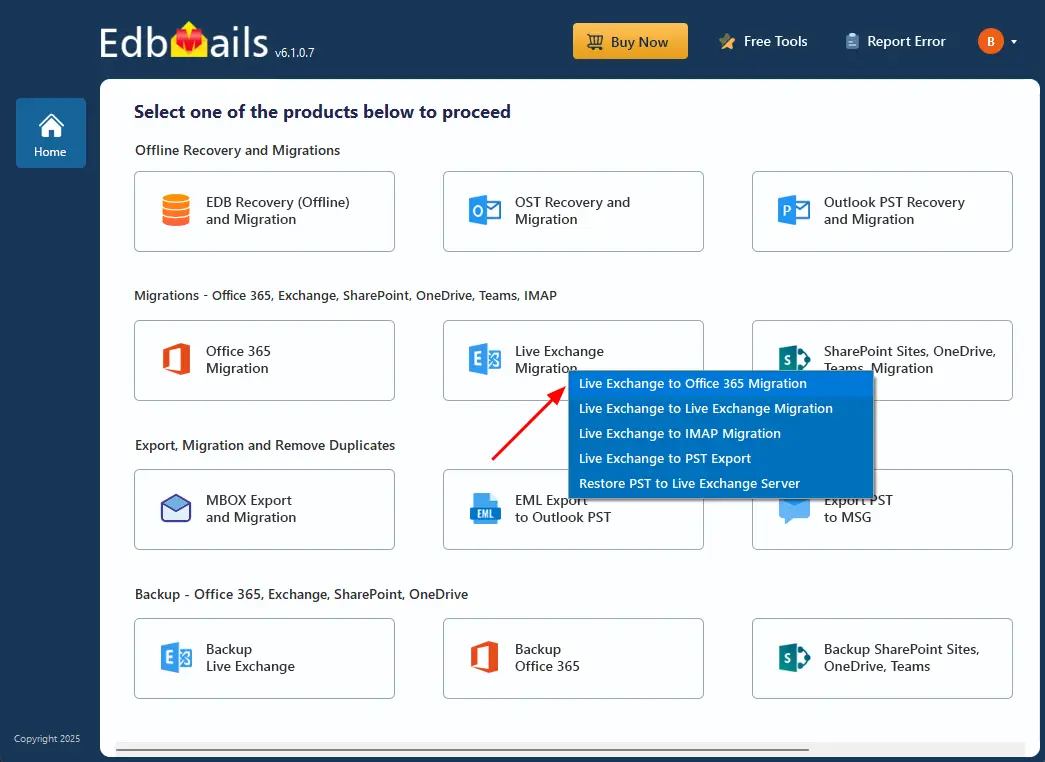
- Select the ‘Live Exchange Migration’ option.
- Then choose ‘Live Exchange to Office 365 Migration’.
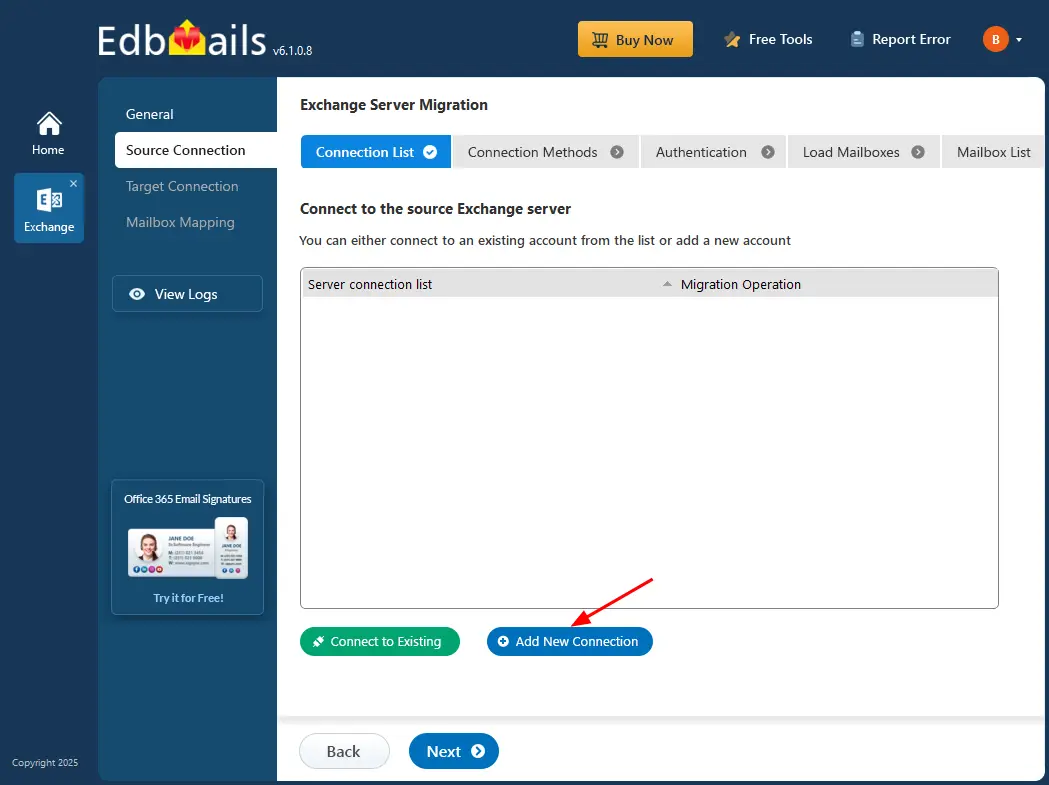
Step 2: Connect to source Exchange server
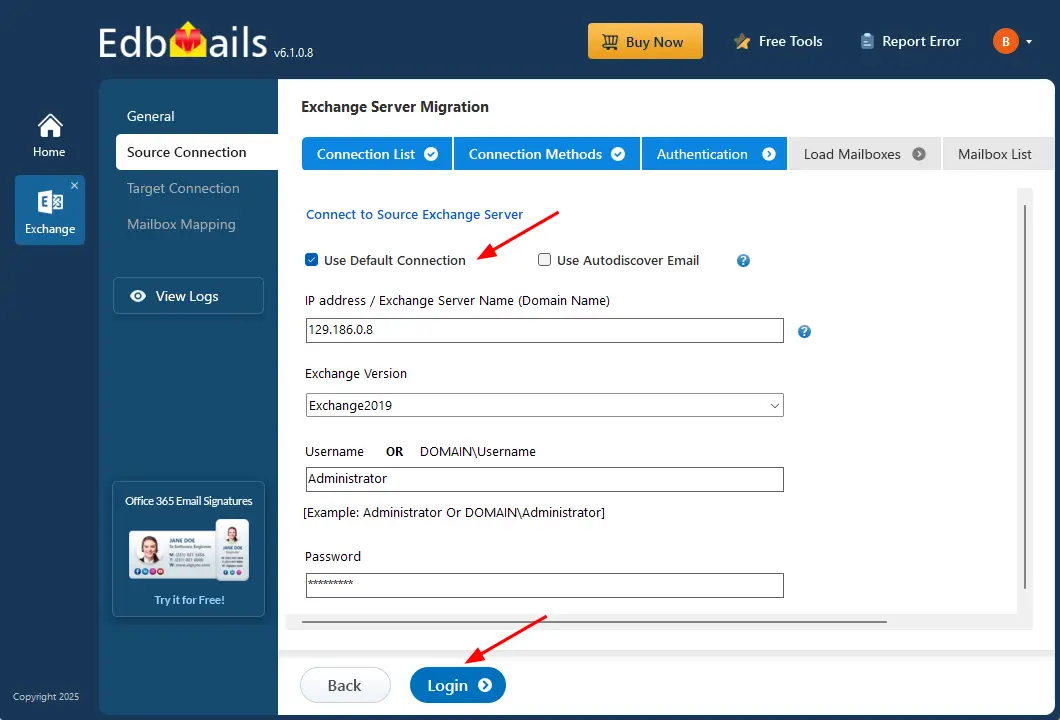
- Click ‘Add New Connection’ to create a new connection with the source Exchange server. If you have already configured a connection earlier, select it from the connection list and click ‘Connect to Existing’ to continue.
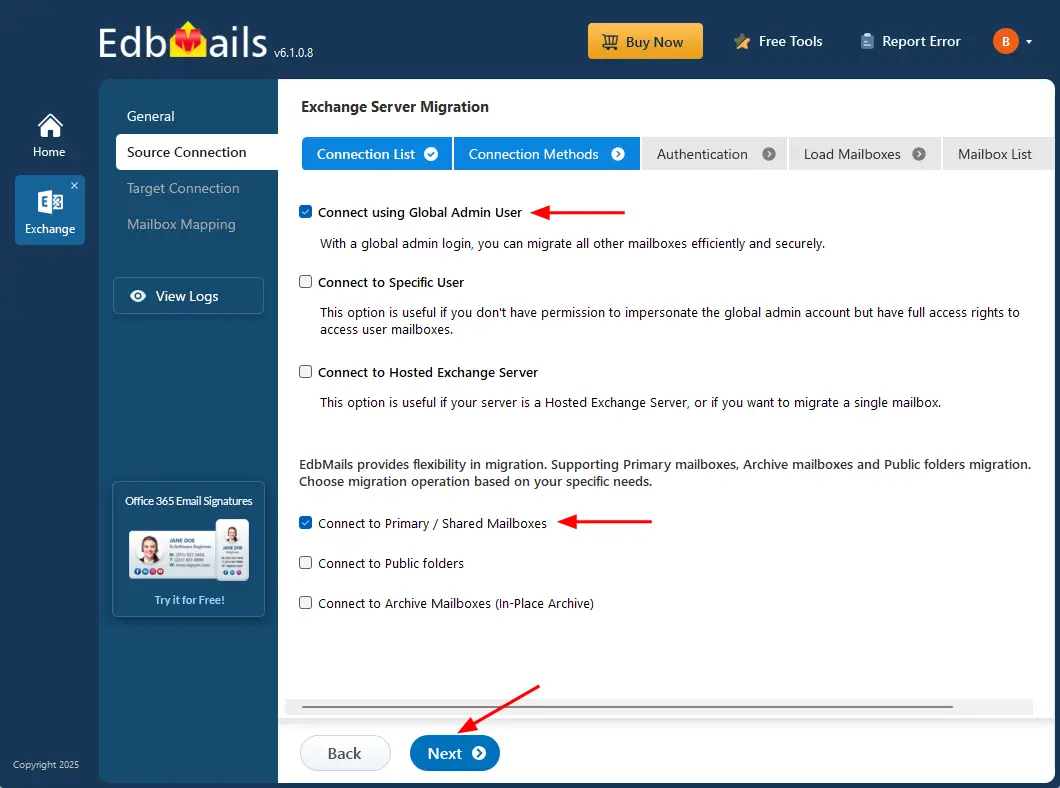
- Select the required connection options and click ‘Next’ to proceed
- If you are using a global admin account to connect to the source Exchange server ensure to set the impersonation rights.
- Enter the source Exchange server details, including the IP address (Domain name), Exchange version, username, and password.
- Click the ‘Login’ button to proceed.
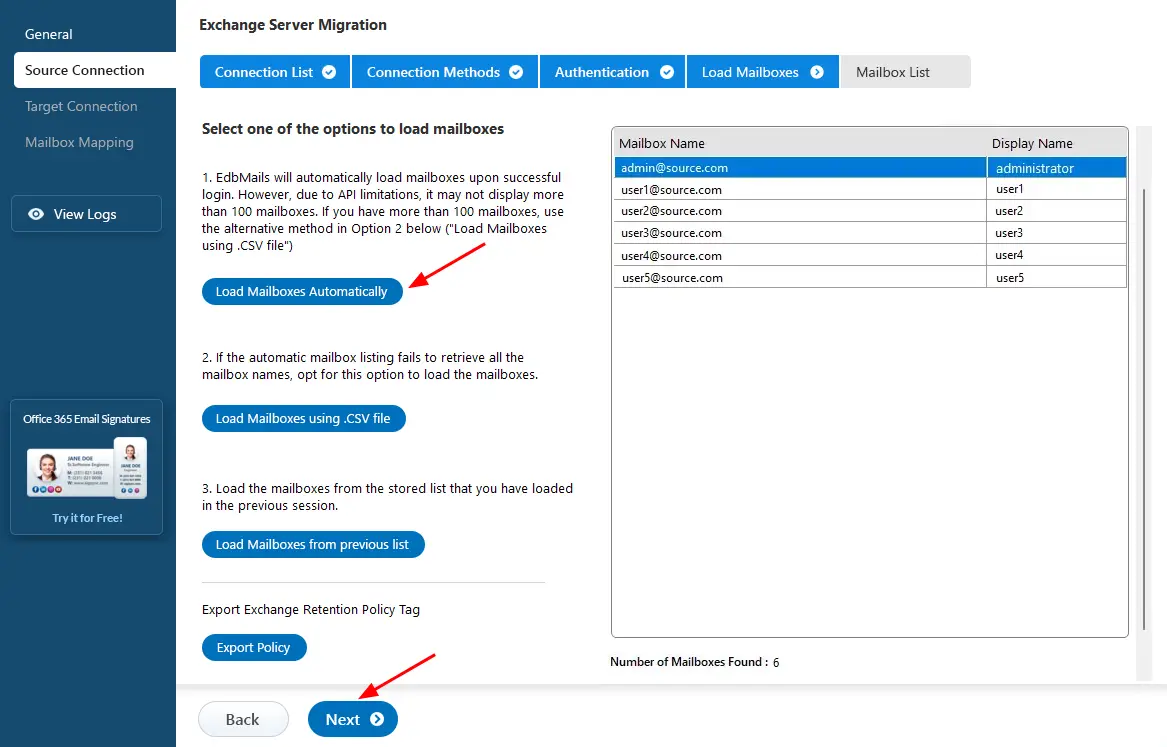
- After successfully logging in to your source Exchange server, choose a method to load the mailboxes. EdbMails can automatically load the mailboxes from the server, but due to Microsoft API limitations, it may display only up to 100 mailboxes. If your environment contains more than 100 mailboxes, select the ‘Load Mailboxes using .CSV file’ option to include all required mailboxes for migration.
See how to load Exchange server mailboxes using CSV files.
- Choose ‘Load Mailboxes Automatically’ to load the primary mailboxes, then click ‘Next’ to proceed.
- Click ‘Add New Connection’ to create a new connection with the source Exchange server. If you have already configured a connection earlier, select it from the connection list and click ‘Connect to Existing’ to continue.
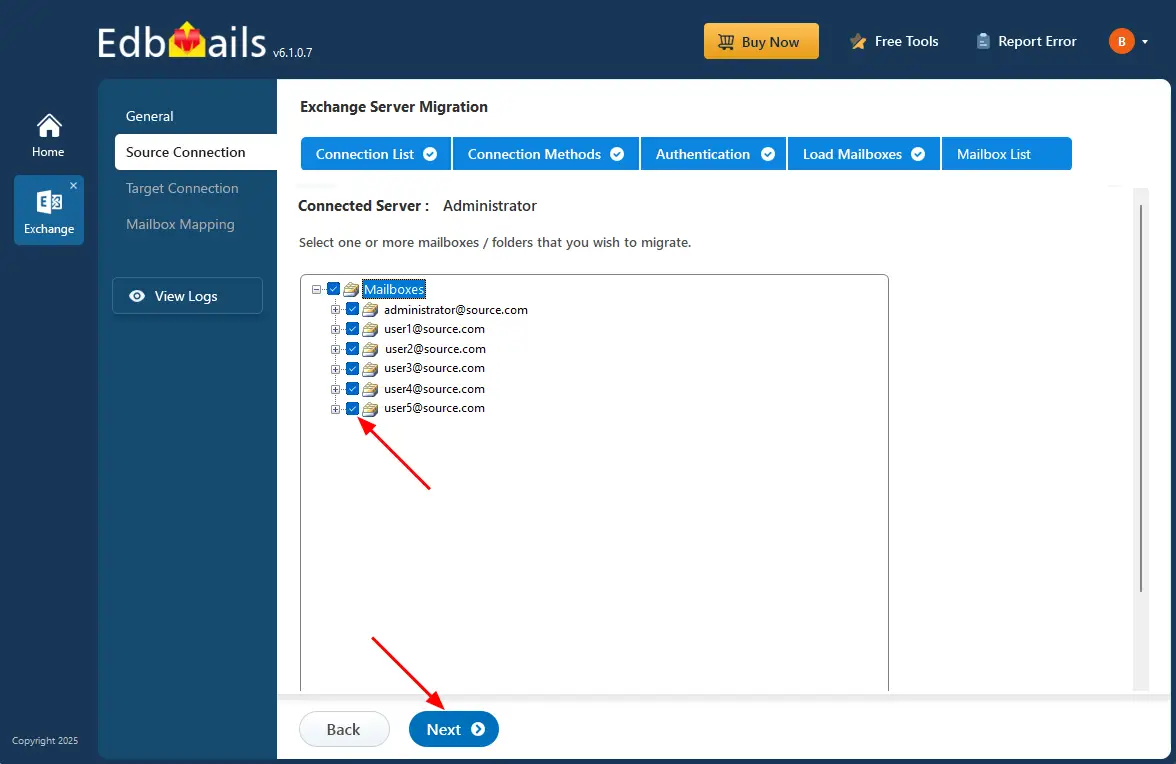
Step 3: Select the mailboxes for Migration
- Choose the source mailboxes and folders you want to migrate.
- Click ‘Next’ to continue.
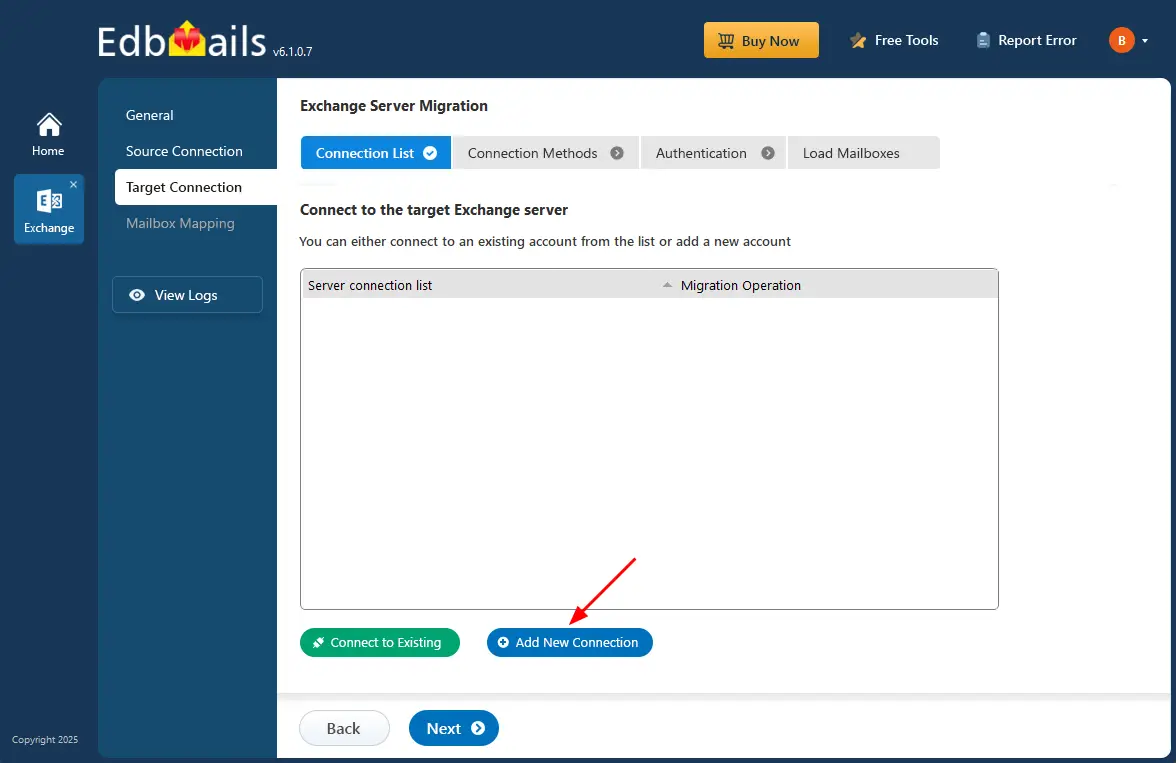
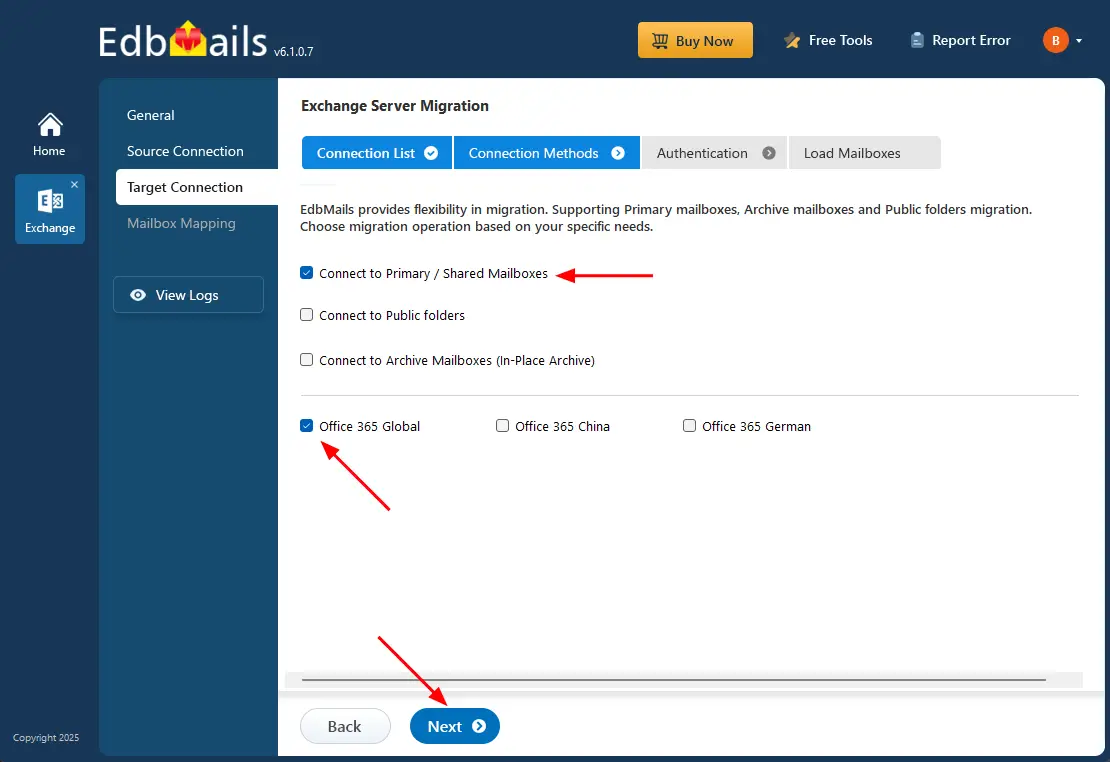
Step 4: Connect to target Office 365 server:
- To connect to the target Exchange server, click the ‘Add New Connection’ button to set up a new connection. If you’ve already connected before, simply choose the existing connection from the list and click ‘Connect to Existing’ to continue.
- Select the required connection options and click the ‘Next’ button.
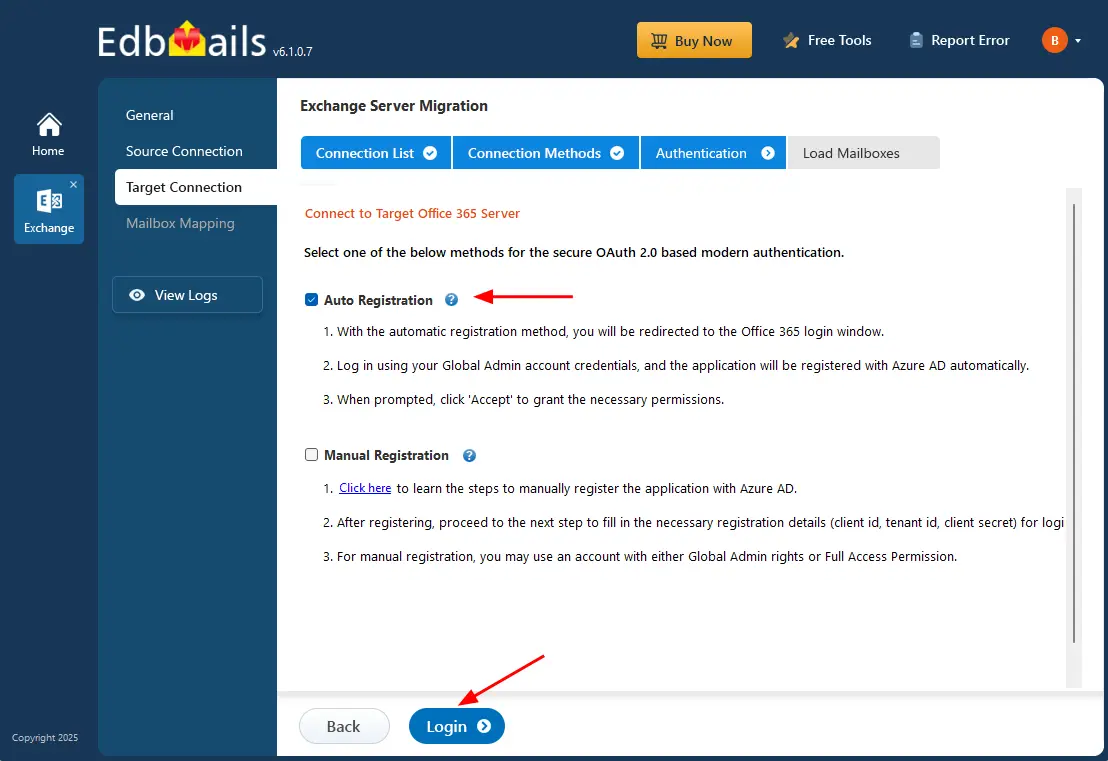
- Ensure you have a Global Admin account with an active mailbox to enable auto registration of the EdbMails application in Entra ID (Azure Active Directory).
- If you choose the Manual Registration option, you can sign in using either a Global Admin account or a user account that has full access permissions.
- Select ‘Auto Registration’ to establish the connection with Office 365 and click the ‘Login’ button to continue.
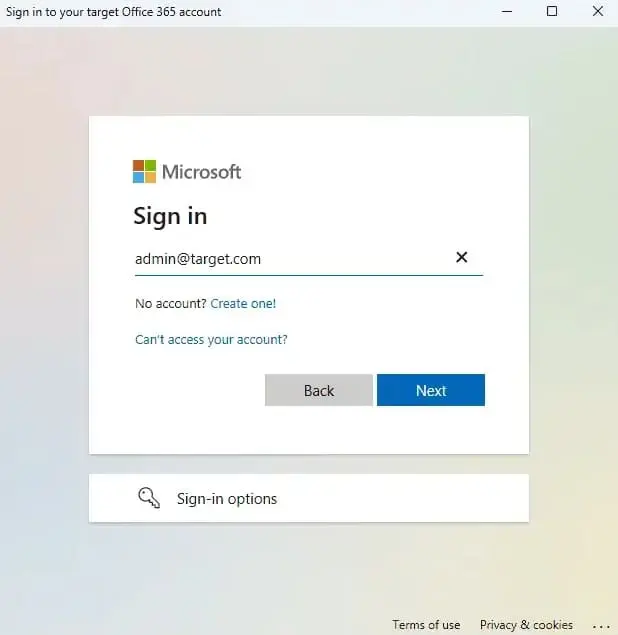
- Authenticate on Microsoft sign-in page.
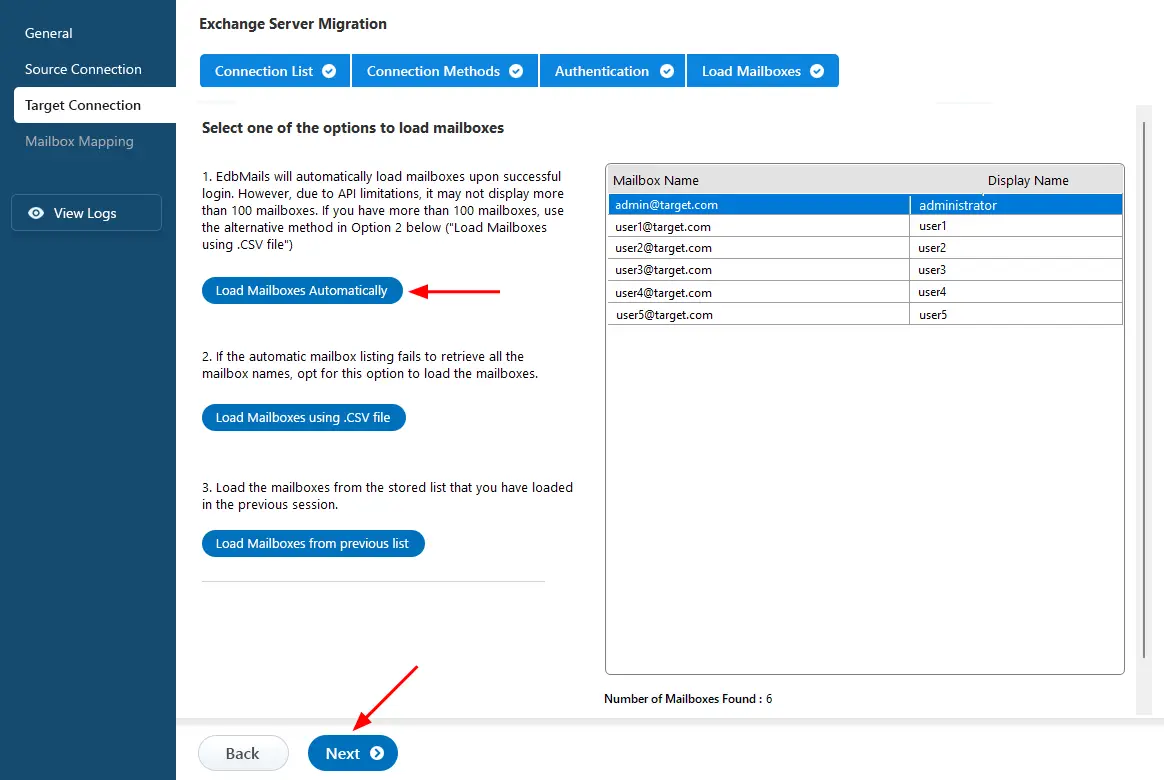
- Select one of the methods to load the mailboxes.
- To connect to the target Exchange server, click the ‘Add New Connection’ button to set up a new connection. If you’ve already connected before, simply choose the existing connection from the list and click ‘Connect to Existing’ to continue.
Step 5: Map source and target Exchange mailboxes
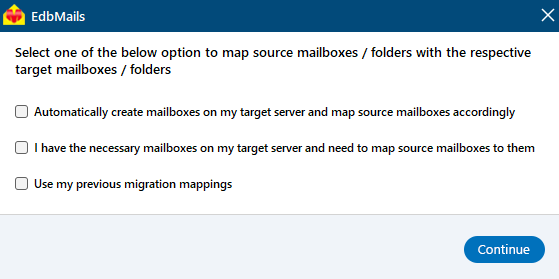
- Select the required mapping option
- EdbMails automatically maps mailboxes between the source and the target servers. This feature is especially useful when migrating a large number of mailboxes, as it reduces manual effort and saves time during the overall migration process. You can also map manually.
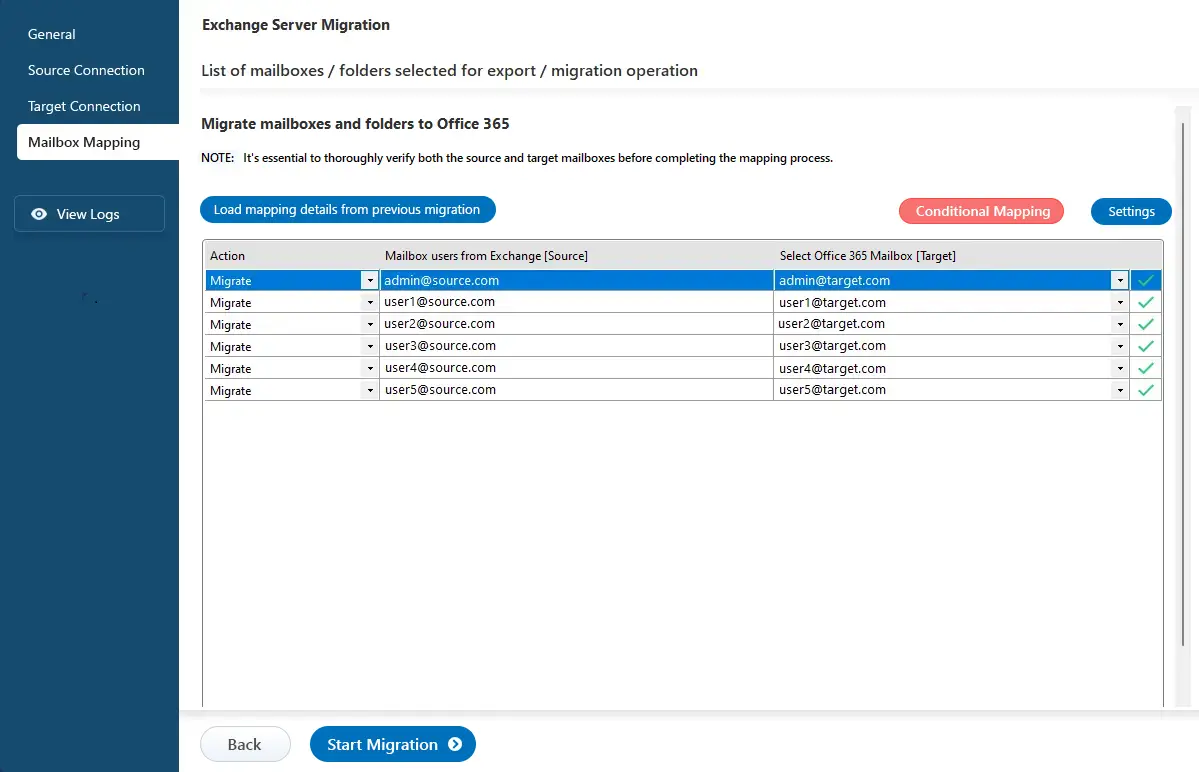
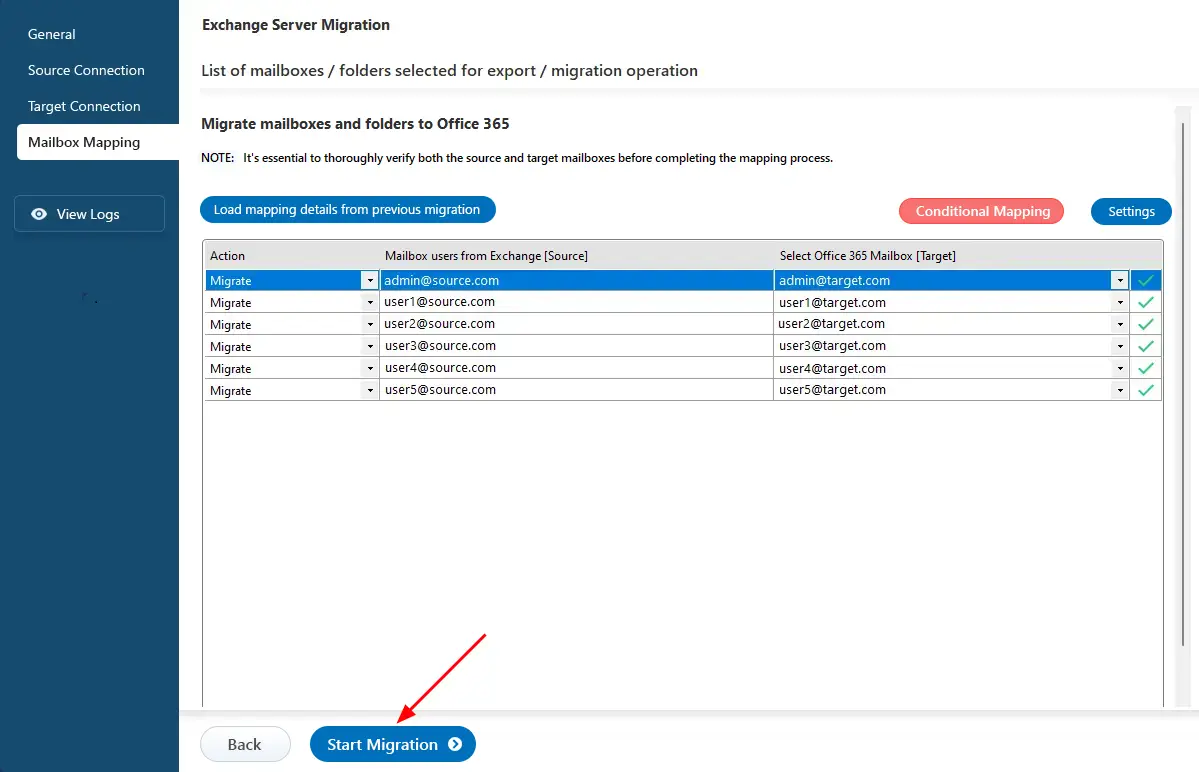
Step 6: Start Hybrid Exchange migration operation
- After completing the mailbox mapping, click the ‘Start Migration’ button to initiate the migration process.
- Now that the migration has been initiated, you can see the migration status in the progress bar. Once the migration is complete, EdbMails will prompt you to review the migration logs.
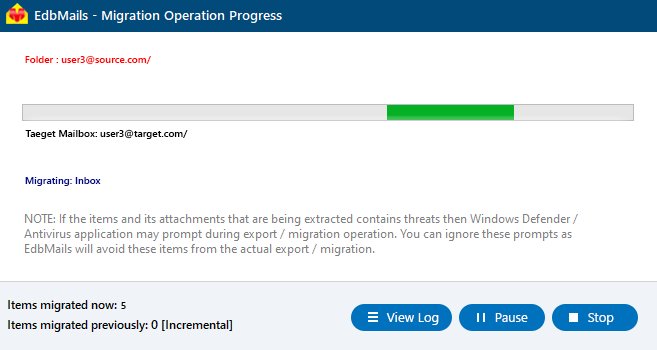
- Click the 'View Logs' button to view the migration report. Also, log in to your target server and verify the items.
- After completing the mailbox mapping, click the ‘Start Migration’ button to initiate the migration process.
Hybrid Exchange to Office 365 Post Migration Tasks
If you are migrating to / from a Hybrid Exchange environment from / to another server, perform the post-migration activities to enable correct mail flow to the target server.
- Add MX records to configure your domain on the new server.
- Configure Outlook profiles for users in your organization.
Troubleshooting guide for Hybrid Exchange Migration
Refer to the Exchange migration troubleshooting guide for possible solutions related to migration errors. For more information on EdbMails Exchange Hybrid migration refer to the frequently asked questions (FAQs)
Advantages of Using EdbMails for Exchange Hybrid Migration
1. Zero Downtime & No Impact on Users
- Migrations run seamlessly in the background.
- Users continue to access their mailboxes without interruption.
2. Automatic Handling of Mailbox Mapping
- The tool automatically maps source and target mailboxes, reducing manual effort.
- Ensures consistency and accuracy during hybrid migrations.
3. Incremental Migration (No Duplicate Items)
- After the first migration, subsequent syncs migrate only new or updated items.
- Saves time and prevents duplicate mailbox items.
4. High Speed and Secure Data Transfer
- Uses modern authentication and encrypted communication for maximum data safety.
- Transfers mailbox data quickly, even for large environments.
5. Migrates Everything (Not Just Emails)
- Includes emails, contacts, calendars, tasks, journals, categories, and folder structure.
- Ensures a complete and accurate mailbox replication.
6. Simple GUI and Easy Setup
- No PowerShell scripting or complex configurations needed.
- Ideal for organizations without deep technical expertise.
7. Supports Legacy Exchange Servers
- Helps migrate even from older Exchange versions that are difficult to upgrade.
- Smooth path for mixed-environment hybrid setups.
- Provides real-time status and comprehensive logs.
- Useful for auditing, troubleshooting, and compliance.
- Offers round-the-clock technical assistance, which is valuable during complex hybrid deployments.