


Step-by-Step Guide to Migrate Between Exchange Servers
Moving data from one Exchange server to another can be complex, and it needs to be planned and carried out carefully. If you don't do it right, it could cause downtime, problems with email access, or delays in business communication. But with the right plan and strategy, this project can be done on time and without any problems, and users can keep working without any problems.
EdbMails Exchange Migration Software brings an easy and reliable solution to the various Exchange 2019, 2016, 2013, 2010, and 2007 environments. With the help of this software, you can perform cross-forest, cross-domain, and one-hop migrations, maintaining the entire folder structure, all the email properties and permissions. Along with other features such as incremental migration, automatic mailbox mapping, concurrent mailbox processing, and throttling management, help ensure a secure and efficient migration with zero downtime.
EdbMails preserves the original mailbox structure such as folder hierarchy, all emails, attachments, contacts, calendars, tasks and permissions with zero data loss throughout the migration process.
This page describes the complete Exchange to Exchange migration workflow using EdbMails starting with the necessary pre-migration checklist and configuration details to the step by step migration process, and lastly to the post-migration verification to confirm that all mailbox data has been successfully migrated to the target Exchange server.
Why Migrate from One Exchange Server to Another
- End of Support and Security Risks: Legacy Exchange versions no longer supported are no security updates, increasing vulnerability risks. EdbMails combined directly to the current exchange server release without having to upgrade in-between.
- Advantages of upgrading Exchange: Newer versions of Exchange are providing enhanced encryption, authentication, and compliance features. EdbMails offers secured migration where it keeps mailbox permissions, folder structure, and metadata intact.
- Better Performance and Reliability: Newer, currently supported Exchange environments deliver improved speed, faster search, and higher reliability over legacy versions. EdbMails supports high-speed incremental migration and prevents duplicate items.
- Improved Scalability and administrability: The new Exchange servers were capable of supporting mailboxes of much greater capacity and improved administrative controls. EdbMails allows simultaneous migration of multiple mailboxes.
- Enhanced functionalities and usability: New Exchange environments increase usability of Outlook integration, mobile, and collaboration. Migration of mails, calendars, contacts, and tasks. Without loss of data using EdbMails.
- Hybrid and Cloud Readiness: Moving to a newer version of Exchange makes a way for hybrid setup or site migration to Office 365. EdbMails endorses Hybrid and cross forest Exchange migration.
- Server Consolidation and Cost Savings: The migration assists with reducing hardware and maintenance expenses through server consolidation. EdbMails makes multi-domain and cross-forest migration projects easier.
Exchange to Exchange Server Migration Planning
The migration of mailboxes and mail data to another exchange server can be difficult and has to be well-planned. The most important points which must be considered during the migration, are shown in the following checklist.
- Create a list and inventory of all items to migrate, such as mailboxes, public folders, shared mailboxes, and archives.
- Inform all end-users and stakeholders about the planned migration changes.
- Analyze the volume of mail data and mailbox count to plan migration resources and timing.
- Prepare the required domains and Active Directory services in the target Exchange server.
- Decide whether Public Folders and Shared Mailboxes should be included in the migration.
- Perform a pilot migration to assess configuration settings and migration behavior.
- Initiate the full migration and verify the migration endpoint configuration.
- Analyze Outlook profiles and confirm that users can receive incoming emails successfully.
Prerequisites for Exchange to Exchange Server Migration
- Step 1: Check that your system meets the Exchange server setup requirements
The following links will help you set up your target Exchange server. Learn more about the network, hardware, coexistence scenarios, and operating system requirements for installing Exchange.
- Exchange 2013 Server setup
- Network and directory requirement for Exchange 2016
- Network and directory requirement for Exchange 2019
- Hardware Requirements for Exchange 2016
- Hardware Requirements for Exchange 2019
- Supported operating systems for Exchange 2016
- Supported operating systems for Exchange 2019
Target Exchange server version Coexistence with the source Exchange server Requirement Migration Exchange 2019 Possible. Can coexist with Exchange 2013
Can coexist with Exchange 2016Install Cumulative Update 21 (CU21) or later on Exchange 2013
Install Cumulative Update 11 (CU11) or later on Exchange 2016With EdbMails Exchange migration software, you can migrate to any Exchange server version regardless of the coexistence issue Exchange 2016 Possible. Can coexist with Exchange 2013
Can coexist with Exchange 2010Install Cumulative Update 10 (CU10) or later on Exchange 2013
Install the latest Rollup update for Exchange 2010 Service Pack (SP3) - Step 2: Preparing the system for the Exchange server.
Before installing the target Exchange server, make sure the following prerequisites are in place for Active Directory, Windows Mailbox server, and Windows Edge Transport servers.
- Exchange 2019 prerequisites for preparing Active Directory (AD)
- Windows Server prerequisites for Exchange 2019
- Exchange 2016 prerequisites for preparing Active Directory (AD)
- Windows Server prerequisites for Exchange 2016
Install cumulative updates (CU) on the source Exchange server For migrating Exchange on-premises to Exchange, it is required that you have the latest cumulative updates (CU) installed on the source server.
- Install for Exchange server 2013
- Install for Exchange server 2016
- Install for Exchange server 2019
Assign the Organization Management role group in Exchange to the admin user. It is an elevated permission that is required if you want to migrate Public folders.
- Step 3 Configure target Exchange server for migration
Given below is the important points to install and configure the Exchange server for migration.
- Prepare AD and domains
- Before installing the Exchange server you need to prepare your Active Directory forest and its domains for the new version of Exchange.
- If you have a separate team to manage Active Directory schema, you need to extend AD schema first; otherwise proceed to the next step to prepare the Active Directory.
- If you have more than one domain, you need to prepare the Active Directory domain too.
- Install Exchange server on your computer
Before you begin the installation, you need to confirm the server system requirements and prerequisites which we discussed above. Next, follow the link to install Exchange 2016 or install Exchange 2019 from the setup wizard based on which server you want to migrate to..
- Prepare a clean Exchange target environment
- Create and configure a send connector to send email out of your organization.
- By default, Exchange automatically creates receive connectors for inbound mail flow when the mailbox server is installed. If you need to configure receive connectors, follow the steps in the link.
- Add accepted domains to allow recipients to send and receive email from another domain.
- Add your accepted domain to every recipient in your organization using the default email address policy.
- Configure the external URLs (domines) on the Client Access (frontend) services virtual directories on the mailbox server to allow clients to access the server over the Internet.
- Configure internal URLs on the Client Access (frontend) services virtual directories on the mailbox server to allow clients to access the server over your internal network.
- Configure SSL certificates issued by a third-party certificate authority on the Client Access virtual directories used for services like Outlook Anywhere and Exchange ActiveSync.
- Run the Get-ExchangeServercmdlet on the Exchange Management Shell (EMS) to verify the installation.
- Establish a trust relationship between the forests (Optional)
A forest trust is an authentication between the two domains in the same Active Directory forest which establishes a trust between the two root domains for sharing data. A trust is built ahead of time in order to overcome any trust issue that occurred either during or after migration.
- Create Mailboxes & Public folders on Exchange Server
The mailboxes must be created on the target server prior to migration. EdbMails creates mailboxes automatically on the target Exchange server, making the entire task of creating users mailbox much easier. If you want to create a user mailbox manually, you may have to look into the link given below..
- Set Impersonation rights to the admin user
If the global admin account is being used to connect to the source and target Exchange servers, then make sure that the impersonation right is configured to the global admin user.
Steps to set impersonation rights in Exchange 2007
Steps to set impersonation rights in Exchange 2019, 2016, 2013, 2010
- Optimize EWS throttling and mail size limits for faster migration
To speed up the migration, adjust the EWS throttling settings on the target Exchange server
Steps to create custom EWS throttling policies on Exchange server
To ensure large emails are migrated, increase the message size limit on the target Exchange
Determine if you want to follow the cutover, staged or hybrid migration method.
Current environment and requirement Ideal migration approach How does the migration take place? You want to perform a complete migration to the Exchange server in a single event and in a limited time frame. Cutover migration Set up your target Exchange server and migrate everything in a single sitting. Suited for large mailbox migration You want to perform the migration in multiple phases Staged migration Migrate your mailboxes in multiple stages and transfer the most recent/required data first followed by the others. You want to migrate Exchange server data to Office 365 within the same Active directory environment Hybrid migration Migrate between Exchange and Office 365 in a hybrid environment. - Prepare AD and domains
- Step 1: Check that your system meets the Exchange server setup requirements
Step-by-Step Process to Migrate Between Exchange Servers
Step 1: Download and Install EdbMails Exchange Migration Tool
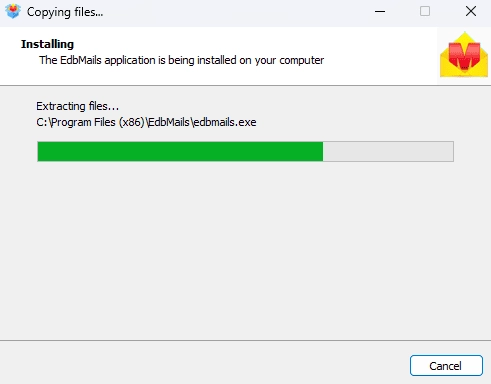
- Download and install the EdbMails application on your computer
See a detailed list of EdbMails system requirements for Exchange migration.
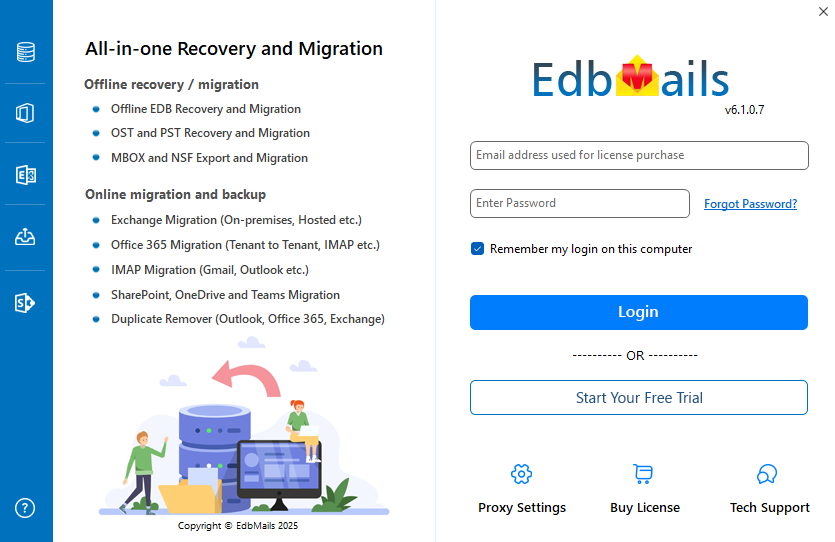
- Open the EdbMails application on your computer.
- Enter your registered email ID and password, then click ‘Login’. If you have not created an account yet, select ‘Start Your Free Trial’ to continue with the trial version.Note: The trial edition includes all core features and allows migration of up to 30 items per folder in all mailboxes. To perform unlimited migration, you need to purchase an Exchange Migration license from the EdbMails website.Once the purchase is complete, close the application and reopen it. Then log in again using the same email ID and password used during the purchase to activate your license successfully.
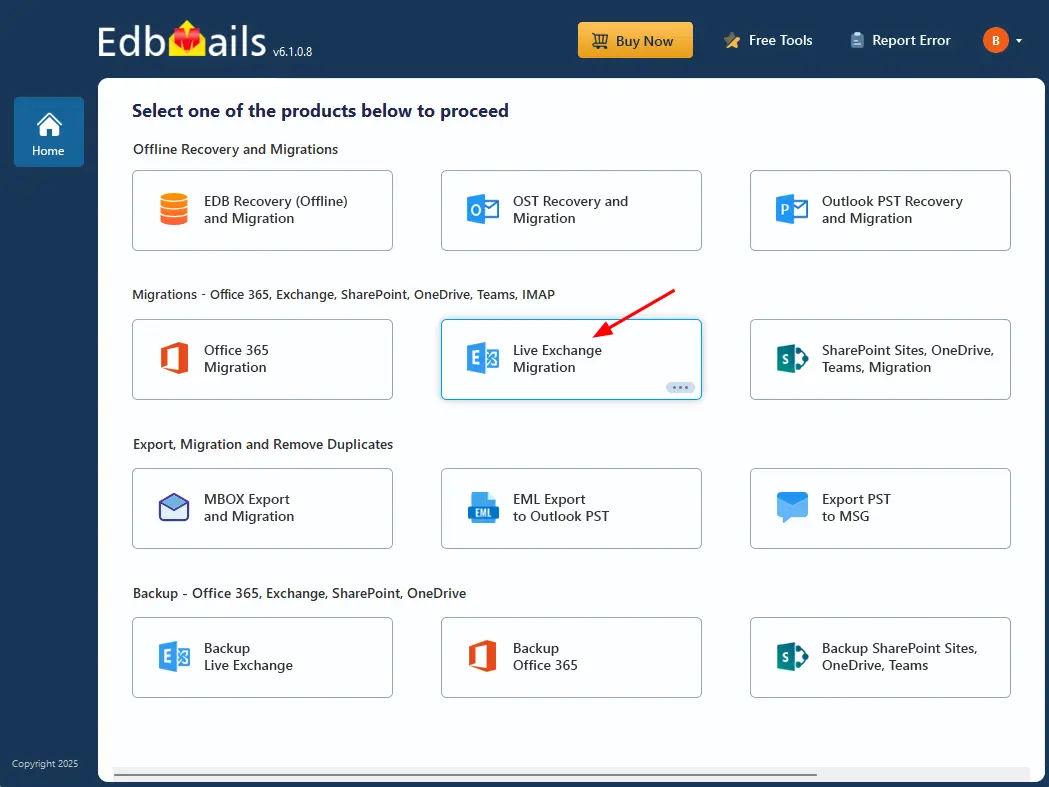
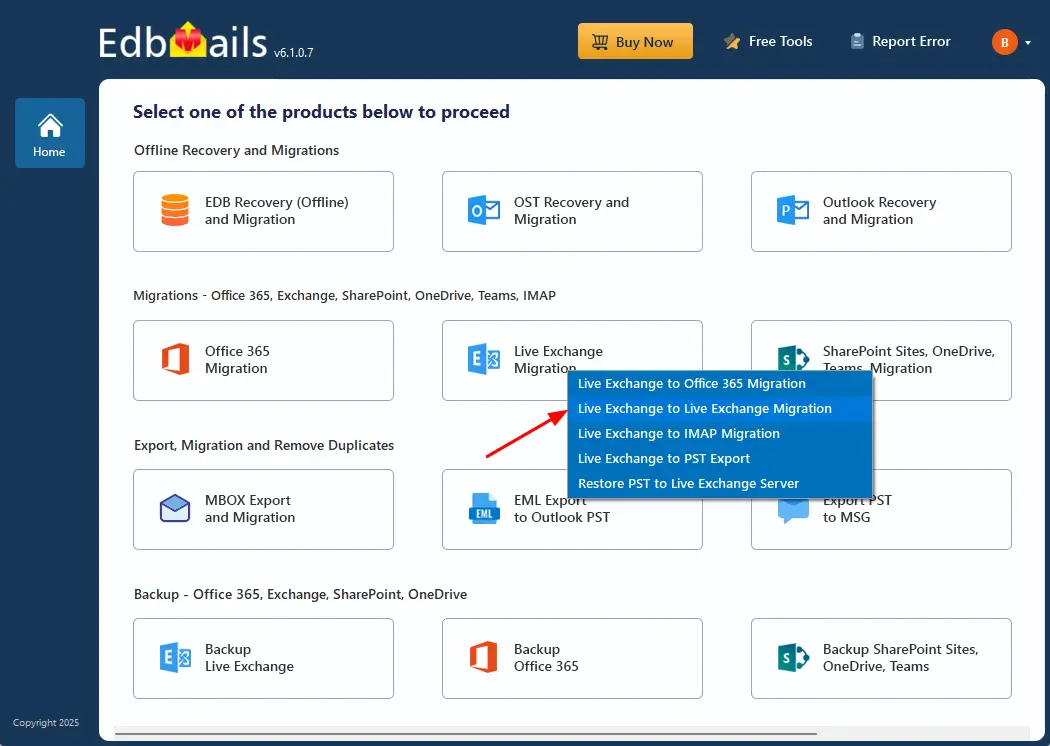
- Select ‘Live Exchange Migration’.
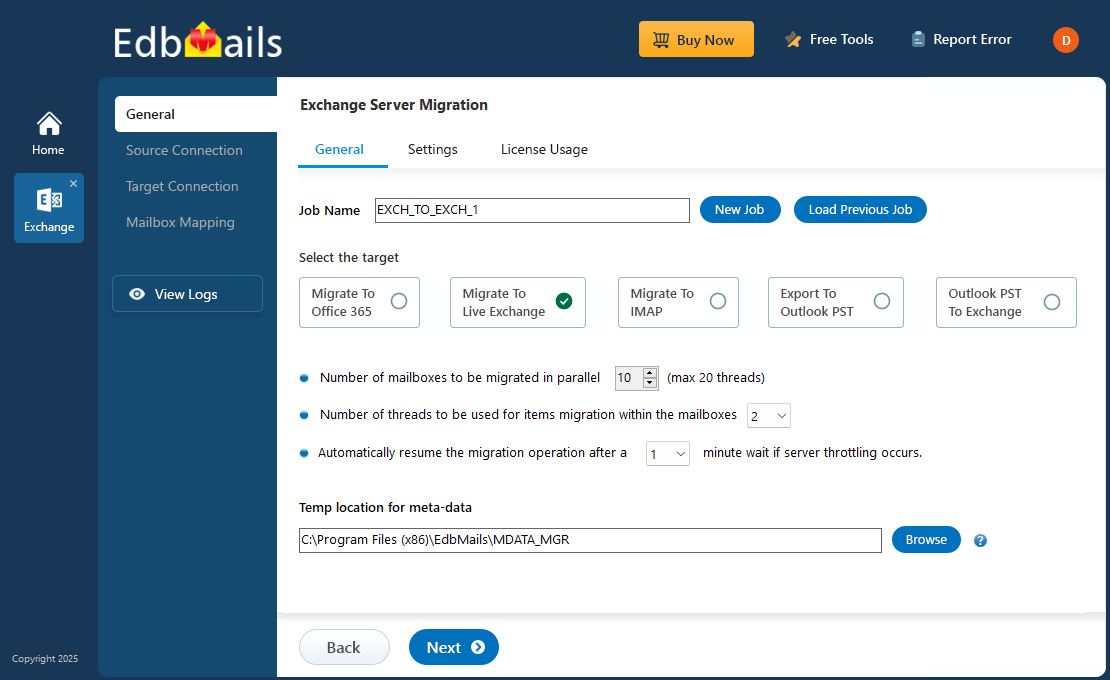
- Select 'Live Exchange to Live Exchange Migration'
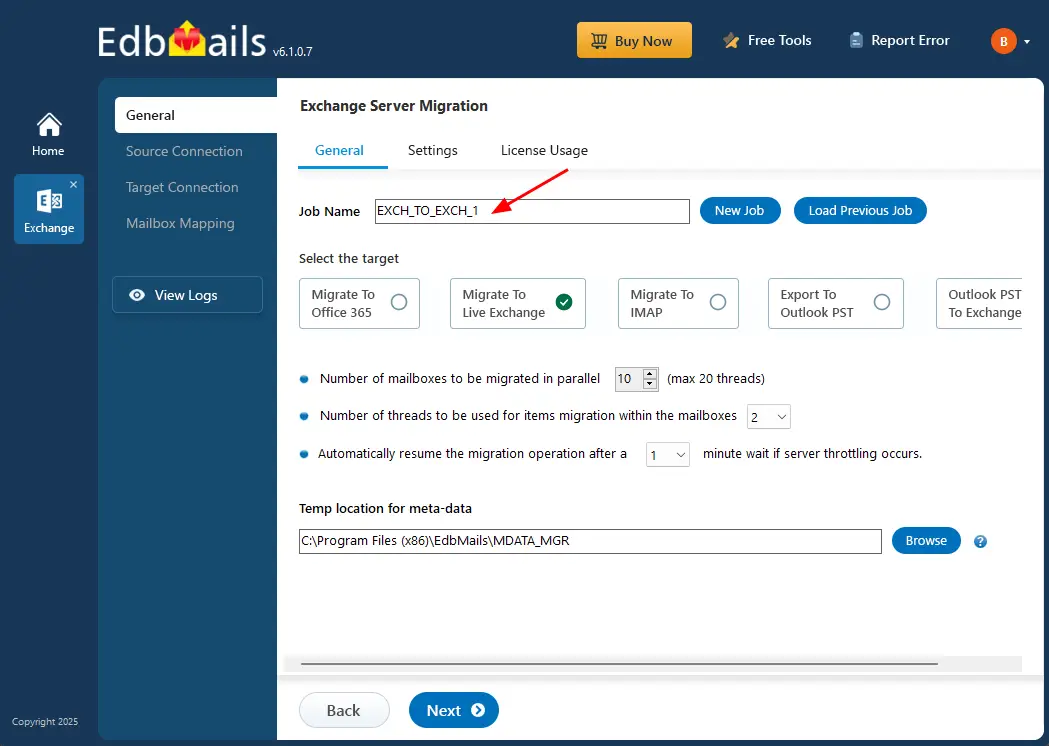
- You can keep the default job name or click the ‘New Job’ option if you want to assign a different name to the migration job.
- Download and install the EdbMails application on your computer
Step 2: Connect to Source Exchange Server
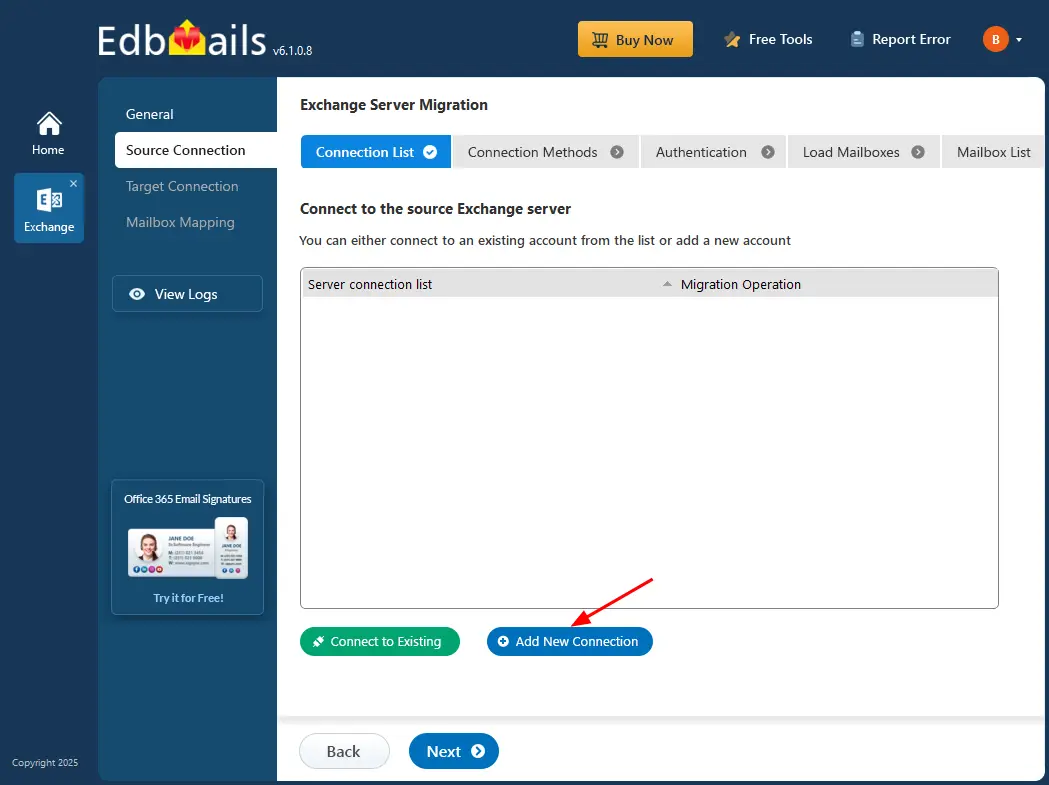
- To create a new connection with the source Exchange server, click on 'Add New Connection'. If you have already configured a connection, select the connection from the list and click on 'Connect to Existing' to proceed.
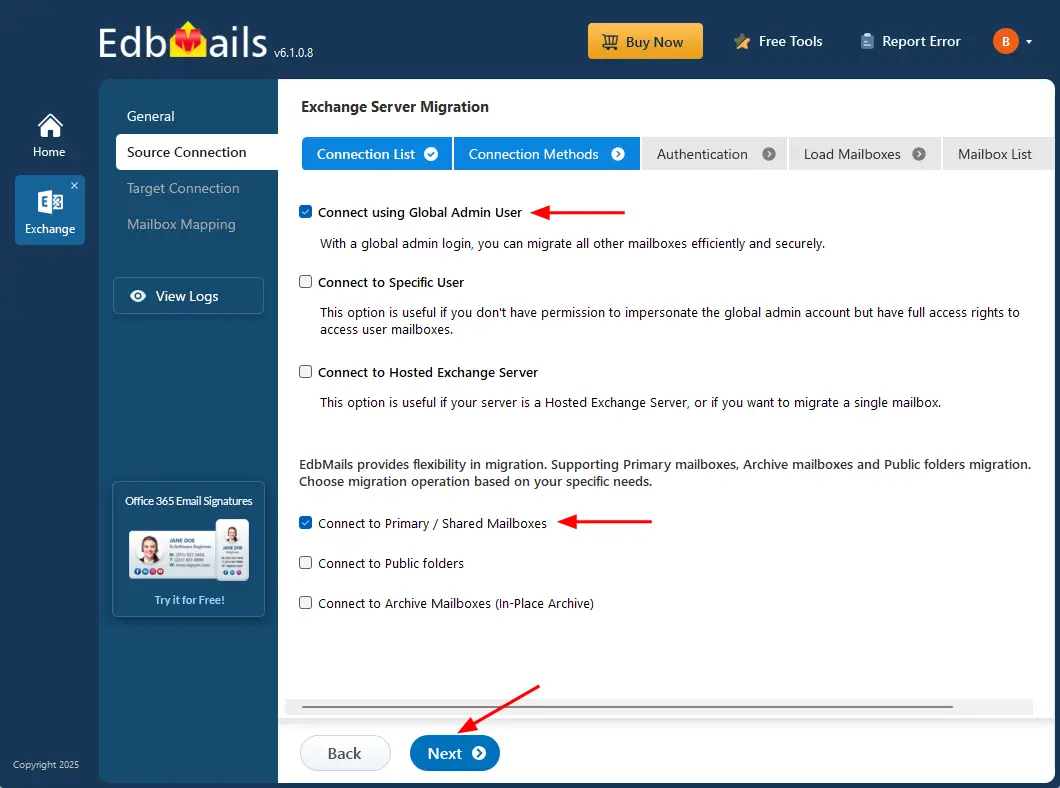
- Select the required connection options and click the ‘Next’ button.
Different options to connect to Exchange server in EdbMails
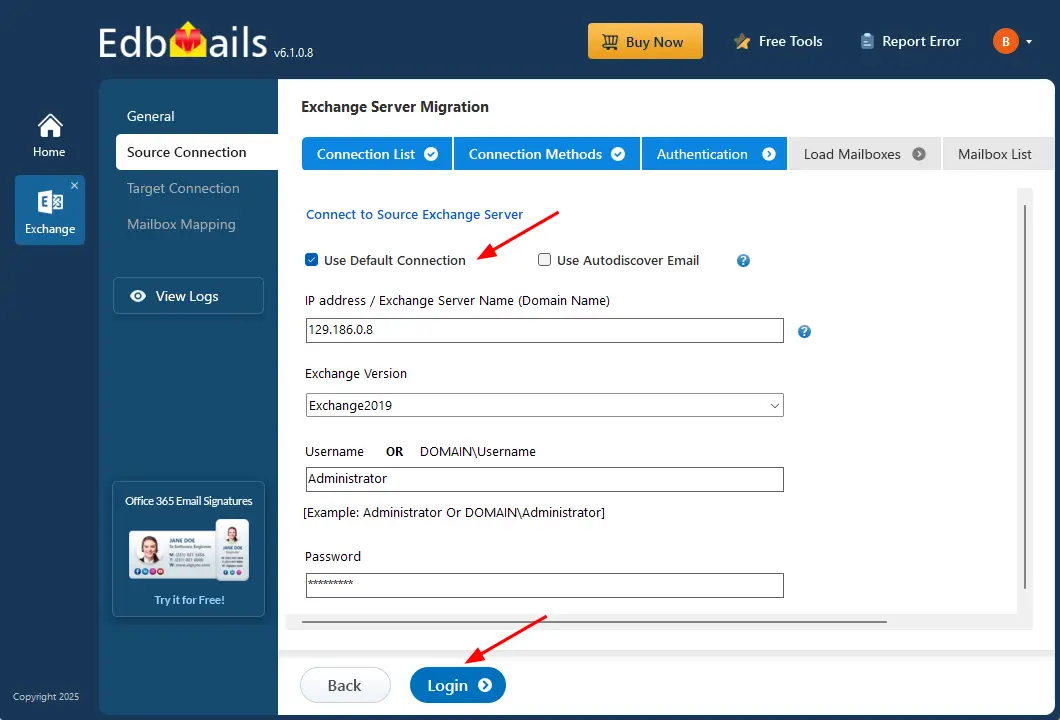
- Enter the source Exchange server details such as IP address (Domain name), Exchange version, Username and password.
- Then click the ‘Login’ button to continue.
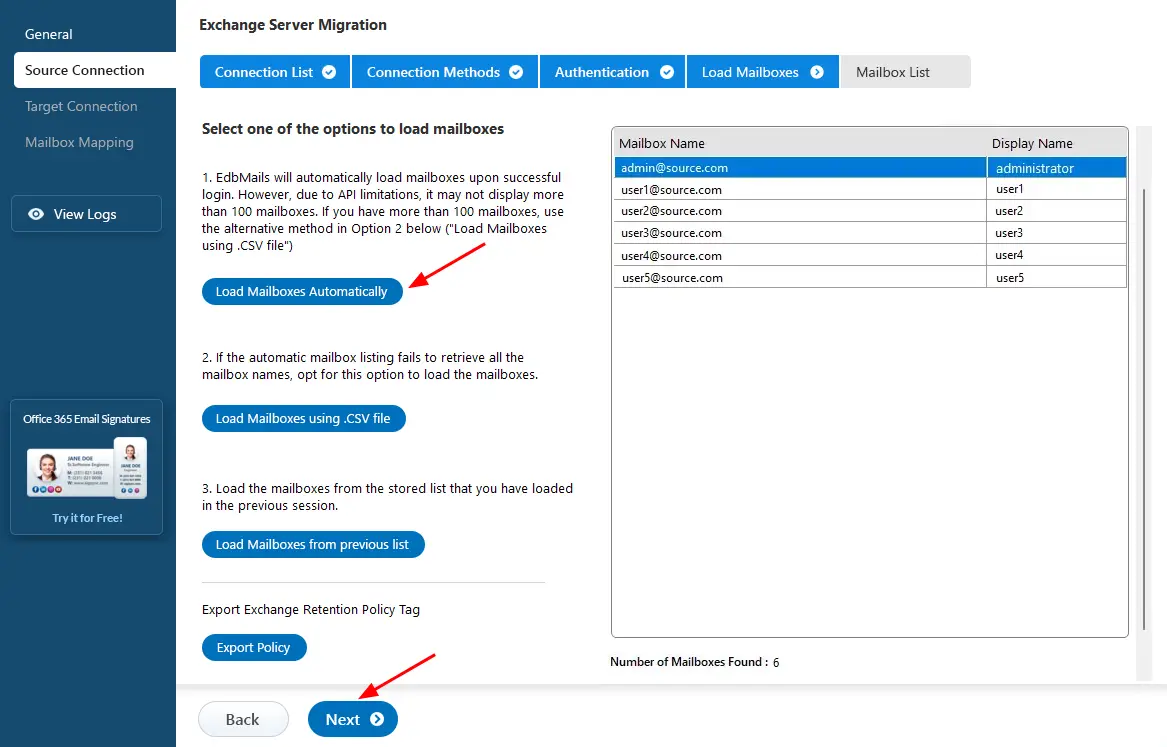
- On successful authentication, you can choose one of the following options to load the mailboxes:
i) Load Mailboxes Automatically: EdbMails will automatically load and show you the available mailboxes. This makes the setup process easy. However, because of limitations in the Microsoft API, only up to 100 mailboxes can be shown. If your environment has more than 100 mailboxes, use the alternative option below.
ii) Load Mailboxes using CSV file: If the list displayed for the automatic method does not display all mailbox names, select 'Load Mailboxes using .CSV file' to import the mailbox.
iii) Load Mailboxes from previous list: This option enables you to import the list of mailboxes saved during the previous import operation.
- Select ‘Load Mailboxes Automatically’ and click ‘Next’ to proceed.
- To create a new connection with the source Exchange server, click on 'Add New Connection'. If you have already configured a connection, select the connection from the list and click on 'Connect to Existing' to proceed.
Step 3: Select mailboxes for migration
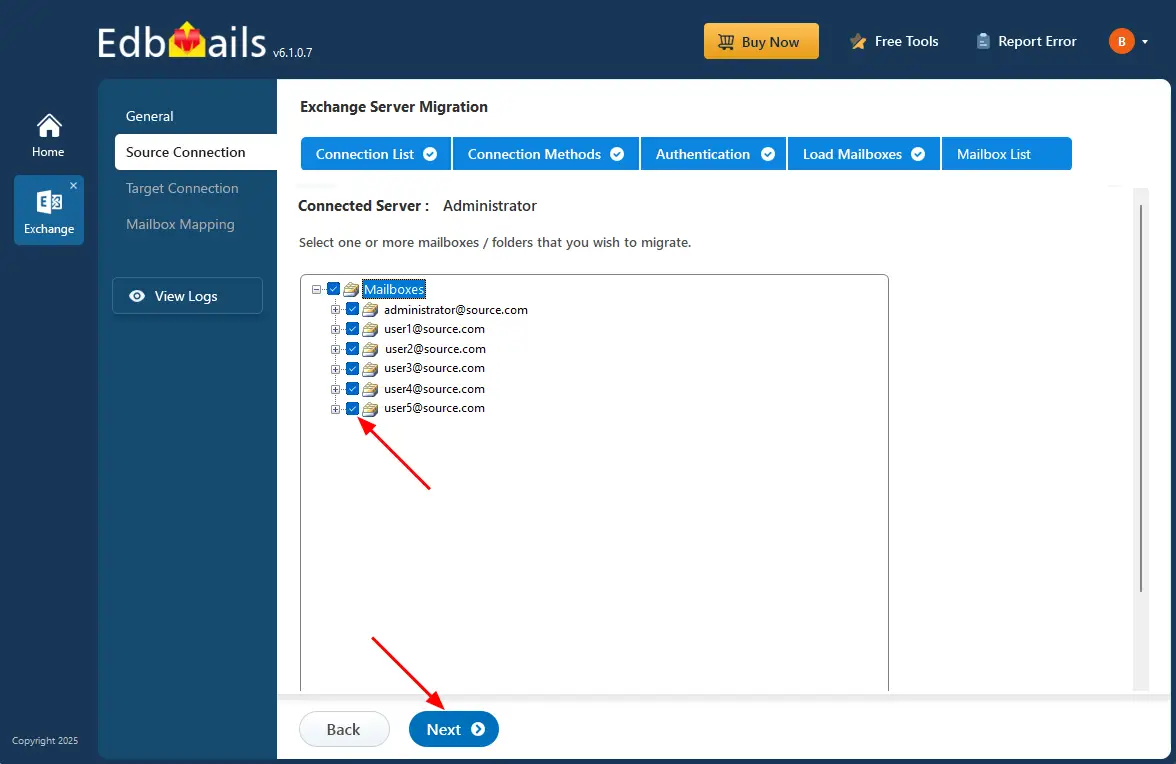
- Choose the mailbox/folders to be migrated from your source Exchange server. The selected mailboxes must be suitable to be migrated.
- Click the ‘Next’ button.
Step 4: Connect to target Exchange server
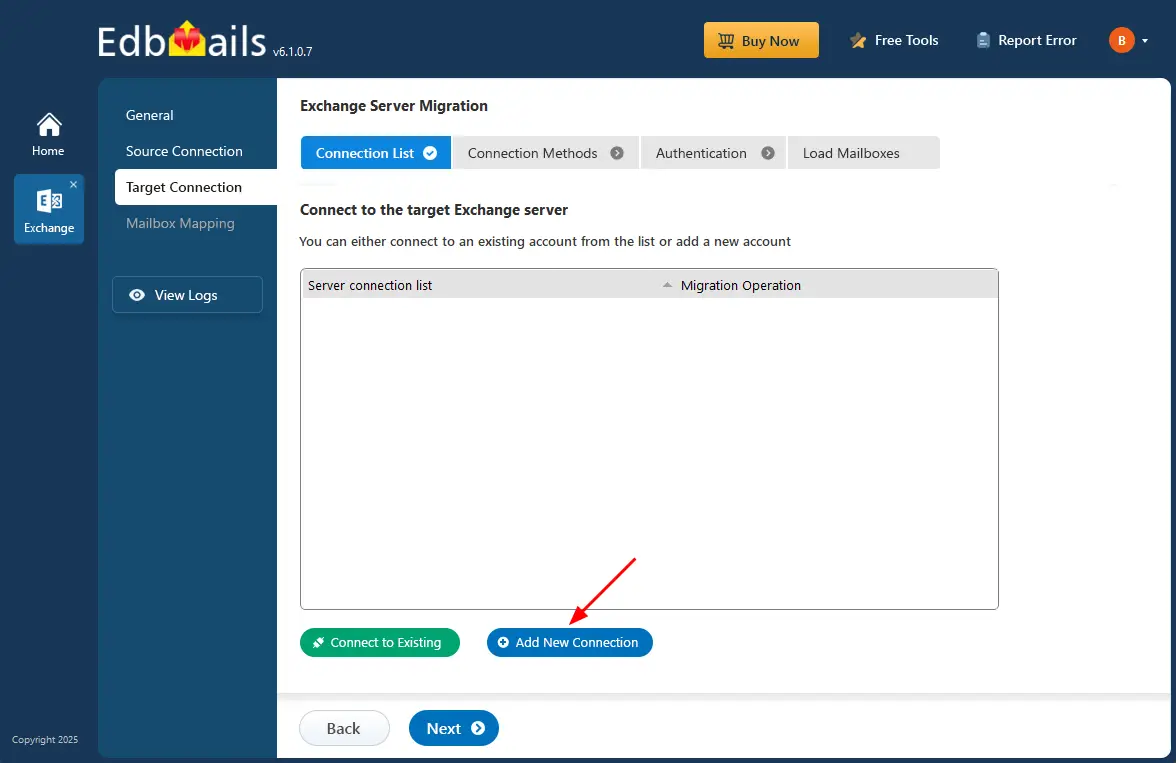
- Select ‘Add New Connection’ to add a new connection with your target Exchange server.
- If you have already configured a connection, choose the existing connection from the list and click ‘Connect to Existing’ to proceed.
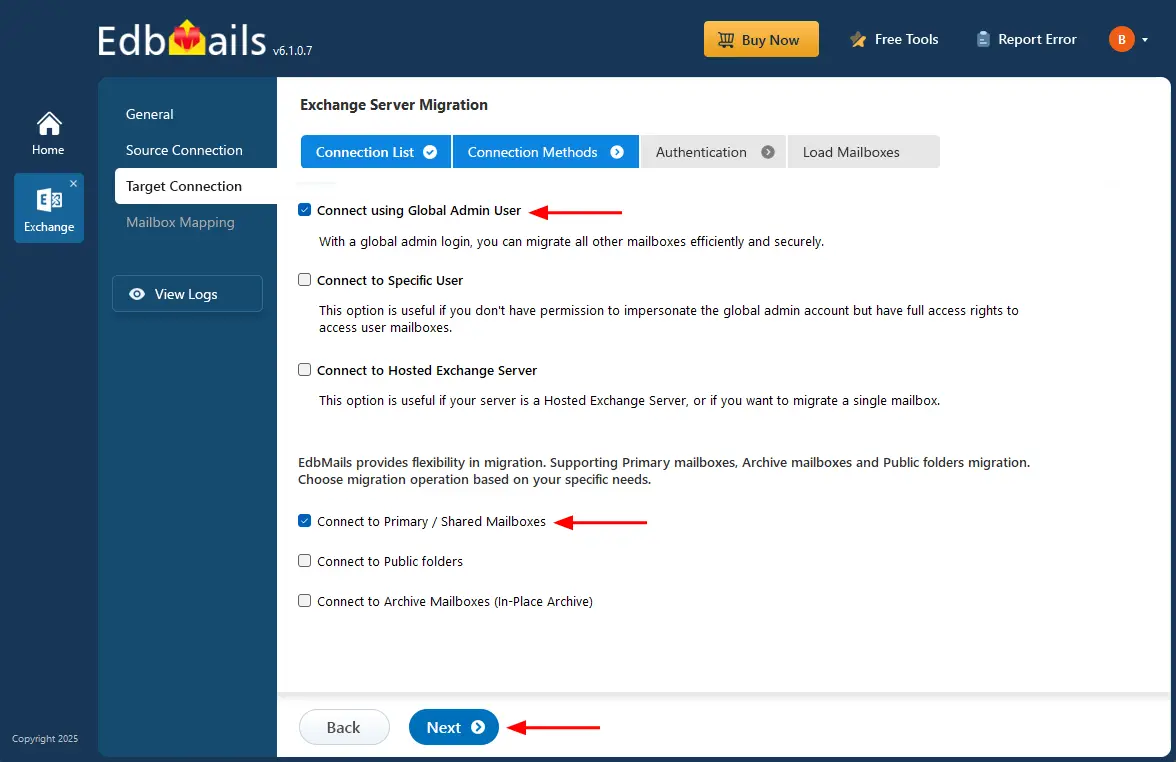
- Choose the required options to connect to the target Exchange server and click the 'Next' button to continue with migration configuration.
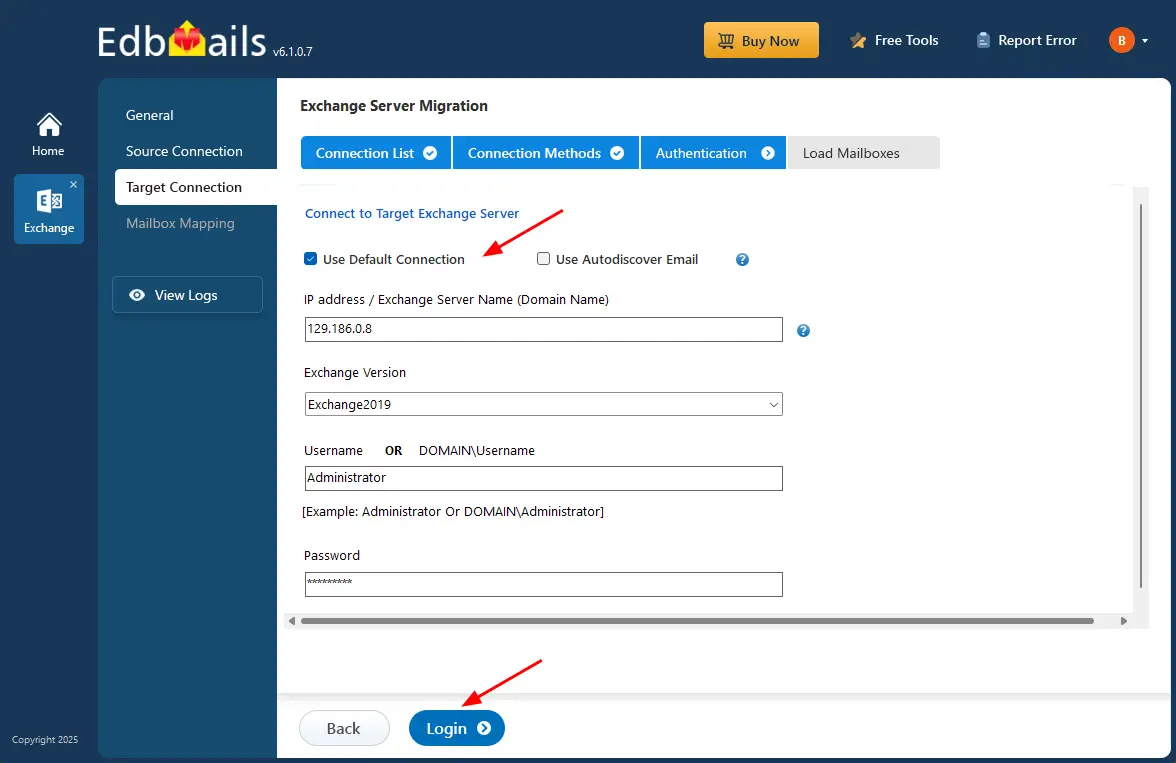
- Enter the target Exchange server details and click the ‘Login’ button.
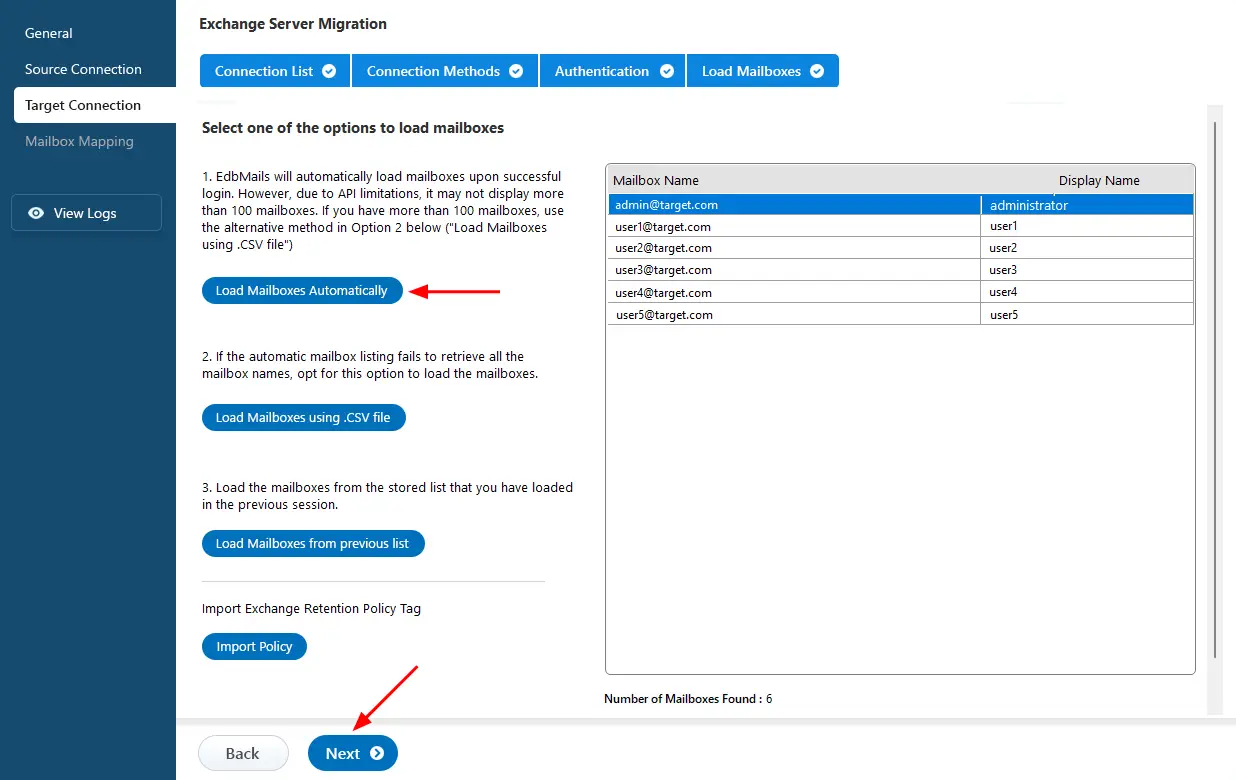
- Choose a required method to load the target Exchange server mailboxes.
Step 5: Map source and target Exchange server mailboxes
- Choose the required mapping option
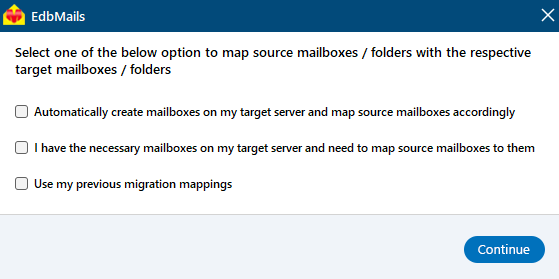
- If you have installed EdbMails on your target Exchange server, you can allow EdbMails to automatically create mailboxes on the target Exchange server.
Click here to know more about automatic mailbox creation.
- EdbMails automatically maps mailboxes between the source and the target Exchange servers. This is particularly useful when you are migrating large numbers of mailboxes, since it saves manual effort and also time in the overall migration process.
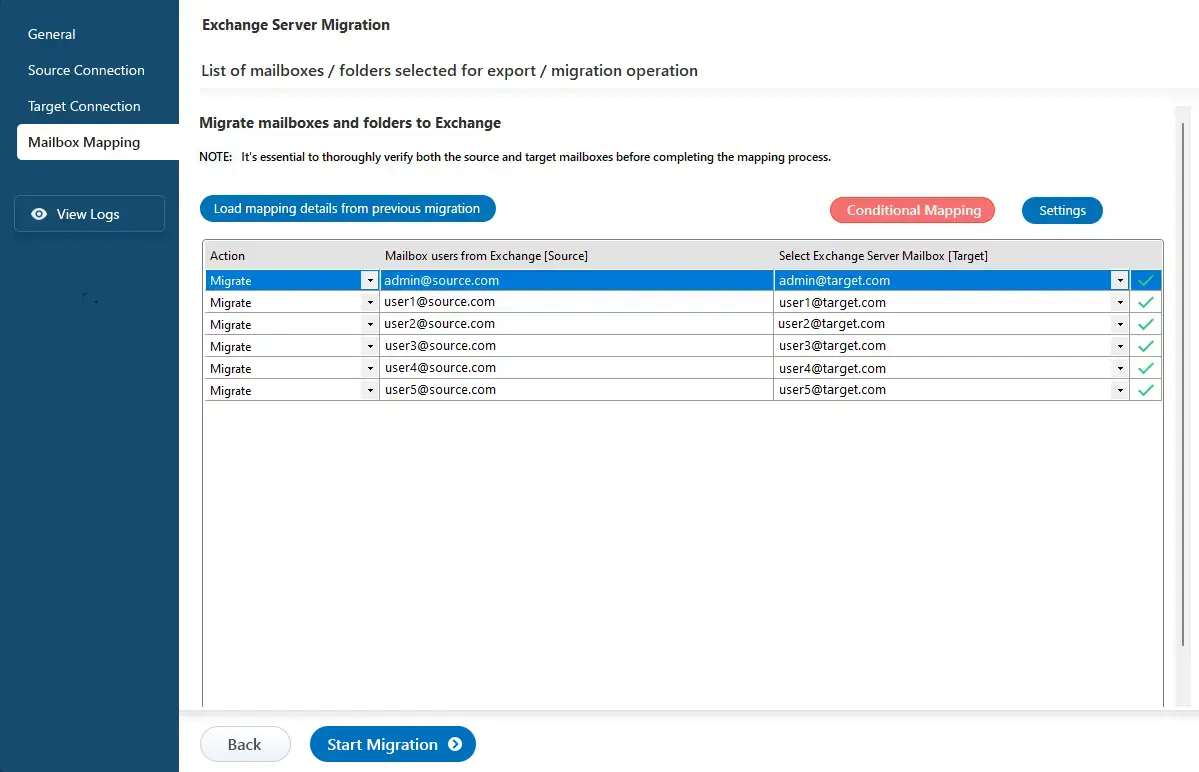
- Choose the required mapping option
Step 6: Start Live Exchange to Live Exchange migration operation
- After completing the mailbox mapping, click the ‘Start Migration’ button to initiate the migration process.
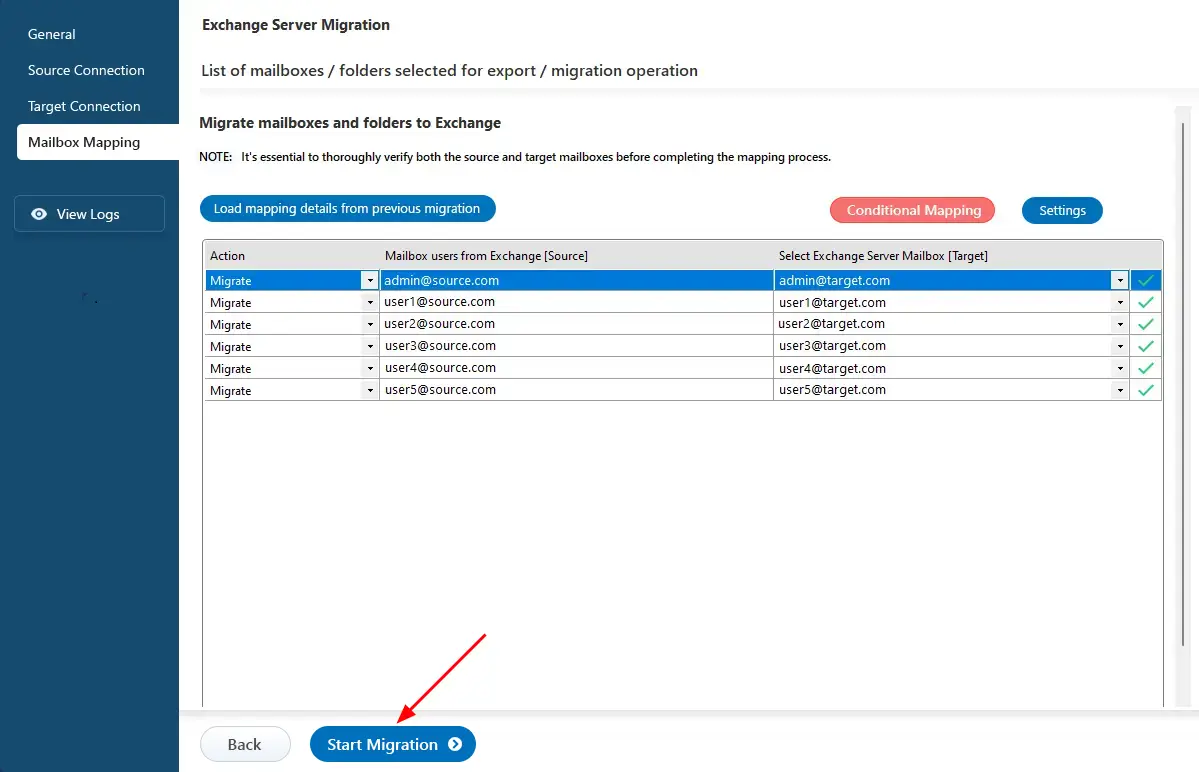
- Now that the migration has been initiated, you can see the migration status in the progress bar. Once the migration is complete, EdbMails will prompt you to review the migration status with logs.
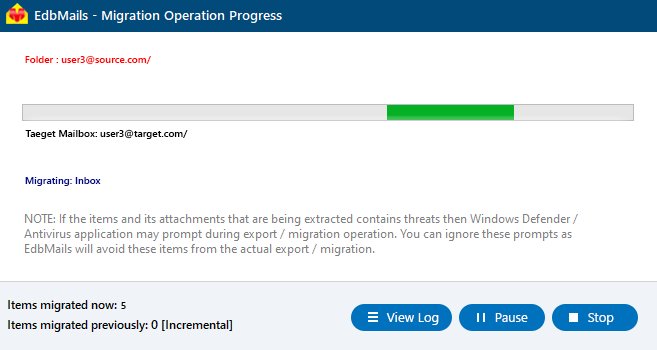
- Click the 'View Logs' button to view the migration report. Also, log in to your target Exchange server and verify the items
- After completing the mailbox mapping, click the ‘Start Migration’ button to initiate the migration process.
Post Migration Activities
- Step 1: Update the MX records to the target Exchange server.
To receive messages on the target Exchange server you need to update the MX record in your DNS to enable email functionality with the new server you migrated to. You will also need to configure the Autodiscover record to allow Outlook to connect to the migrated mailboxes.
- Step 2: Configure Outlook profile for users in the new domain.
You may need to configure an outlook profile for each user in your new domain if Outlook encounters issues connecting to the new Exchange server.
- Step 3: Decommission and uninstall the old exchange server.
Once you are finished with your migration you can uninstall and decommission your old exchange server.
- Step 1: Update the MX records to the target Exchange server.
Troubleshooting of Exchange to Exchange Migration
The Exchange migration troubleshooting guide provides solutions for migration errors. Please see the frequently asked questions about EdbMails Exchange migration tool.
Advantages of using EdbMails for Exchange Server Migration
- Selective granular brick-level migration of specific mailbox items.
- Can support incremental migration to prevent migrating duplicate items.
- Advanced include and exclude filter options to filter mailbox items and folders.
- Exchange Public folders migration and shared mailbox migration are also supported.
- Data accuracy with zero downtime and data loss.
- Automatically maps source and target Exchange server mailboxes.
- It can directly migrate any version of the exchange server (2007-2019) without coexistence issues.
- Compatible with all Windows operating systems.
- Intuitive, user-friendly interface to simplify the migration process.
- Automatically creates mailbox in target Exchange server.
- Concurrent mailbox migration support allows multiple mailboxes to be processed at the same time for faster completion.
- Office 365 throttling is managed automatically to maintain consistent migration performance.
- Provides all detailed migration reports for tracking the progress and results of the migration process.
- 24/7 free technical support available for any issues during or after migration.
Frequently Asked Questions
- Why is EdbMails the best choice for migrating between Exchange servers?
EdbMails Exchange Migration Tool is one of the best solutions for migrating mailboxes between Exchange servers and to Office 365. It supports direct, secure migrations across Exchange versions (2007, 2010, 2013, 2016, 2019) without downtime or data loss, and preserves folder structure, permissions, and metadata.
- Can I migrate Exchange Public Folders?
Yes. EdbMails supports migrating Exchange Public Folders to another Exchange server or Office 365 while preserving hierarchy, folder permissions, and all data.
- How long does an Exchange migration take?
The time will be based on mailbox size, network speed and server throttling limits. EdbMails has advanced throttling and incremental migration to speed up the process and provide seamless work without interruption, actual time depends on the network.