


Office 365 Shared mailbox to Exchange migration with EdbMails
Many organizations use shared mailboxes over regular mailboxes due to their collaborative nature. Shared mailboxes provide multiple users to access emails, manage the team communications and workflow without requiring an individual user license. This is very cost-effective and practical particularly in the case of a department such as customer service or sales, where a unified mailbox is critical for efficiency.
However, when it comes to migration of shared mailboxes from Office 365 to Exchange server, a lot of organizations go with third-party tools such as EdbMails. The manual migration may be too complicated for an organization can lead to downtime, data loss, or incomplete transfers, so EdbMails is the most trusted solution.
EdbMails comes with an user-friendly interface and automation, making it so much easier and accurate to transfer all data without the involvement of any administrative efforts. Its efficient capabilities makes migration easy with its efficient features so data can remain accurate. This is why businesses choose EdbMails for the safe and reliable migration of their data.
Planning a migration from Office 365 Shared mailbox to Exchange
- Ensure that you enable the shared mailboxes and make them available in Office 365 admin center.
- Create and enable shared mailboxes on the Exchange server
- Determine whether you want to migrate the source Shared mailboxes to the target primary or Shared mailboxes.
- Determine whether you want to move everything at once or in stages.
- Check your internet connection speed and network configuration.
- Communicate the migration plan and the changes to your end users.
- Perform a test Office 365 migration before you start the actual one.
Pre-migration activities for Shared mailbox to Exchange migration
Step 1: Check that you meet the following requirements on Office 365
- Ensure that you have a global admin account with a mailbox for Auto Registration of EdbMails application on your Entra ID (Azure Active Directory). However, you can use either a global admin account or any user account with full access rights in the Manual Registration method.
- Ensure that you meet the network and bandwidth requirements for the migration.
- See performance factors and best practices for Office 365 Shared mailbox to Exchange migration.
Step 2: Check that your system meets the Exchange server setup requirements.
The following links will help you to know about the network, hardware and operating system requirements for the Exchange server you want to install and migrate to.
Note: Exchange 2010 has reached the end of support on October 13, 2020 and Exchange 2013 will reach the end of support on April 11, 2023. Therefore it is highly recommended that you migrate your mail data and Shared mailboxes to Exchange 2016 and 2019.
Step 3: Prepare your target system with the following prerequisites
Complete the following prerequisites for Active Directory, Windows Mailbox server, and Windows Edge Transport servers before installing the Exchange server.
Step 4: Setup Exchange server for migration
Given below is a list of key points for installing and preparing the Exchange server for migration. If you have already installed and set up your Exchange server, skip to point 4 in this step.
Prepare AD and domains
- Before installing Exchange Server, you need to prepare your Active Directory forest and its domains for the new version of Exchange.
- If you have a separate team to manage the Active Directory schema, you need to first extend the active directory schema, else proceed to the next step to prepare the Active Directory.
- If you have multiple domains you need to additionally prepare the Active Directory domains.
- Install Exchange server on your computer
Before installing the Exchange server, ensure that you meet the server system requirements and prerequisites as outlined previously. Next, follow the link to install Exchange 2016 or install Exchange 2019 from the setup wizard.
Prepare a clean Exchange target environment
- Configure a Send connector to send mail outside the Exchange organization.
- By default, Exchange automatically creates receive connectors for inbound mail flow when the mailbox server is installed. If you need to configure receive connectors, follow the steps in the link.
- Add accepted domains to allow recipients to send and receive email from another domain.
- Configure the default email address policy to add the accepted domain to every recipient in the organization.
- Configure external URLs (domains) on the virtual directories in the Client Access (frontend) services on the Mailbox server to allow clients to connect to your server from the internet (outside the organization’s network).
- Configure internal URLs on the virtual directories in the Client Access (frontend) services on the Mailbox server to allow clients to connect to your server from the internal network.
- Configure SSL certificates from a third-party certificate authority for services such as Outlook Anywhere and Exchange ActiveSync.
- Verify the Exchange server installation by running the command Get-ExchangeServer on the Exchange Management Shell (EMS).
Create mailboxes and Public folders on the Exchange server
- Before you migrate, ensure that you have mailboxes on the Exchange server and have assigned suitable licenses to them. Ensure that you also have the Shared mailbox enabled.
- Assign management roles to the admin account
- If you are using a global admin account to connect to the Exchange server, ensure that impersonation rights are set.
See the steps to set impersonation rights on Exchange server.
- If you are using a global admin account to connect to the Exchange server, ensure that impersonation rights are set.
- Configure the throttling and message-size limits
- To create custom throttling policies and set maximum message size limits on the target Exchange server, follow the steps provided in the links below.
Steps to migrate from Shared mailbox to Exchange using EdbMails
Step 1: Download and install EdbMails application
- Download and install the EdbMails application on your computer running on Windows OS. Ensure you can connect to the target Exchange server computer.
- Start the application and enter the required details and click the ‘Login’ button or click the ‘Start Your Free Trial’ button to continue.
- Know more details on System requirements for Office 365 to Exchange migration.
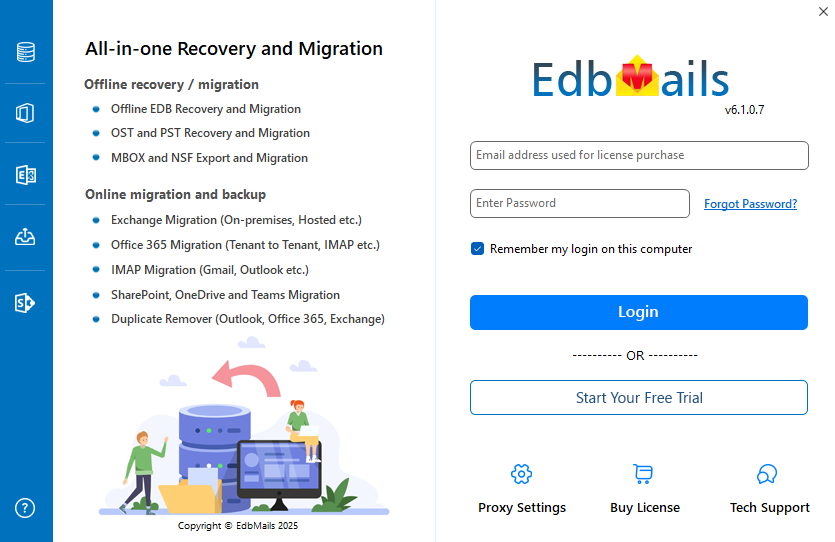
- Select the ‘Office 365 Migration’ option.
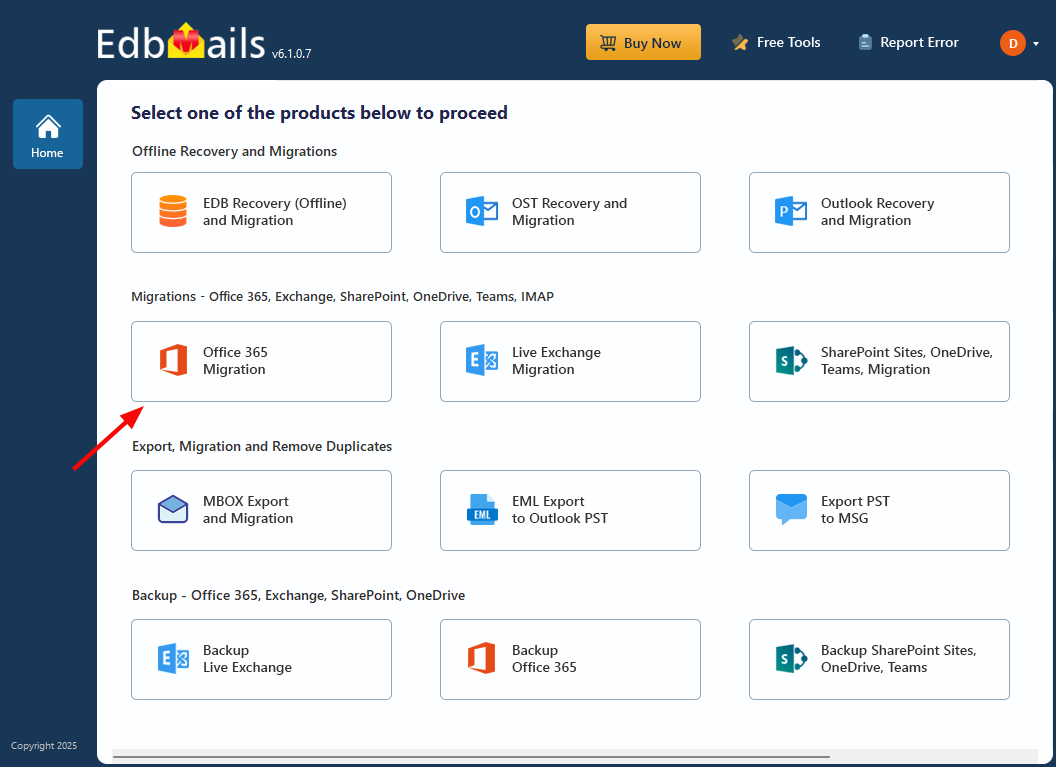
- Select ‘Office 365 to Live Exchange Migration’ option
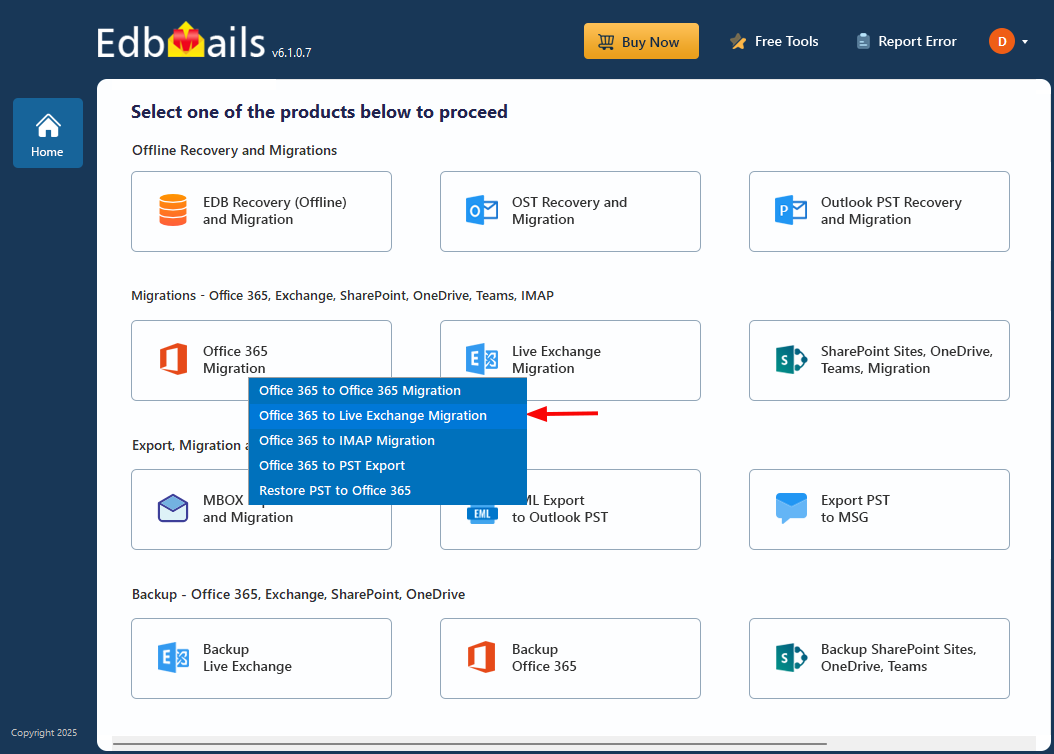
- You can either keep the default job name or click the 'New Job' button to rename it to one of your choice.
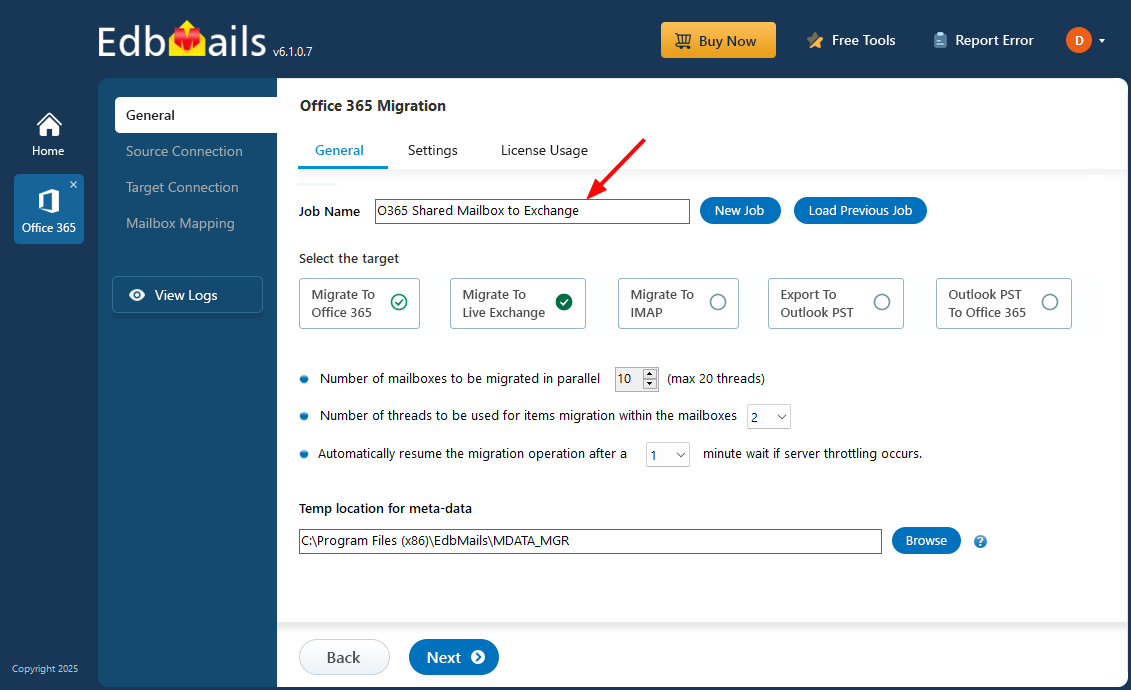
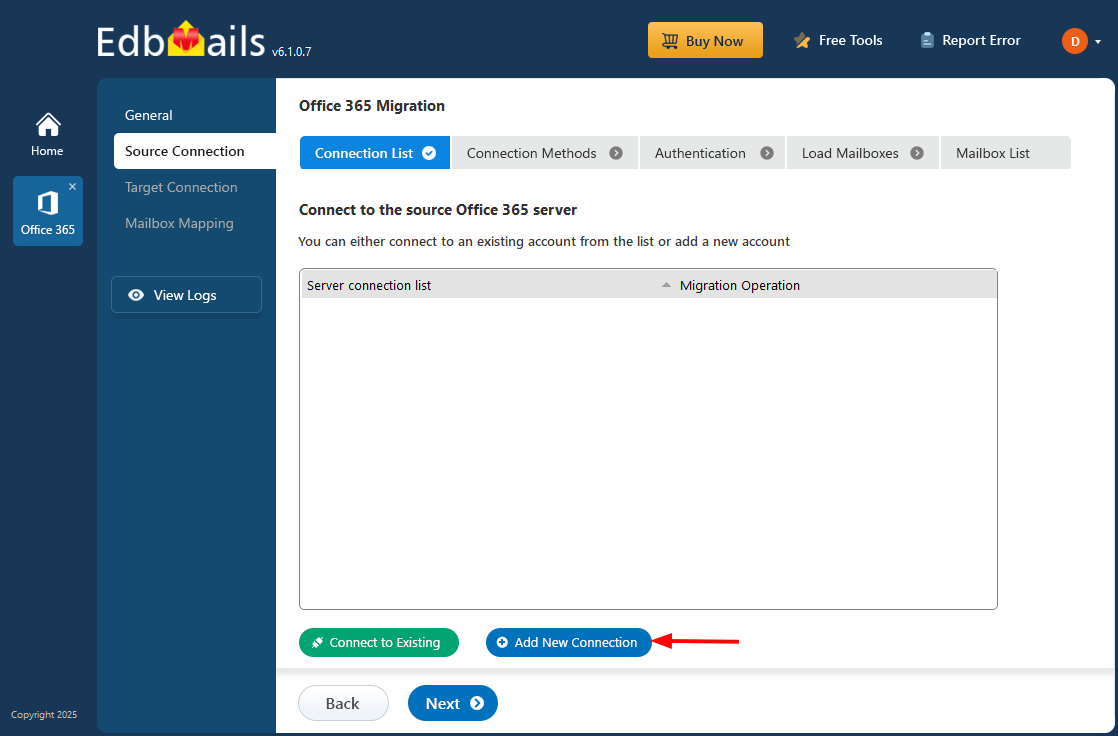
Step 2: Connect to the source Office 365 server
- Click the 'Add New Connection' button to establish a new connection to the source Office 365. If you want to use an existing connection, simply select it from the connection list and click the 'Connect to Existing' button to proceed.
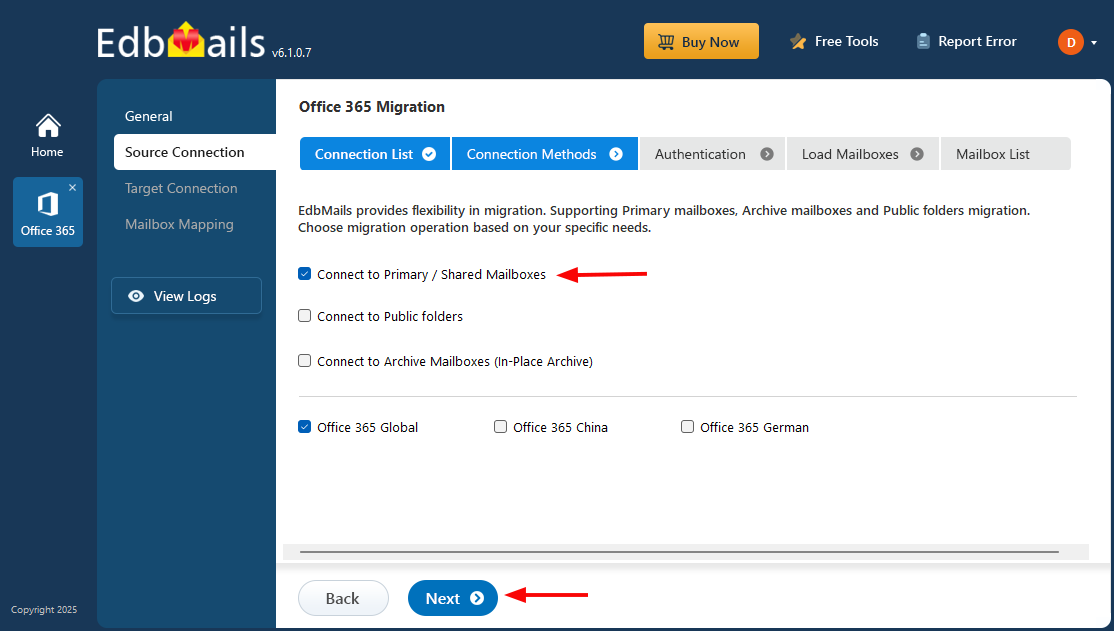
- Select the required connection options and click the 'Next' button to continue.
- Choose one of the methods for secure OAuth 2.0 based modern authentication
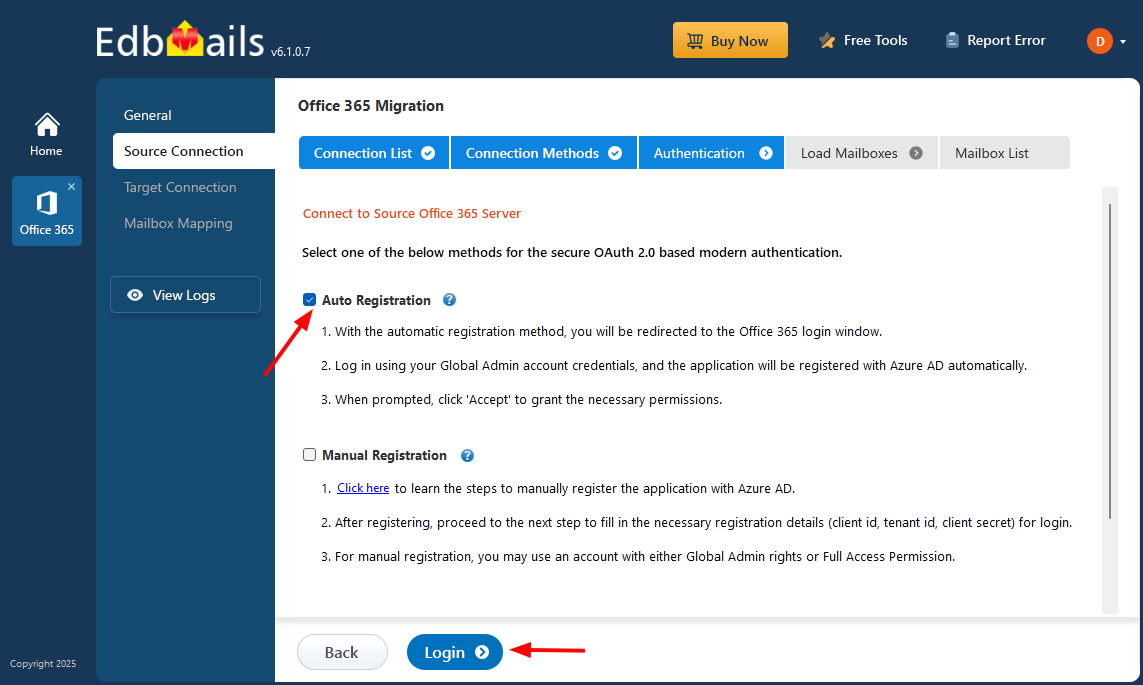
Connect to Office 365 server using secure modern authentication
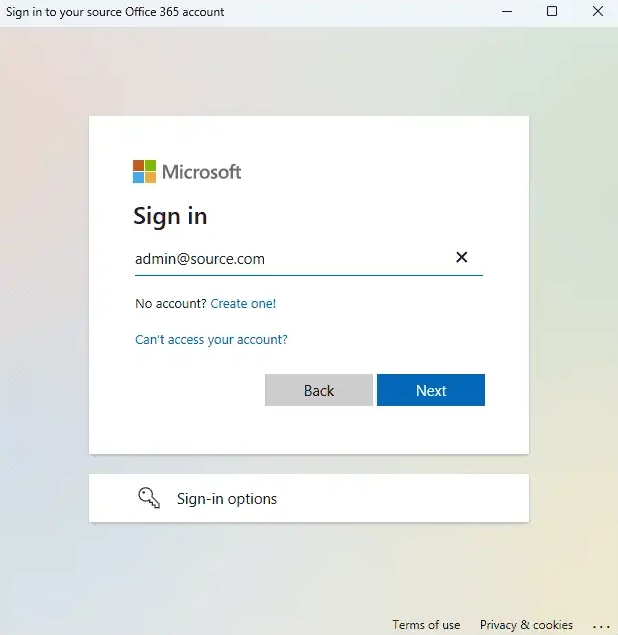
- Sign in on the Microsoft page for authentication.
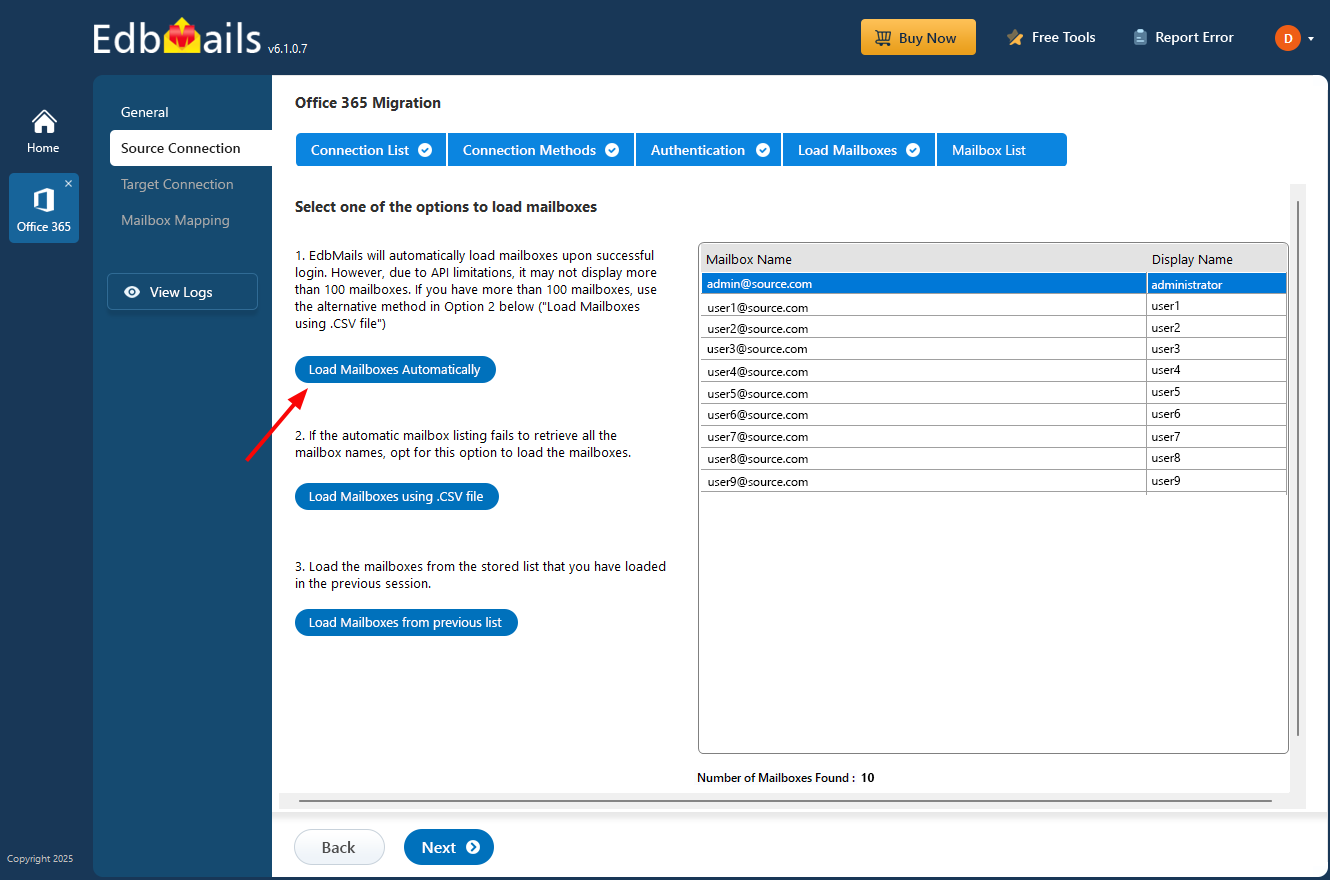
- After successfully connecting to your Office 365 server, select an option to load the shared mailboxes. Alternatively, you can also load the mailboxes using a CSV file.
- Click the 'Add New Connection' button to establish a new connection to the source Office 365. If you want to use an existing connection, simply select it from the connection list and click the 'Connect to Existing' button to proceed.
Step 3: Select source Office 365 shared mailboxes
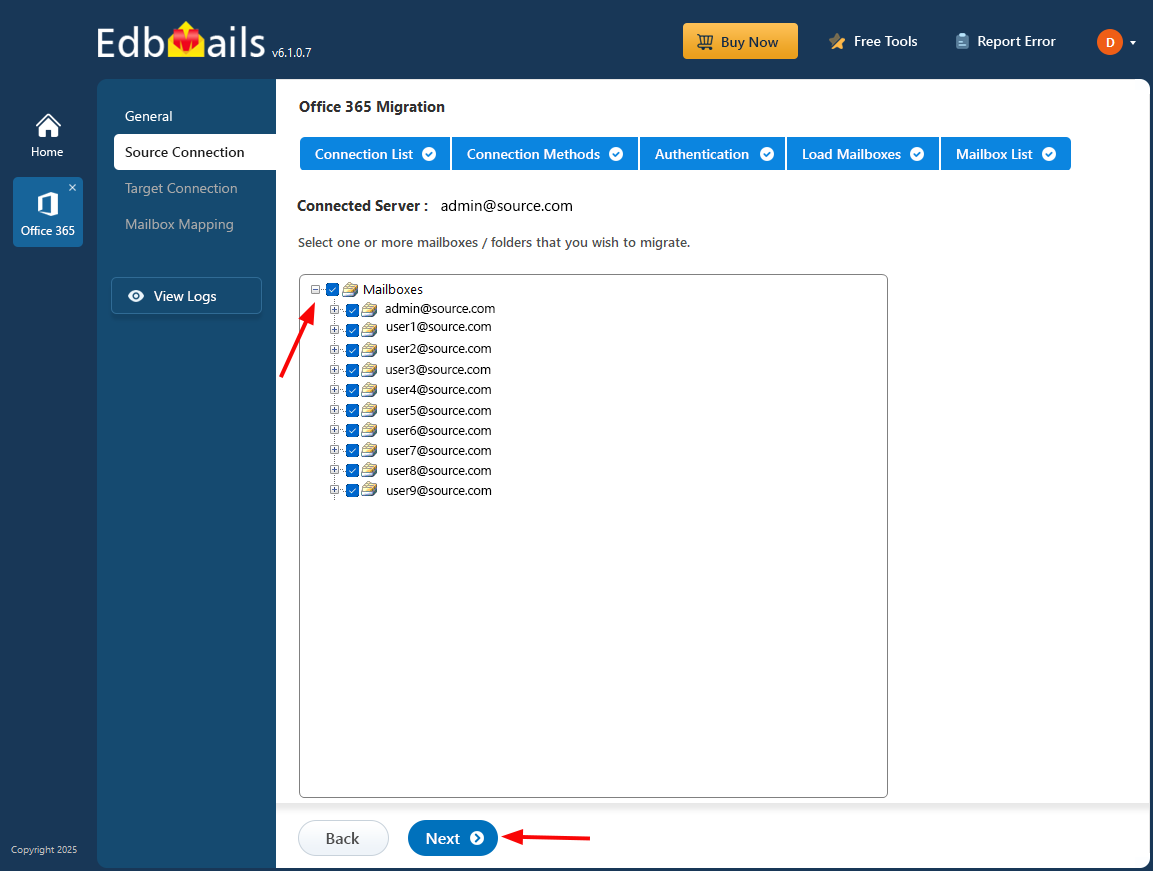
- Select the Shared mailboxes and folders from the left pane of the main migration window.
- Click ‘Next’ to set up the connection with the target Exchange server.
Step 4: Connect to the target Exchange server
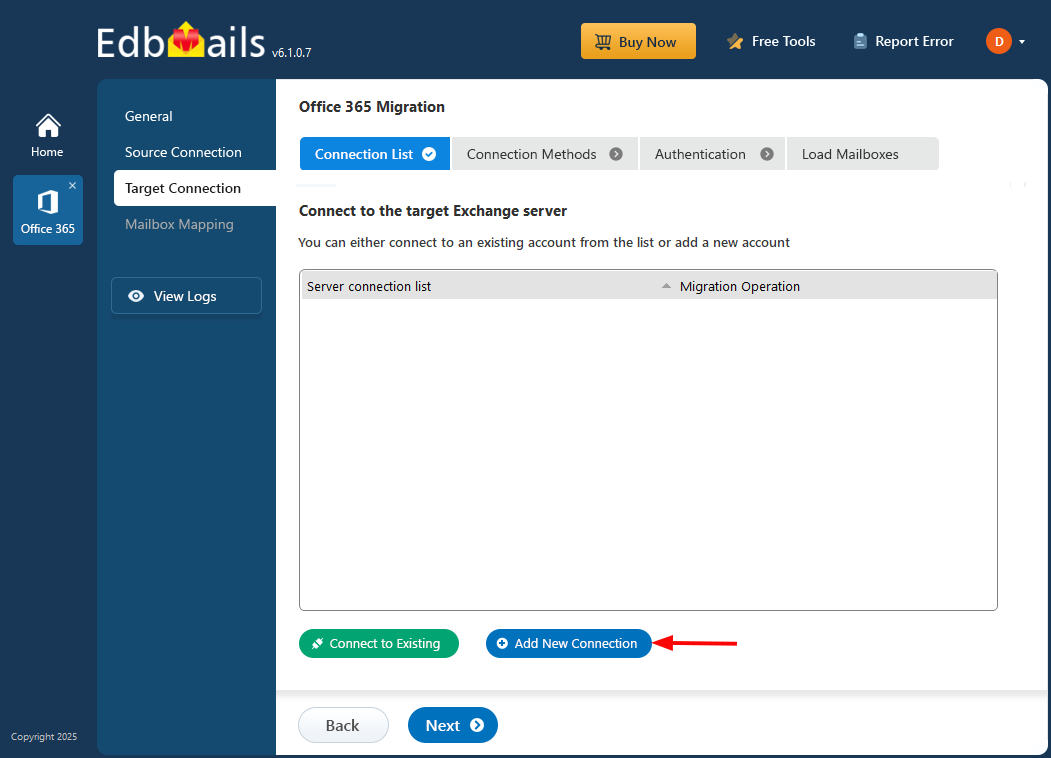
- Click the 'Add New Connection' button to create a new connection to the target Exchange server. If you prefer using an existing connection, select it from the connection list and click the 'Connect to Existing' button to proceed.
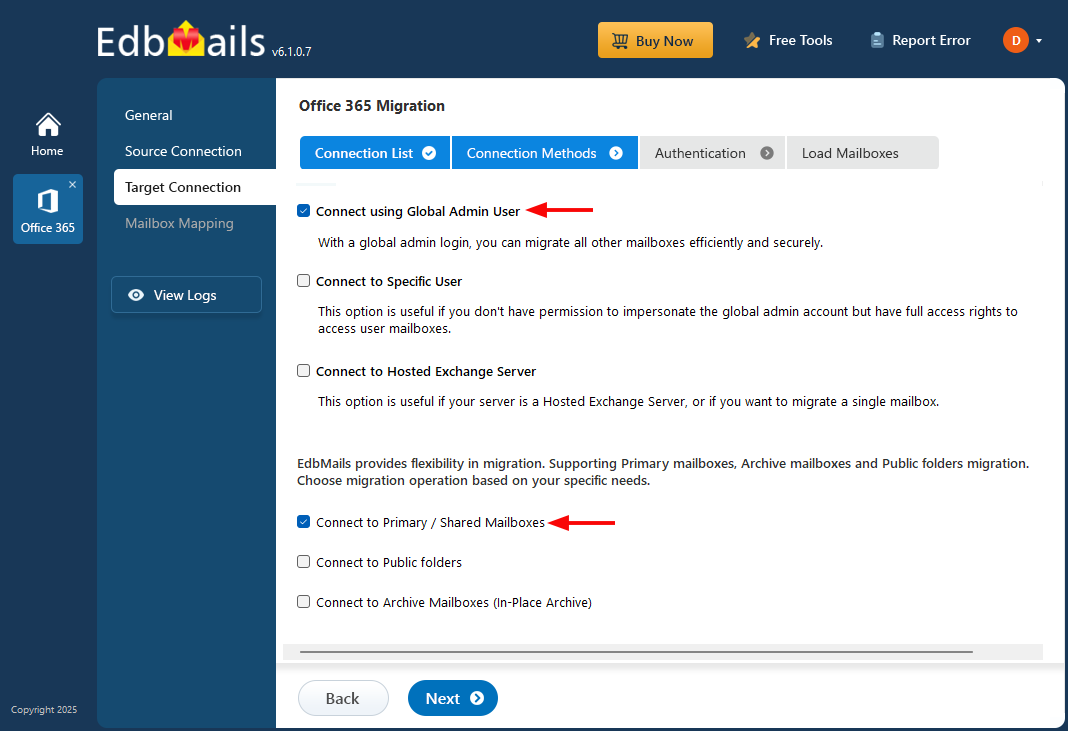
Different options to connect to Exchange server in EdbMails
Using EdbMails, you can migrate mailboxes, public folders, and archive mailboxes from Microsoft 365 to target Exchange server.
- Choose the desired connection options and click the 'Next' button to proceed.
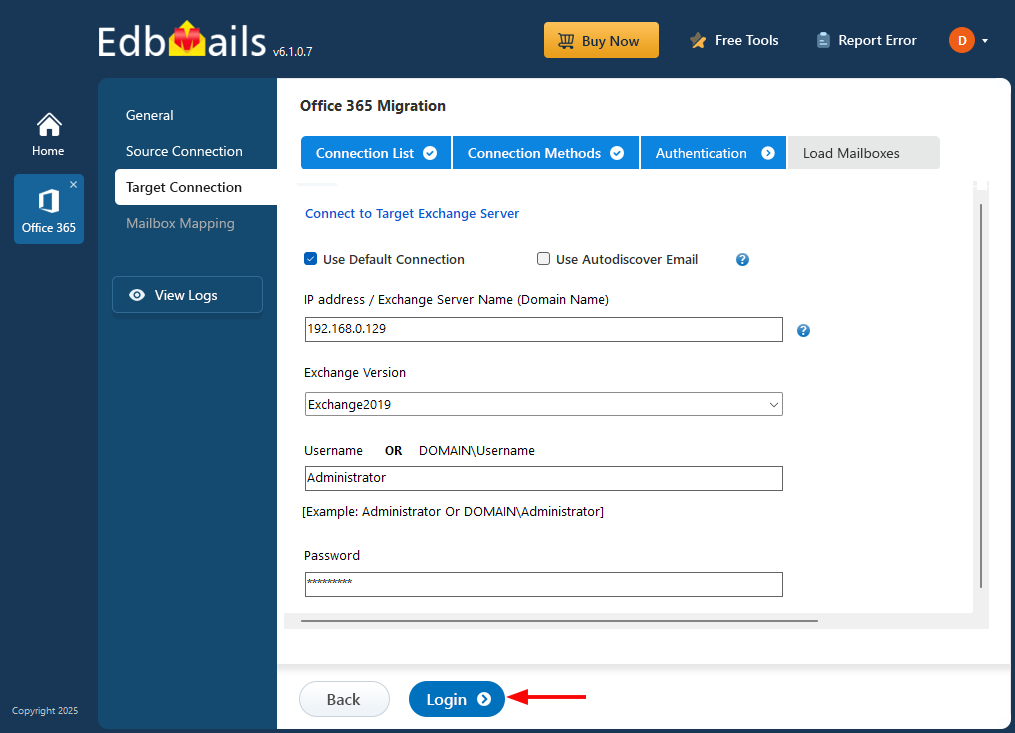
- Enter your target Exchange server details and then click the ‘Login’ button to proceed.
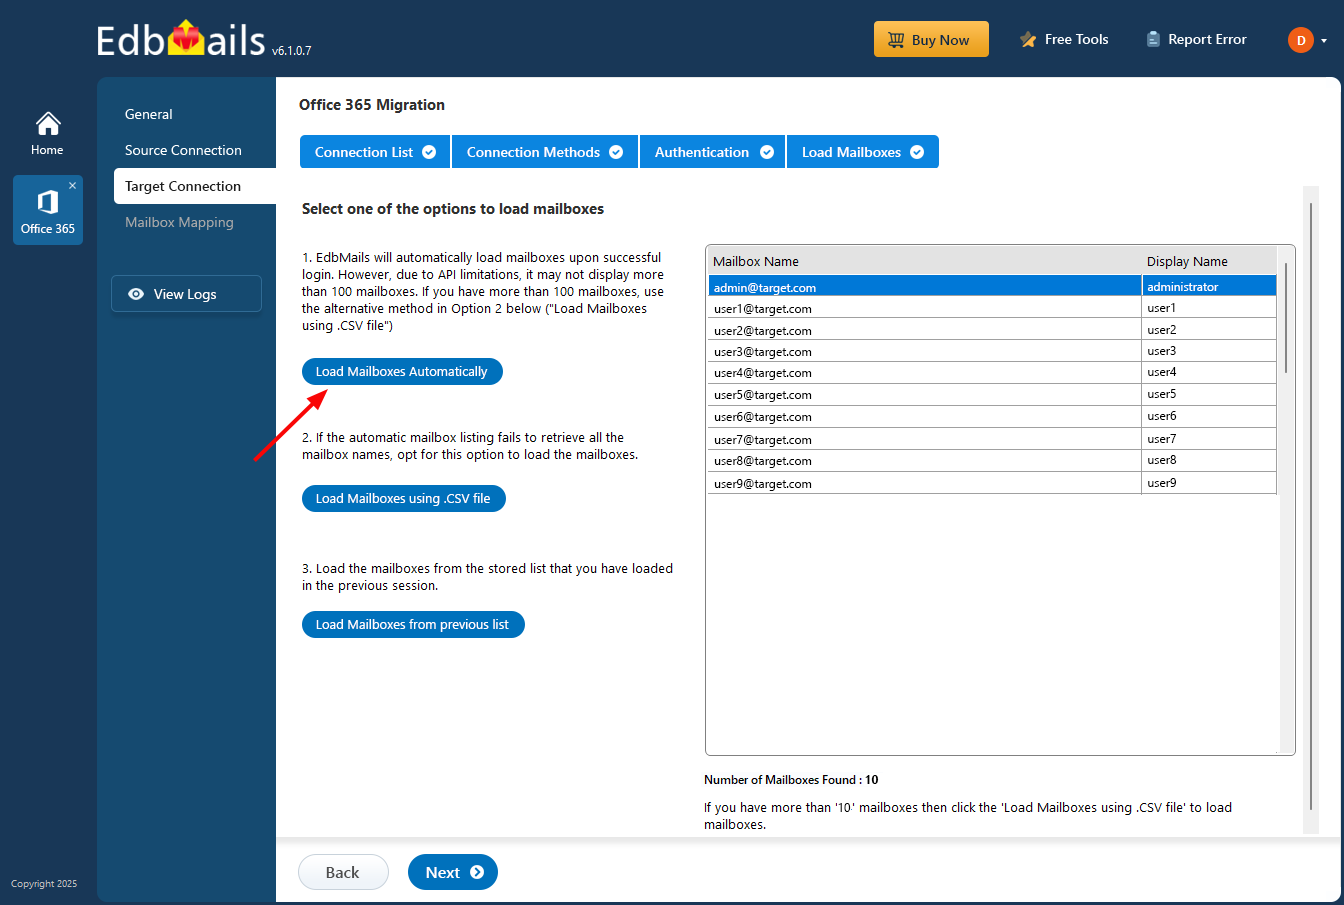
- Once you've successfully logged in to your, select the required option for loading the target Exchange server mailboxes.
- Click the 'Add New Connection' button to create a new connection to the target Exchange server. If you prefer using an existing connection, select it from the connection list and click the 'Connect to Existing' button to proceed.
Step 5: Map source and target mailboxes
- Select the appropriate option for mapping your mailboxes
- If you install EdbMails on your target Exchange server, you can choose to automatically create mailboxes on the target Exchange server.
Click here to know more about automatic mailbox creation.
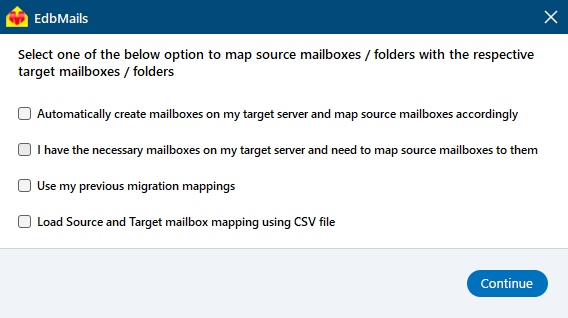
- EdbMails automatically maps shared mailboxes between the source Office 365 server and the target Exchange server. However, if needed, you can also manually map the shared mailboxes between the source and target servers.
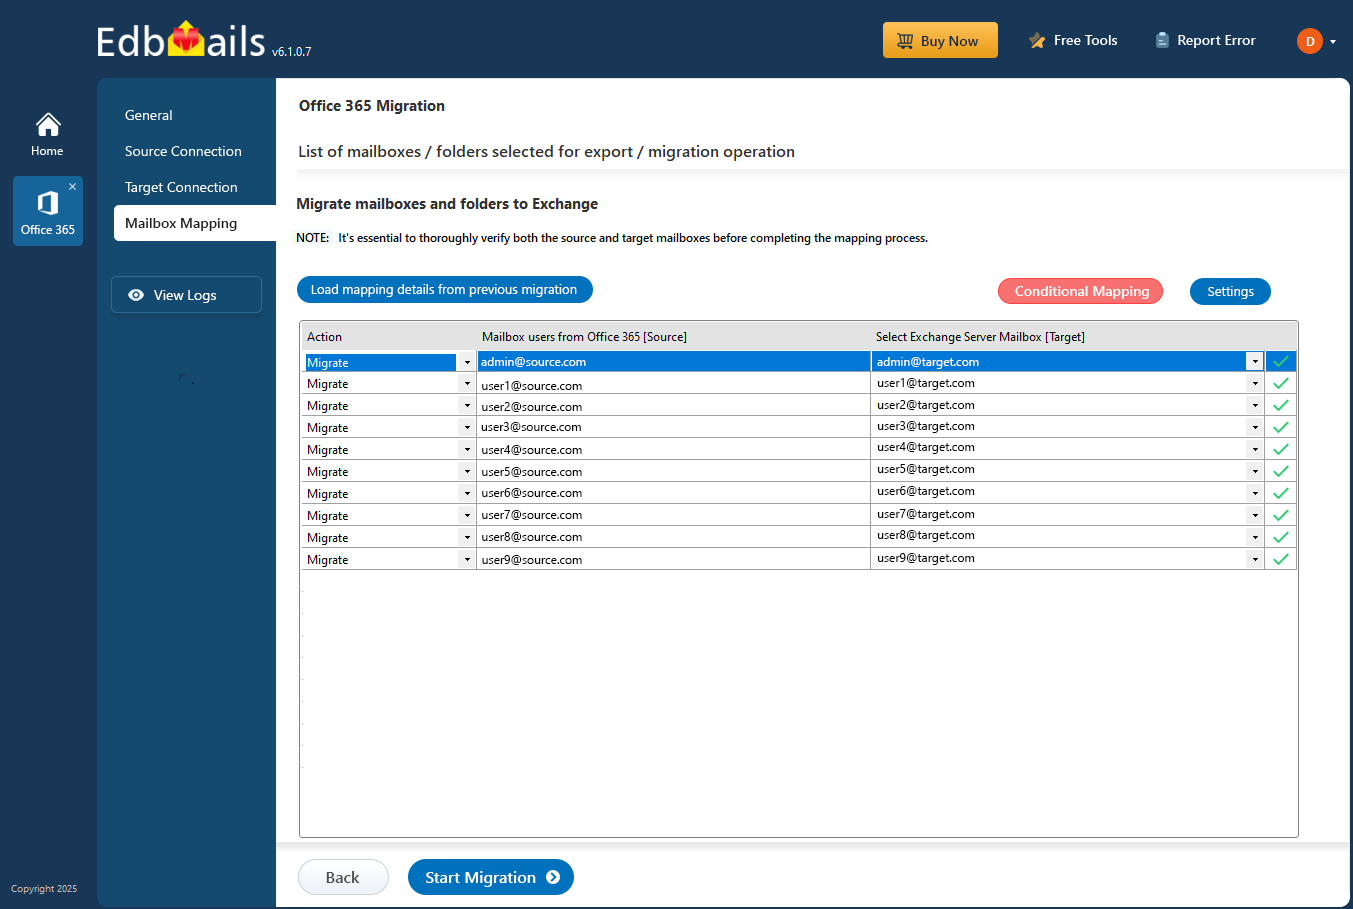
Step 6: Start Office 365 Shared mailbox to Exchange migration
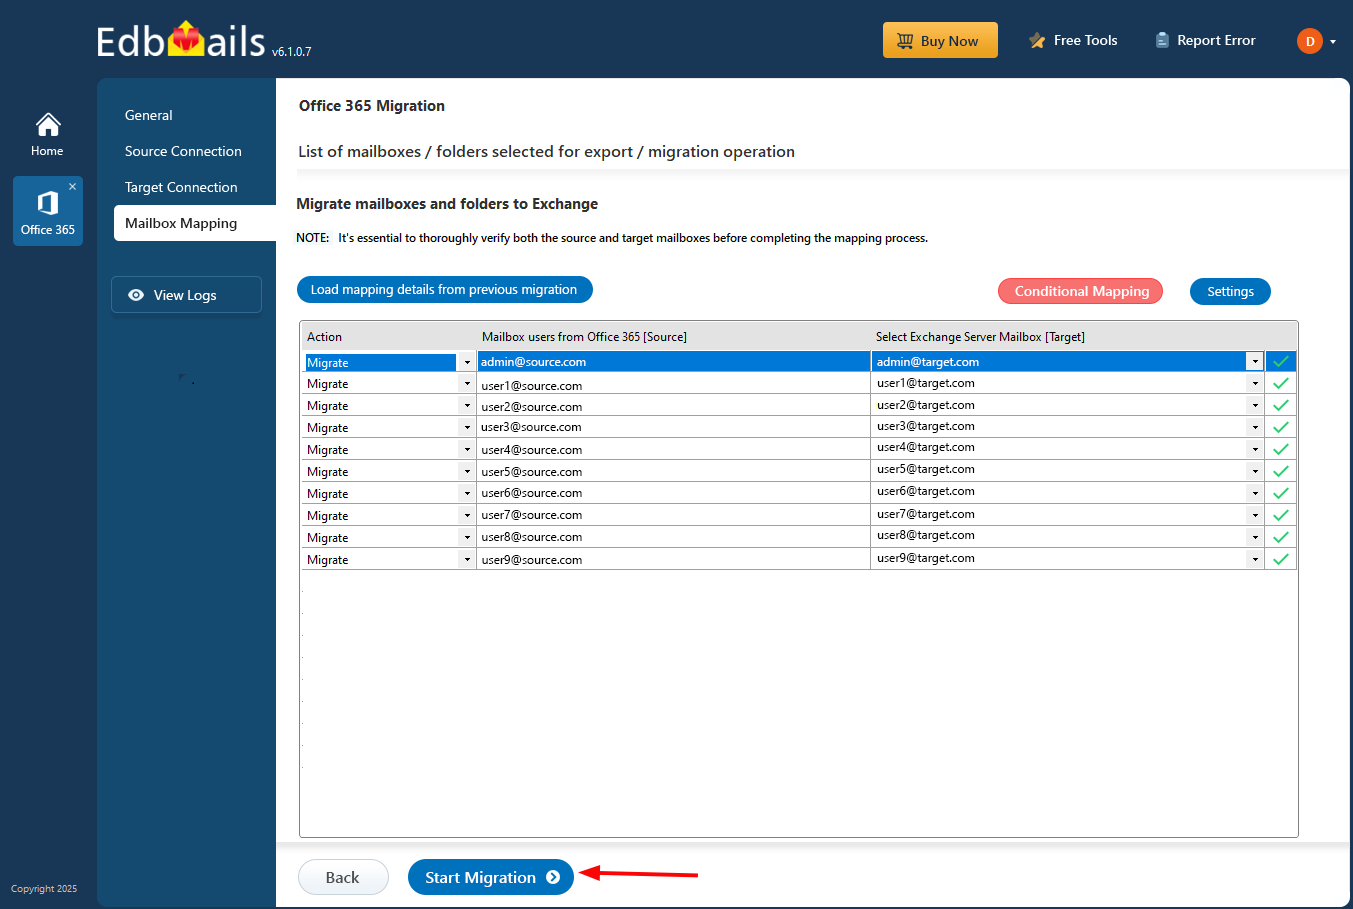
- After mapping the mailboxes, click the ‘Start Migration’ button to initiate the migration process.
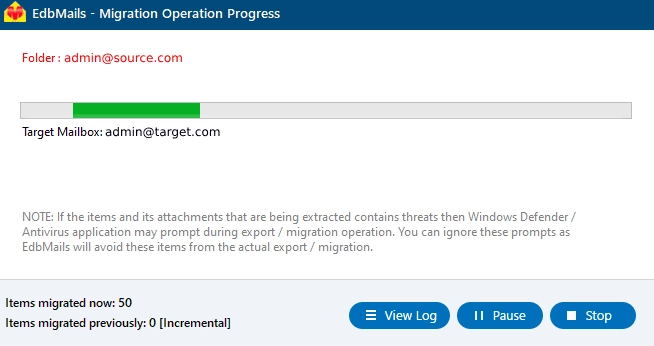
- You can track the progress of the Office 365 Shared mailbox to Exchange migration in real-time, with the ability to pause and resume the process as required. Once the migration is complete, a confirmation message will appear. Furthermore, you can verify the migrated folders and mailbox items using EdbMails' detailed text-based migration report.
- After mapping the mailboxes, click the ‘Start Migration’ button to initiate the migration process.
Office 365 Shared mailbox to Exchange post-migration tasks
Step 1: Update the MX records to point to the Exchange server
When receiving emails in Exchange it is necessary to update the MX record for emails to be delivered to the new server that has been migrated. The Autodiscover record also needs to be changed so Outlook is able to find the new mailboxes.
Step 2: Create a new Outlook profile for users in the new domain
- Ensure you have the latest Outlook version installed to avoid compatibility issues.
- Configure the Outlook profile for each user in your domain if Outlook has problems connecting to Office 365 mailboxes.
- Configure the new server settings, such as server address, username, and password in Outlook.
- Test email flow to confirm that users can send and receive emails.
Step 3: Remove the old Office 365 subscription plan
After the migration is successful and you have verified the data, remove the Office 365 subscription plan from the source and any domains associated if you no longer plan to use it.
Office 365 Shared mailbox to Exchange migration troubleshooting
See the troubleshooting solutions for Office 365 and Exchange migration. For more information related to EdbMails Office 365 migration, see frequently asked questions.

Advantages of EdbMails for Office 365 Shared mailbox to Exchange migration
- Secure migration
EdbMails is a totally secured migration as it uses OAuth 2.0 and TLS encryption to ensure that all your data is safe throughout the transfer. The enhanced security system used ensures that your sensitive data is never lost and it is kept in complete secrecy.
- Migrate everything from Office 365 mailboxes
All folders and sub folders of the mailboxes, mails, inbox rules, calendar, contacts, distribution groups, tasks, notes, journals are migrated by EdbMails. This entire migration assures that no essential information will remain back which keeps your business running.
- Automatically create target mailboxes
The EdbMails has the capability to create destination mailboxes on the Exchange without any manual intervention, and this reduces a lot of time. This process eliminates the possibility of errors and the migration can be a hassle free and speedy one without any delays.
- Advanced filtering options
EdbMails provide selective migration by using advanced filtering parameters like date range, subject and others. Therefore only the necessary data is migrated reducing the overall migration time and avoid excessive data migration.
- Automatic mailbox loading
Mailbox loading with EdbMails is entirely automated. If it could not find the all names while auto mailbox loading, you could use the 'Load Mailboxes using .CSV file' option.
- 24/7 free tech support
EdbMails offers 24x7 free technical support to support your organization during the migration process. All the problems occurred during migration can be resolved at the earliest thus the downtime for your organization can be minimized.