EdbMails EDB Recovery and Migration software
  • Products
    EdbMails
    All-in-one Recovery and Migration
    Explore our products
    • EDB recovery and Migration
    • OST, PST, MBOX, NSF, EML, MSG
    • Office 365, Exchange Migration
    • SharePoint, OneDrive & Teams
    • G Suite Migration
    • IMAP Migration
    • Duplicate Remover
    • Windows Data Recovery
    • Backup Solutions

    EDB Recovery and Migration

    EdbMails lets you recover corrupted, damaged, and offline Exchange EDB files, convert EDB mailboxes to PST format, and directly migrate mailbox data to Office 365 and live Exchange Server.

    EDB to PST
    Recover corrupted, damaged, offline EDB files and convert Exchange EDB mailboxes to PST file format
    Public Folder to Exchange
    Migrate public folders from an Exchange offline EDB file to live Exchange Server
    EDB to Live Exchange Migration
    Directly migrate offline Exchange database (EDB) files to live Exchange server
    Archive Mailbox to Office 365
    Migrate archive mailboxes from offline EDB files directly to Office 365
    EDB to Office 365 Migration
    Directly migrate offline Exchange database (EDB) files to Office 365
    Public Folder to Office 365
    Migrate public folders from an offline Exchange EDB file to Office 365

    OST, PST, MBOX, NSF, EML, MSG Export and Migration

    EdbMails lets you to recover OST and PST files, export OST, PST, MBOX, NSF, EML, and MSG files to PST files, and directly migrate OST, PST, MBOX, and NSF mailbox data to Office 365 and live Exchange Server.

    OST Recovery and Migration
    Recover offline OST files, convert OST to PST, and migrate OST to Office 365 and Exchange Server
    PST Recovery and Migration
    Recover Outlook PST files , Export PST to PST, migrate PST to Office 365 and Exchange Server
    MBOX Export and Migration
    Export MBOX to PST, migrate MBOX to Office 365 and Exchange Server
    NSF Export and Migration
    Export NSF to PST, migrate NSF to Office 365 and Exchange Server
    EML to PST Export
    Convert EML files to Outlook PST files
    PST to MSG Export
    Convert Outlook PST file to MSG file format
    MSG to PST Export
    Export MSG files to Outlook PST files

    Office 365, Exchange Migration

    EdbMails lets you securely migrate mailboxes across Microsoft 365, Exchange, Google Workspace (G Suite), and IMAP-supported servers such as Outlook, Gmail, Zimbra, Zoho Mail, and cPanel, ensuring zero downtime.

    Office 365 Migration
    Migrate between Office 365 tenants, Office 365 to Exchange, Office 365 to PST, PST files to Office 365.
    Exchange Migration
    Migrate between any Exchange Servers, Exchange to Office 365, Exchange to PST, PST files to Exchange.
    Tenant to Tenant Migration
    Migrate Mailboxes, Public Folders, Archive Mailboxes between Office 365 Tenants.
    Exchange to Office 365
    Migrate Mailboxes, Public Folders, Archive Mailboxes from live Exchange server to Office 365.
    Office 365 to IMAP
    Migrate Office 365 to IMAP, Office 365 to Gmail, Office 365 to Outlook, Office 365 to Zoho etc.
    Exchange to IMAP
    Migrate from live Exchange Server to IMAP servers such as Gmail, Outlook, and Zoho Mail.
    Public Folder to Office 365
    Migrate Public Folders between Office 365 tenants with complete folder hierarchy and mailbox data integrity.
    Exchange to PST
    Export live Exchange Server mailboxes, public folders, and archive mailboxes to Outlook PST files.

    SharePoint, OneDrive & Microsoft Teams Migration

    EdbMails lets you migrate SharePoint sites, OneDrive data, Microsoft Teams, teams, channels, chats, permissions, and documents between Microsoft 365 tenants while maintaining the existing folder structure and data integrity.

    SharePoint Online Migration
    Migrate documents, lists, files and folders from SharePoint sites.
    OneDrive for Business Migration
    Migrate documents, lists, files, folders, private chats from OneDrive.
    Microsoft Teams Migration
    Migrate Teams, chats, channels, documents, files and folders etc.

    Google Workspace / G Suite Migration

    EdbMails G Suite Migration Tool lets you easily migrate emails, calendars, contacts, tasks, and more from G Suite to Office 365, Exchange Server, and IMAP servers using a Google Admin account without requiring individual user credentials.

    G Suite Migration
    Migrate emails, calendars, contacts, tasks from G Suite to Office 365, G Suite to Exchange, G Suite to IMAP Servers
    G Suite to Office 365
    Migrate emails, calendars, contacts, tasks from Google Workspace / G Suite to Office 365
    G Suite to Exchange Server
    Migrate emails, calendars, contacts, tasks from Google Workspace / G Suite to on-Premise Exchange Server
    G Suite to IMAP
    Migrate emails, calendars, contacts, tasks from Google Workspace / G Suite to IMAP, Outlook, Zimbra, Zoho etc.

    IMAP Migration

    EdbMails IMAP Migration tool lets you easily migrate emails from IMAP servers such as Outlook, Gmail, Zoho Mail, Zimbra, cPanel, and more. Supports IMAP to IMAP, Office 365, Exchange Server, PST, and bulk PST to IMAP migration.

    IMAP Email Backup & Migration
    Backup and migrate emails from IMAP servers to PST, Office 365, and On-Premises Exchange Server
    IMAP to Office 365
    Migrate emails, folders, and attachments from IMAP servers to Office 365
    IMAP to Exchange
    Migrate emails, folders, and attachments from IMAP servers to on-premises Exchange Server
    IMAP to PST
    Export emails, folders, and attachments from IMAP servers to Outlook PST files for backup
    PST to IMAP
    Migrate emails, folders, and attachments from bulk PST files to IMAP servers

    Duplicate Remover

    EdbMails Duplicate Remover lets you easily remove duplicate items from Office 365 and Exchange Server, and from IMAP, Outlook, Gmail, Zimbra, Zoho Mail, etc., ensuring a clean and organized mailbox.

    Remove Duplicates
    Easily clean up your Office 365, Exchange, Outlook and IMAP accounts by removing duplicate emails.
    Remove Duplicates from Office 365
    Remove duplicate emails, calendars, contacts, journal tasks, etc. from Office 365.
    Remove Duplicates from Exchange Server
    Remove duplicate emails, calendars, contacts, journal tasks, etc. from live Exchange Server.
    Remove Duplicates from IMAP, Outlook
    Remove duplicate emails, attachments from IMAP, Outlook, Gmail, Zimbra, Zoho Mail etc.

    Exchange, SharePoint, OneDrive, Teams and Office 365 Backup

    EdbMails enables secure, automated backup and recovery for Microsoft 365 services including Exchange Online, SharePoint, OneDrive, Teams, and Live Exchange Server with complete data protection and restore flexibility.

    Office 365 Backup
    Incremental, Granular, Encrypted and Compressed Office 365 Mailboxes Backup
    Exchange Server Backup
    Incremental, Granular, Encrypted and Compressed Exchange Mailboxes Backup
    SharePoint, OneDrive & Teams Backup
    Backup Online site collections, Team sites, Office 365 groups, all documents etc.

    Windows Data Recovery

    EdbMails Windows Data Recovery Software lets you recover permanently deleted data, including photos, videos, documents, and archived files, from partitions on hard drives, SSDs, USB drives, SD cards, and external storage devices.

    Windows Data Recovery
    Recover and restore permanently deleted data from hard drives, SSDs, USB drives, SD cards, and etc.
    Whitepaper
    Request a Demo
    Sign Up
  • Features
  • FAQ
  • Pricing
  • Download
  • Support
  • Sign in
User’s Manual
Office 365 Migration

User Manual

User Manual

  • Office 365 Migration Overview
  • Initial setup
  • System Requirements
  • Migration Scenarios
  • Software Setup
    • EdbMails Installation Process
    • Upgrading the Software
    • How to uninstall
    • Reinstallation
  • Understanding the Application
    • Software's Main Components
    • Understanding the Migration
  • FAQ
    • General
    • Migration Free Trial / Demo
    • Migration License
    • Before Migration
    • Migration - Steps
    • After Migration
  • Videos
    • Office 365 to Office 365
    • Office 365 to Exchange
    • Office 365 to IMAP
    • Office 365 to PST
    • Public Folder to Office 365
    • Archive Mailbox to Office 365
    • Public Folder to Exchange
    • Archive Mailbox to Exchange
    • Restore Bulk PST files to Office 365
    • Automatically Create Office 365
    • Export Office 365 user to CSV file
  • Screenshots
    • Office 365 to Office 365
    • Office 365 to Exchange
    • Office 365 to PST
    • Office 365 to IMAP
  • How it works?
    • Office 365 to Office 365
    • Office 365 to Exchange
    • Office 365 to IMAP
    • Office 365 to PST
    • Public Folder to Office 365
    • Public Folder to Exchange
    • Public Folder to Shared Mailbox
    • Archive Mailbox to Office 365
    • Archive Mailbox to Exchange
    • Office 365 to Hosted Exchange
    • Multiple PST to Office 365
    • Office 365 to Gmail Migration
    • Office 365 Shared mailbox to Exchange
    • Office 365 Public folders to PST
    • Office 365 archive mailbox to PST
    • Office 365 Shared mailbox to PST
    • Office 365 shared mailbox to Public folder
    • Office 365 Archive mailbox to Shared mailbox
    • Office 365 Shared mailbox to Archive mailbox
    • Office 365 to Zoho migration
    • Office 365 group mailbox to shared mailbox
    • Shared mailbox to Office 365 Groups mailbox
    • Office 365 Groups mailbox to Regular mailbox
  • Connect to source Office 365
  • Connect to target Office 365
  • Modern Authentication Using OAuth 2.0
    • Microsoft 365 modern authentication
    • Automatic Registration
    • Manual Registration
  • Connect to Exchange server
  • Knowledge Base
    • Migrate between Office 365 tenants
    • Migrate Office 365 mailbox
    • Public folder migration
    • Office 365 to Exchange Migration
    • Office 365 Migration with same Domain
    • Office 365 Group Migration
    • Selective Mailbox Migration
    • Migration to Exchange 2007, 2010, 2013, 2016 and 2019
    • User-Defined Mailbox/Folder Mapping
    • Export Office 365 users to CSV
    • GoDaddy to Microsoft 365 migration
    • Rackspace to Office 365 migration
    • Office 365 migration methods
    • Office 365 migration checklist
    • Migrate Shared mailbox to Office 365
    • Office 365 migration best practices
    • Office 365 migration challenges
    • Convert shared mailbox to regular mailbox
    • Office 365 to Exchange 2019 migration
    • Office 365 multiple mailbox migration
    • Office 365 Server to Server Migration
    • Cross-Tenant Office 365 migration
    • EWS throttling in Exchange Online
    • Office 365 migration common use cases and solutions
    • Language settings on Office 365 Server
    • Office 365 to iCloud migration
    • Office 365 to Yahoo Mail migration
    • Microsoft 365 sign-in issue
    • Batch create Outlook profiles Intune
  • Set Office 365 Impersonation rights
    • Using PowerShell commands
    • Using Office 365 GUI
  • Migration Types
    • Cutover Migration
    • Staged Migration
  • Set Exchange Server Impersonation rights
  • Map the Mailboxes
  • Migration Walkthrough
    • Office 365 tenant to tenant migration
    • Office 365 to Exchange migration
    • Office 365 to PST Export
  • Multifactor Authentication
    • Enable MFA in Office 365
    • Create App password for MFA
    • Disable Security Defaults
  1. Home
  2. Product
  3. How to migrate Office 365 Public folders to Exchange server?
Download Buy Now

Office 365 Public Folder to Exchange Migration

Office 365 Public folder to Exchange migration comes up when businesses are dealing with infrastructure upgrades, consolidation of email systems, or staying compliant with organizational policies. Organizations shift from Office 365 to on-premises or hosted Exchange environments when they want better data control, reduced costs, or to meet regulatory requirements. EdbMails Office 365 migration tool steps in here, giving IT teams a straightforward way to handle Public folder migration with these needs effectively. Folder data, mail items and permissions all move across to the target Exchange server — no PowerShell scripts, manual procedures. Key features include incremental migration, automatic mapping of source and target public folders, and detailed migration log reports — everything an IT administrator needs to move Public folders across to Exchange 2019, 2016, 2013, 2010, and Hosted Exchange servers.

The following sections cover migration planning, pre-migration requirements, and the steps to migrate Office 365 Public folders to a live Exchange server using EdbMails.
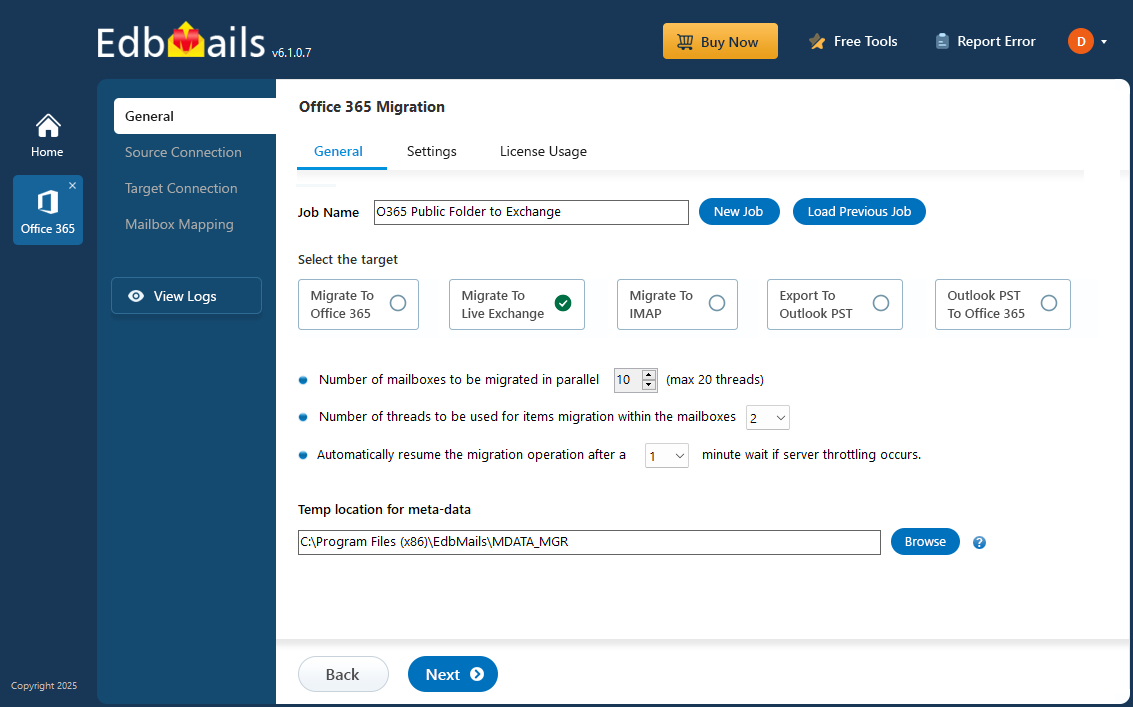
Office 365 Public folder to Exchange migration

  1. Planning a Public Folder Migration to Exchange Server

    Jumping straight into a Public folder migration from Exchange Online to an on-premises Exchange server without any prerequisites is where most teams run into trouble. A quick checklist of items to identify and prepare your environments.

    1. Identify the size and number of Public folders you want to migrate
    2. The Exchange server should be installed, and the target environment should be prepared before migration.
    3. Public folders on the target server need to exist and be mail-enabled.
    4. Determine whether you want to move everything at once or in stages.
    5. Your internet speed and network setup can make or break a migration — check both.
    6. Decide if you plan to move Public folders to Public folders, primary mailboxes, or Shared mailboxes.
    7. Communicate the plan and the changes to your end users.
    8. Always run a test migration first. Never go straight into the real thing.
    9. Start the migration, verify the endpoint and add DNS records.
    10. Create new Outlook profiles and check if you are receiving mails correctly.
  2. Office 365 Public Folder to Exchange Migration: Pre-Migration Activities

    • Step 1: Make sure the following are in place on the Office 365 side before you do anything else:
      1. Ensure that you have a global admin account that has an active mailbox — this is what the Manual registration method uses to connect to the source Office 365 server.
      2. The admin user also needs the right Public folder permissions assigned to their account. See the steps to assign the required permissions to the admin user
      3. Ensure the required network and bandwidth are available for the migration. See performance factors and best practices for Office 365 Public folder migration.
    • Step 2: Check that your system meets the Exchange server setup requirements.

      The links below cover what you need to know about network, hardware, and operating system requirements for whichever Exchange version you're migrating to.

      Note: Exchange 2010 hit end of support on October 13, 2020 and Exchange 2013 followed on April 11, 2023. If you're still on either of these, moving your mail data and Public folders to Exchange 2016 or 2019 is strongly advisable at this point.

      • Network and directory requirement for Exchange 2019
      • Network and directory requirement for Exchange 2016
      • Hardware Requirements for Exchange 2019
      • Hardware Requirements for Exchange 2016
      • Supported operating systems for Exchange 2019
      • Supported operating systems for Exchange 2016
    • Step 3: Prepare your target system before you start the Exchange server installation.

      Work through the prerequisites below for Active Directory, Windows Mailbox server, and Windows Edge Transport servers — these need to be sorted out before you actually install Exchange.

      • Exchange 2019 prerequisites for preparing Active Directory (AD)
      • Windows Server prerequisites for Exchange 2019
      • Exchange 2016 prerequisites for preparing Active Directory (AD)
      • Windows Server prerequisites for Exchange 2016
    • Step 4: Setup Exchange Server for Migration

      Below are the key things to take care of when installing and getting the Exchange server ready for migration.

      1. Prepare AD and domains
        1. The Active Directory forest and its domains need to be prepped for the new Exchange version before anything gets installed.
        2. If a separate team looks after your Active Directory schema, you need to first extend the Active Directory schema — otherwise, jump straight to preparing Active Directory.
        3. Running multiple domains? You'll also need to go through preparing the Active Directory domains as an additional step.
      2. Install Exchange server on your computer

        Double-check that your system meets the requirements and prerequisites covered in the earlier steps. Once that's confirmed, use the setup wizard to install Exchange 2016 or install Exchange 2019, depending on your target version.

      3. Prepare a clean Exchange target environment
        • Set up and configure a Send connector so the Exchange organization can send mail outside its boundaries.
        • Exchange sets up receive connectors on its own when the mailbox server gets installed — but if your setup needs something specific, here's how to configure receive connectors manually.
        • Add accepted domains so recipients can send and receive email across different domains.
        • Set up the default email address policy to push the accepted domain out to every recipient in the organization.
        • Configure external URLs (domains) on the virtual directories in the Client Access (frontend) services on the Mailbox server to allow clients to connect to your server from the internet (outside the organization's network).
        • Configure internal URLs on the virtual directories in the Client Access (frontend) services on the Mailbox server to allow clients to connect to your server from the internal network.
        • Get your SSL certificates configured from a third-party certificate authority — this covers services like Outlook Anywhere and Exchange ActiveSync.
        • Once everything's in place, verify the Exchange server installation by running Get-ExchangeServer in the Exchange Management Shell (EMS).
      4. Create Public Folders on the Exchange Server

        Get the Public folders created on the target server first, then assign the admin permissions needed to manage them.

         Steps to create Public folder in Exchange server

      5. Assign Management Roles to the Admin Account

        If you're connecting to the Exchange server through a global admin account, impersonation rights need to be set up before things will work properly.

        See the steps to set impersonation rights on Exchange server

      6. Configure the Throttling and Message-Size Limits

        Before the migration runs, it's worth setting up custom throttling policies and maximum message size limits on the target Exchange server. The links below walk through both:

        • Custom EWS throttling settings on Exchange server
        • Change message size limits on Exchange
  3. Steps to migrate Public folders from Office 365 to Exchange

    1. Step 1: Download and install EdbMails software

      • Download EdbMails and install EdbMails application on a computer running Windows OS.

          Explore the full System requirements for EdbMails Office 365 migration.

      • Enter the appropriate details and click ‘Login’ or click ‘Start Your Free Trial’
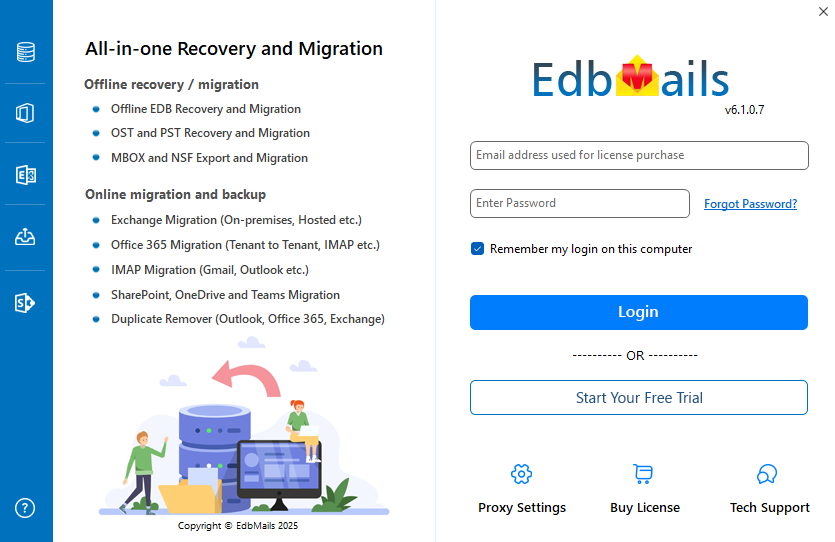
        Launch EdbMails software application

    2. Step 2: Select ‘Office 365 to Live Exchange migration’ operation

      • Select the 'Office 365 Migration' option.
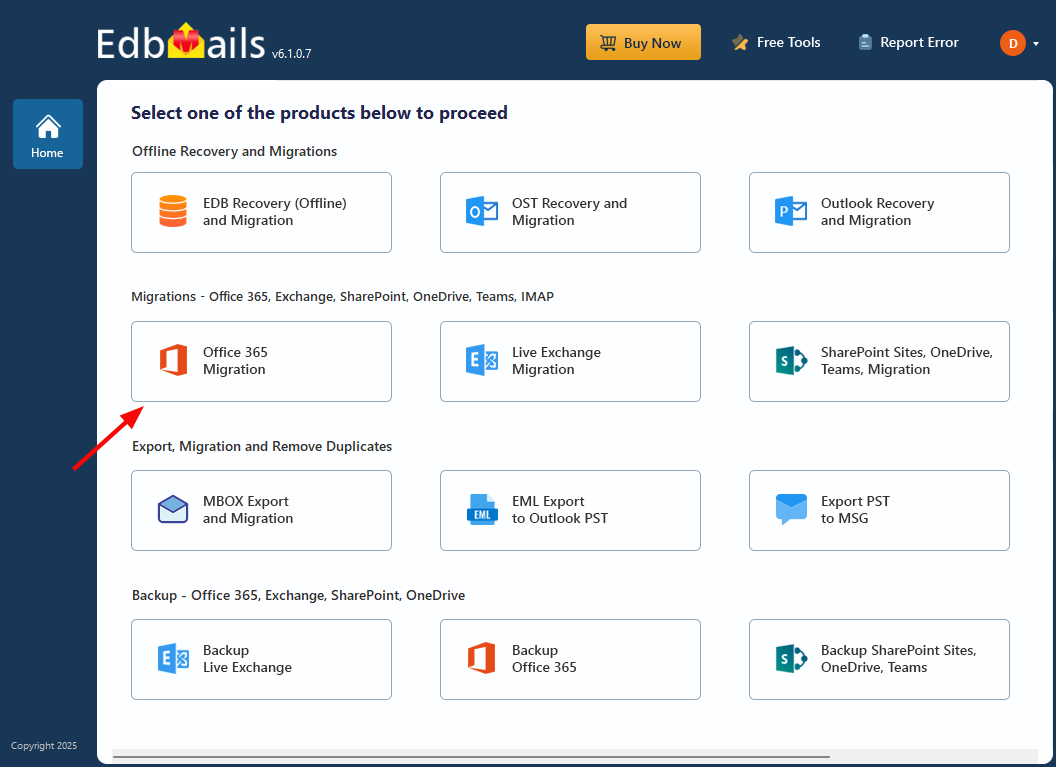
        Select the Office 365 migration option

      • Choose the 'Office 365 to Live Exchange Migration' option..
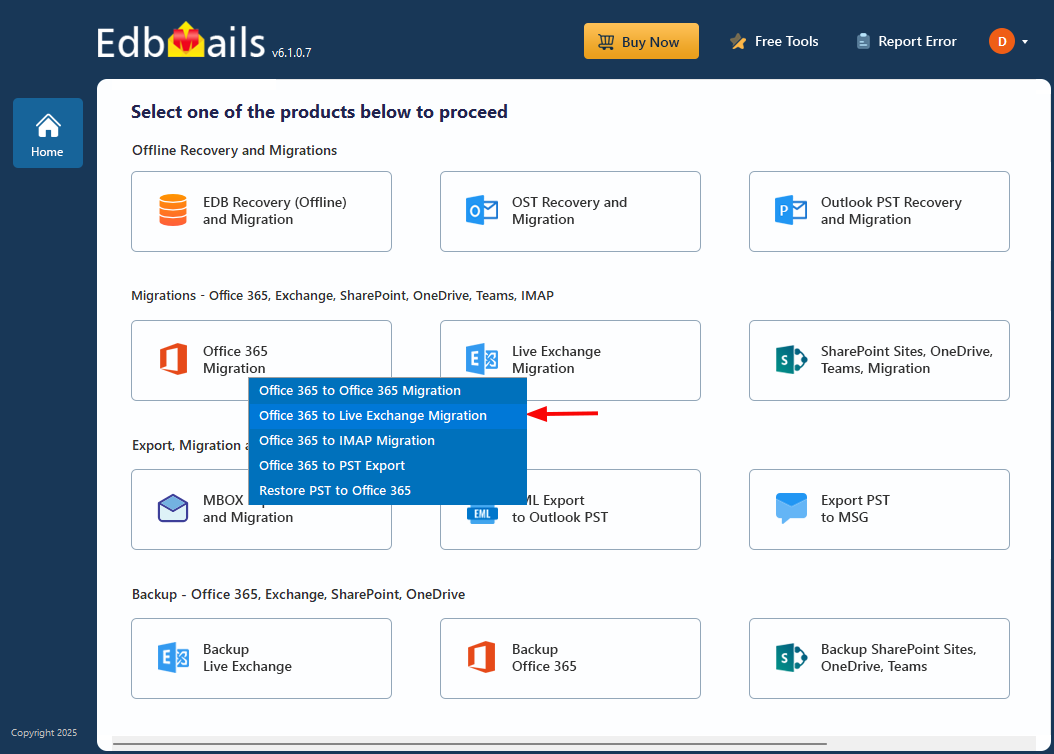
        Select the Office 365 to Live Exchange migration option

      • Keep the default job name or type your own, then click 'Next.'
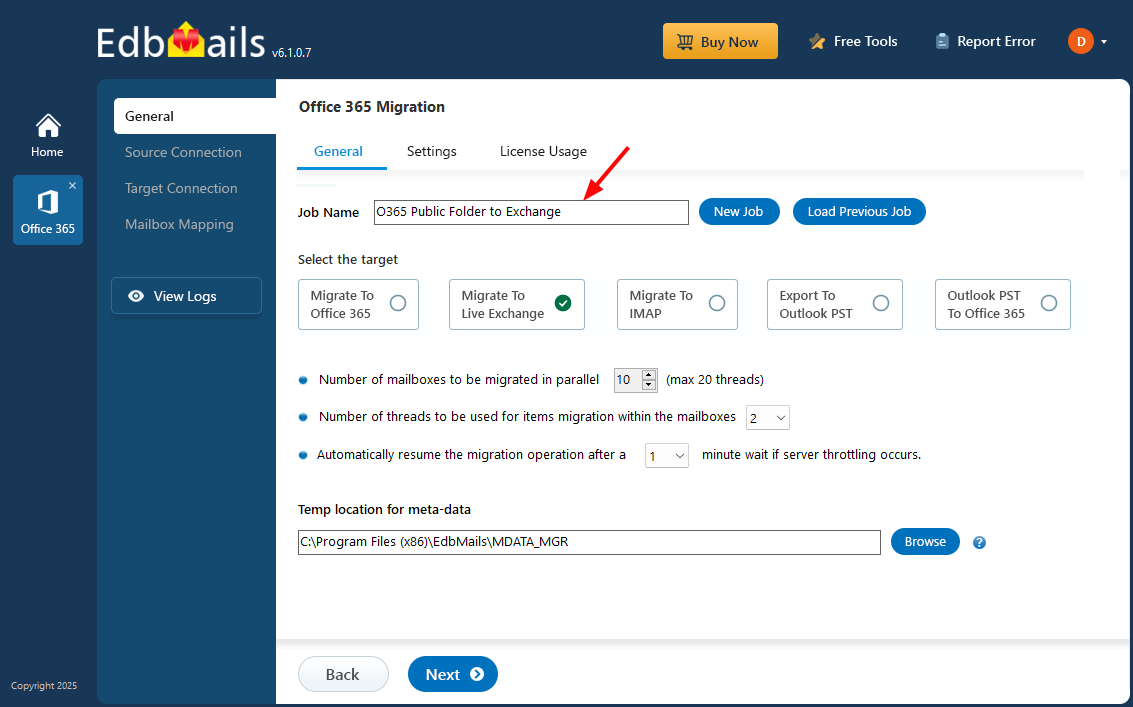
        Enter public folder to Exchange job name

    3. Step 3: Connect to source Office 365 server

      • Click ‘Add New Connection’ to set up a new connection to the source Office 365 account. To use an existing connection, select it from the list and click ‘Connect to Existing’ to proceed.
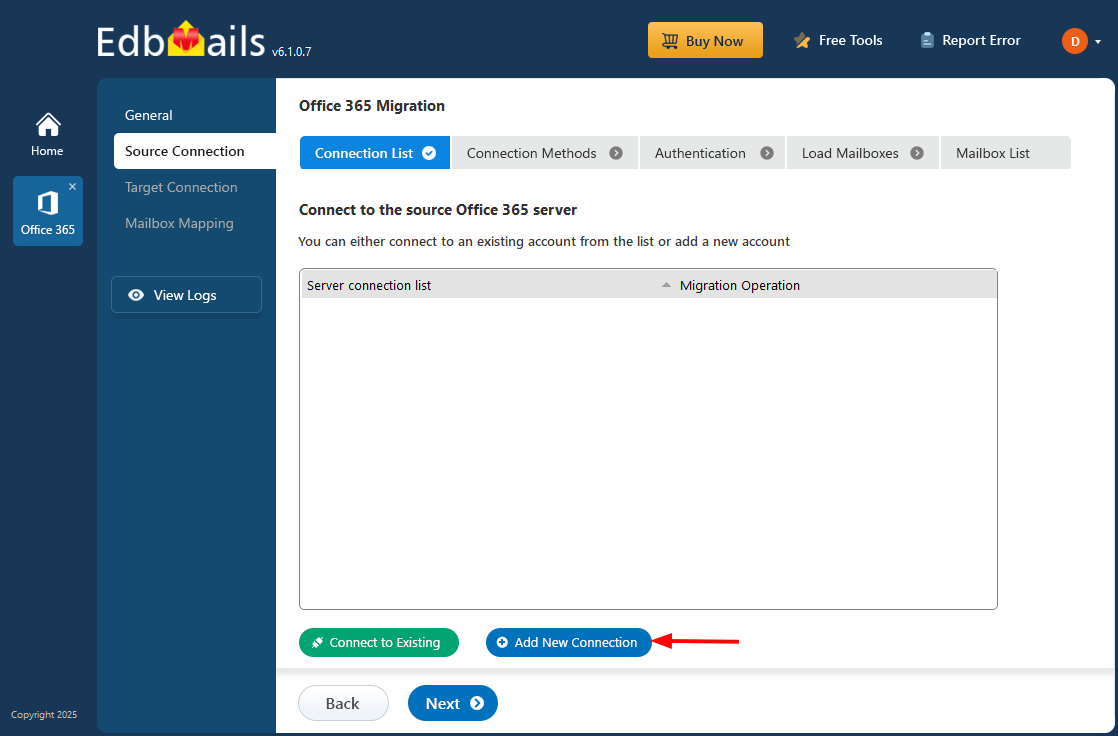
        Click add new connection

      • Select ‘Connect to Public Folders’ and click ‘Next’ to continue.
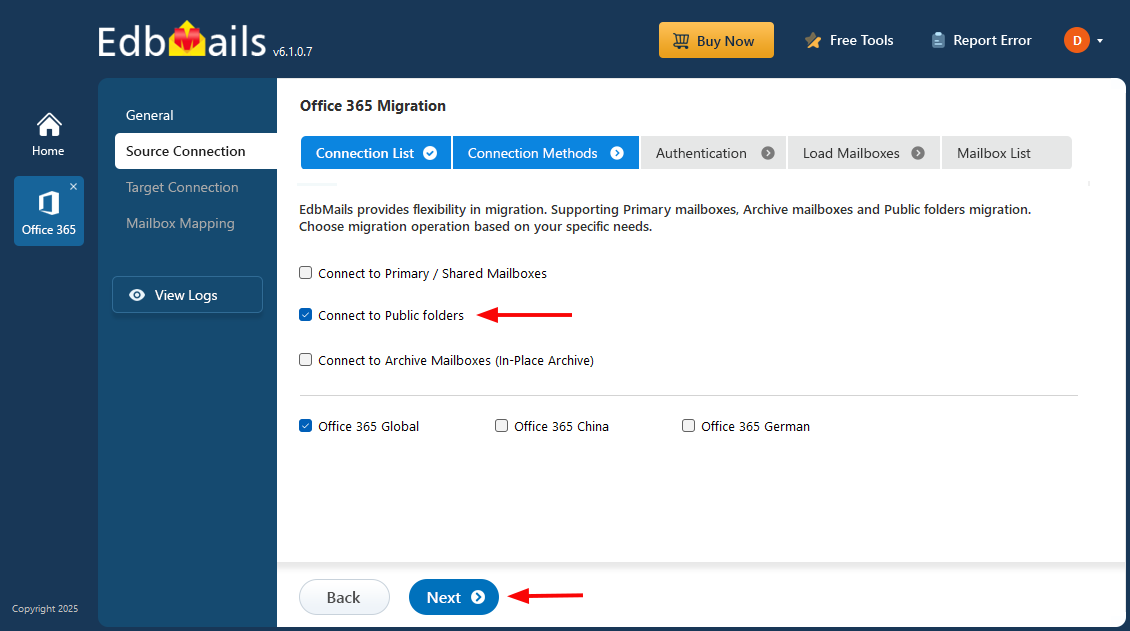
        Connect to public folders

      • Choose one of the methods for secure OAuth 2.0 authentication and click the ‘Login’ button to proceed.
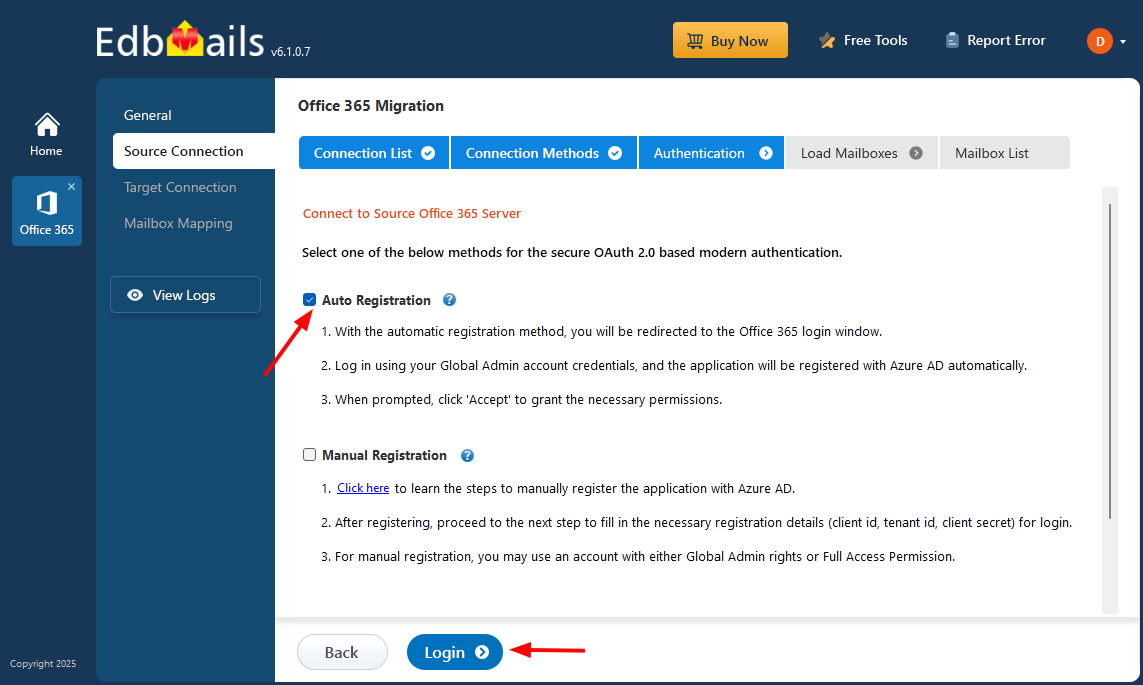
        Connect to source Office 365 server

      • Connect to Office 365 server using secure modern authentication

         Sign in on the Microsoft authentication page using a global admin account.
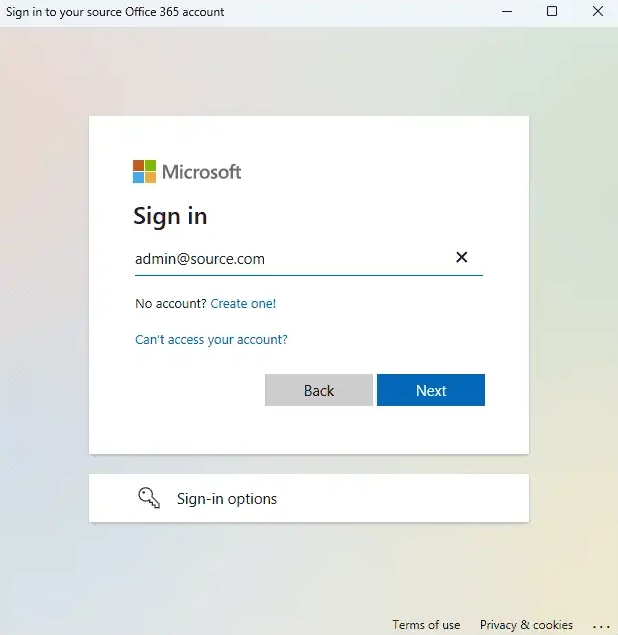
        Microsoft login

      • Once authentication is successful, select the method to load public folders.
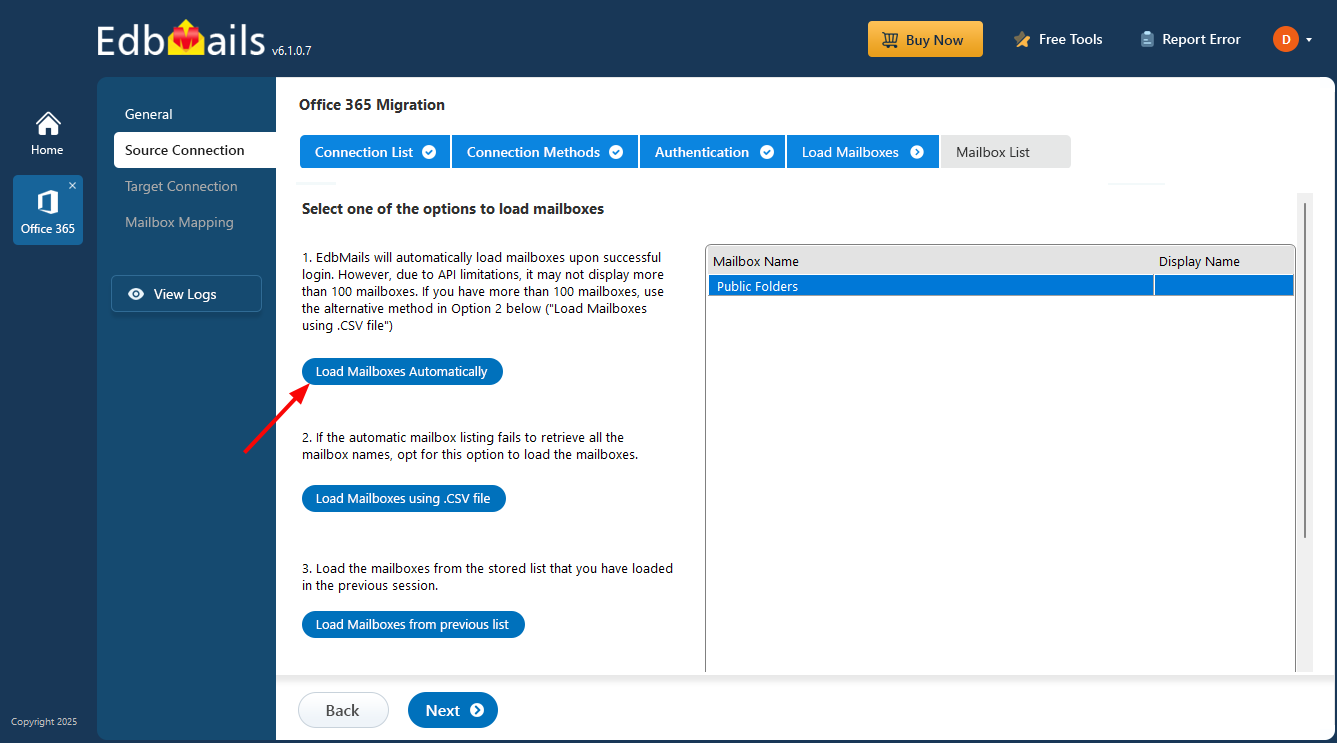
        Select the option to load the mailboxes

         Tip: If this is the first time you’re migrating with EdbMails, the migration is a full migration. On subsequent migrations from the same source to the target, the migration is incremental.

    4. Step 4: Select the Office 365 Public folders

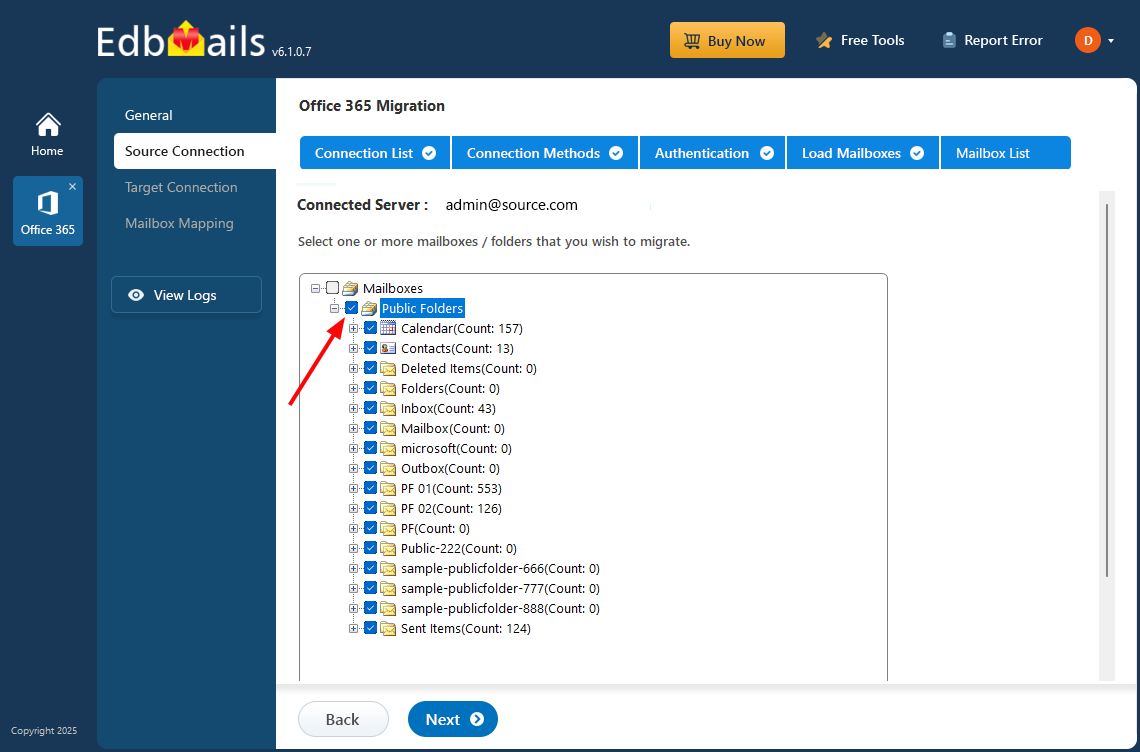
      • Select the public folders you want to migrate from the source Office 365 server.
      • Then click ‘Next’ to proceed.

        Select Office 365 public folders

    5. Step 5: Connect to target Exchange server

      • Click ‘Add New Connection’ to establish a new connection to the target Exchange server. To use an existing connection, select it from the list and click ‘Connect to Existing’ to proceed.
      • Choose the necessary connection options and click ‘Next.’

         Explore various methods to connect to the Exchange server in EdbMails.
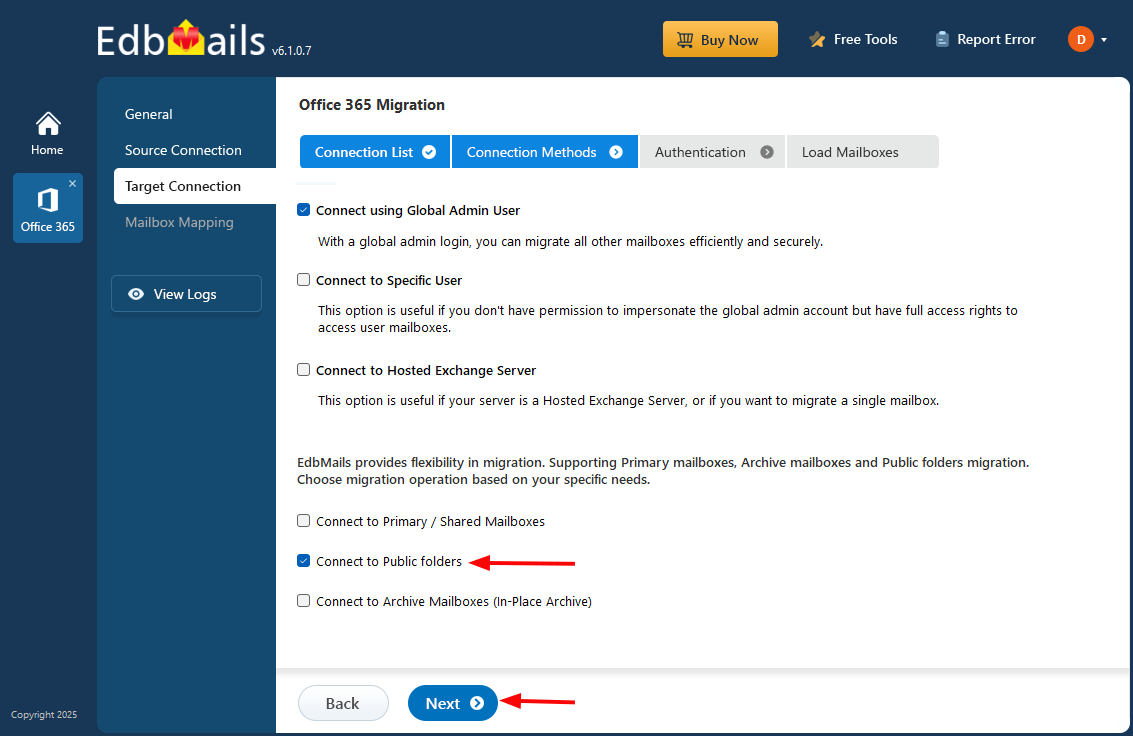
        Connect to target Exchange Public folder

      • Enter the Exchange server details and click the ‘Login’ button
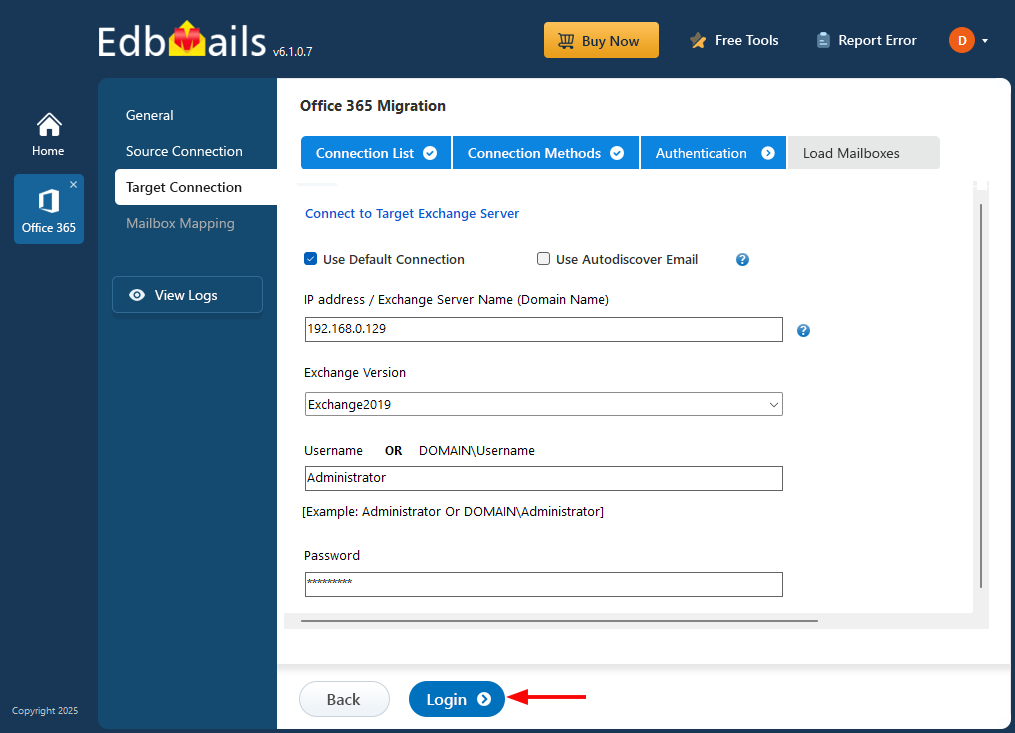
        Login to Exchange server

      • Choose one of the methods to load public folders.
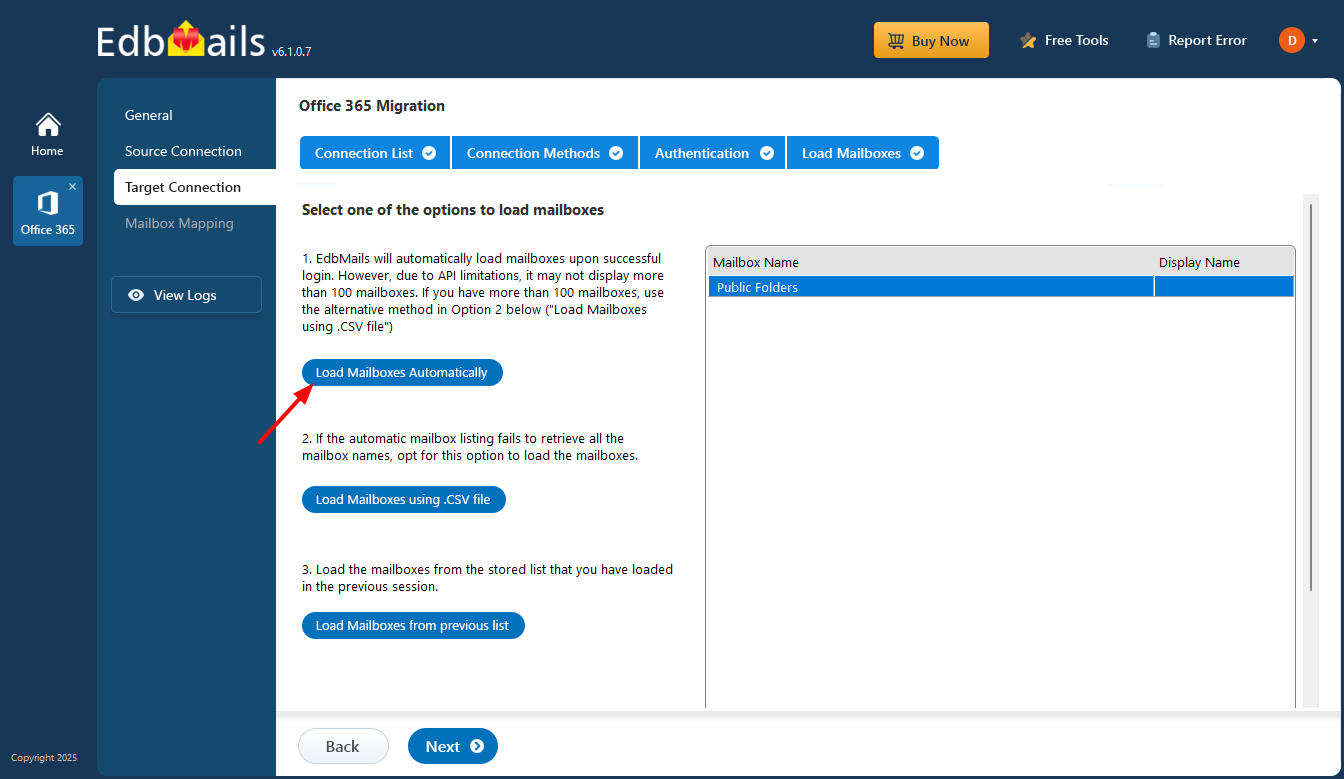
        Select the option to load the mailboxes

    6. Step 6: Public folder mapping between source and target servers

      • EdbMails automatically maps public folders between the source and target servers. You can also manually map source folders to the required target folders and map the source and target folders using a CSV file.
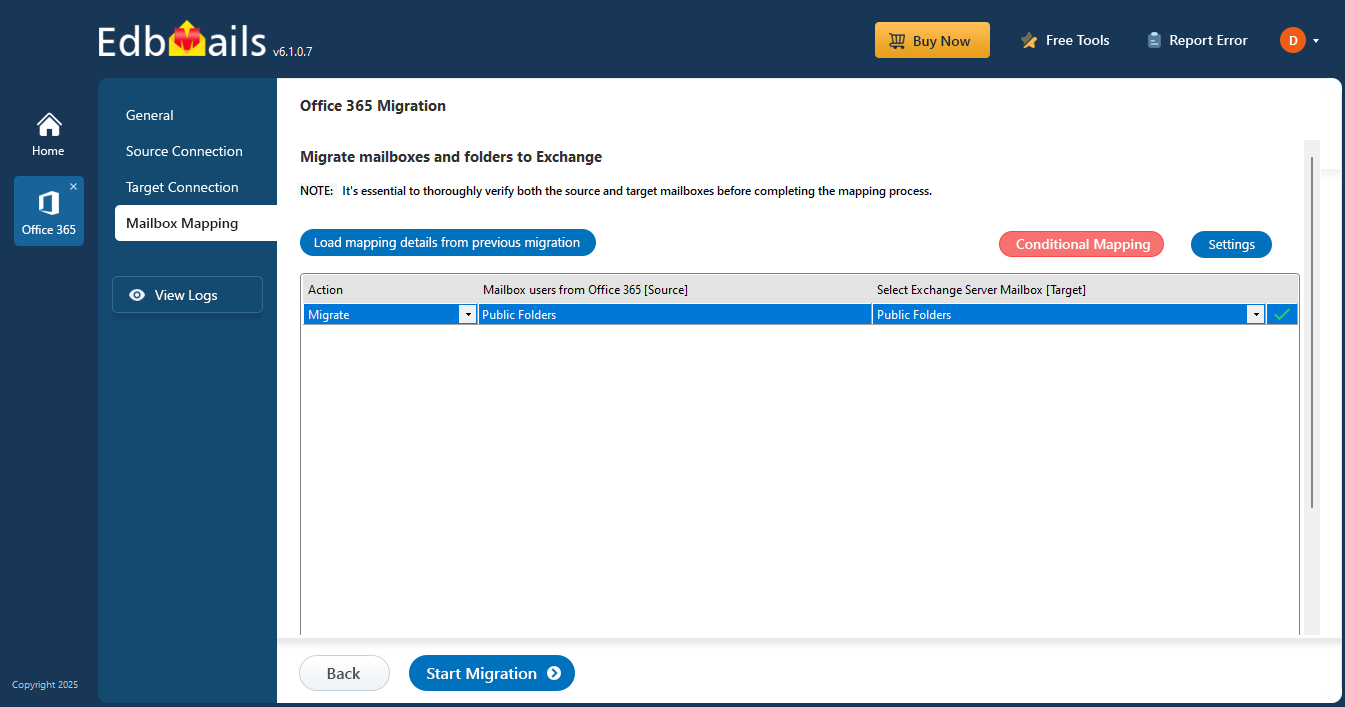
        Office 365 to Exchange Public folder mapping

    7. Step 7: Start Public folder migration to Exchange server

      • Click the 'Start Migration’ button to initiate the migration process.
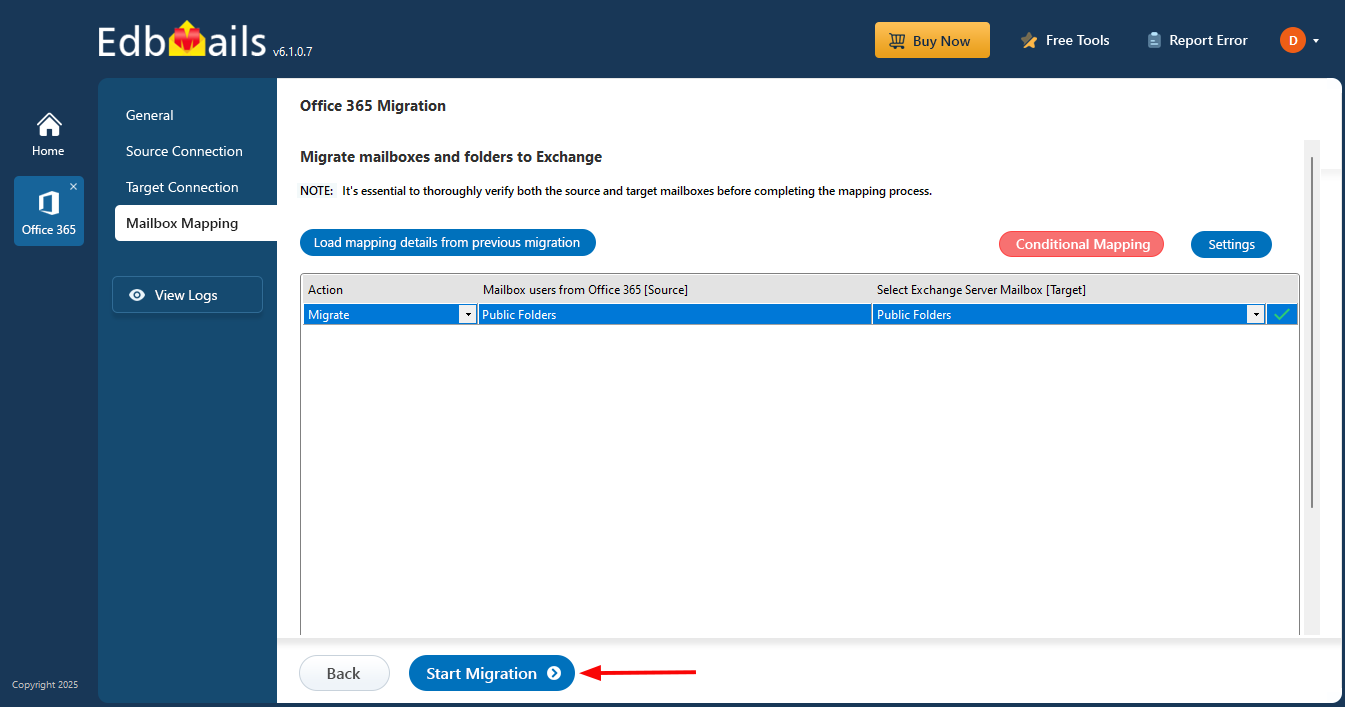
        Start migration

      • The migration process will now begin. Once it’s complete, you’ll be prompted to review the migration status. Click the ‘View Logs’ button to view the migration report. Then, log in to the target server to check the migrated items.
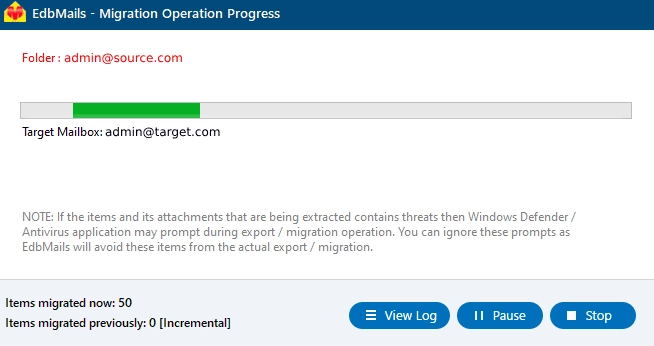
        Office 365 to Exchange public folder migration progress

  4. Office 365 Public Folder to Exchange Server Post Migration Tasks

    • Step 1: Update the MX Records to Point to the Exchange Server

      To receive messages on Exchange, change the DNS records known as MX records to enable email to work with the new server you have migrated to. In addition, configure the Autodiscover record to allow Outlook to connect to the migrated mailboxes.

    • Step 2: Create a New Outlook Profile for Users in the New Domain
      • Check that the latest Outlook version is on every machine to avoid compatibility issues.
      • Configure the Outlook profile for each user in your domain if Outlook has problems connecting to Office 365 mailboxes.
      • Configure the new server address, username and password in Outlook.
      • Test email flow to confirm that users can send and receive emails.
    • Step 3: Remove the Old Office 365 Subscription Plan

      Data verified, migration done — now cancel the Office 365 subscription on the source and drop any domains tied to it that you no longer need.

  5. Office 365 Public Folder to Exchange Migration Troubleshooting

    • Running into errors mid-migration happens — check the Office 365 migration troubleshooting guide and the Public folder troubleshooting page for fixes to the most common issues. Got questions about how EdbMails handles Office 365 migration? The frequently asked questions page covers a lot of ground.
    • If Public folders aren't migrating and permissions are the suspected cause, this one's worth a look — unable to migrate Public folders due to insufficient permissions.

Benefits of EdbMails for Office 365 to Exchange Public Folder Migration

Manually moving Public folders to a live Exchange server is tedious, error-prone, and frankly unnecessary. EdbMails handles it automatically — and the graphical interface shows the full Public folder hierarchy right there on screen. This allows you to migrate folders, subfolders and mail items — all of it moves across without touching a single PowerShell script.

  1. EdbMails Office 365 migration software ensures secure migration is built in, with modern authentication and TLS encryption covering every transfer between Office 365 and Exchange.
  2. The incremental migration feature in EdbMails ensures that only new and modified items, which were not included in previous migration runs, are migrated. This reduces overall migration time, saves bandwidth, and prevents the migration of duplicate items during subsequent migrations.
  3. Whatever folder and subfolder structure exists on the Office 365 side lands exactly the same way on the target Exchange server.
  4. EdbMails automates Public folder mapping between the source and target servers.
  5. You can migrate Public folders of any size without any downtime or data loss while the business keeps running.
  6. Facility for free trial to test the software's working and free 24x7 technical support and migration assistance.


Additional Resources:

  • Office 365 public folder to shared mailbox migration
  • Office 365 to Exchange public folder migration
  • Office 365 Archive mailbox migration
  • Disable EWS throttling in Office 365
  • Disable EWS throttling policy on Exchange server
  • Set impersonation rights on Exchange server
lady image

 In this manual

IntroductionMigration PlanPre-migration activitiesMigration stepsPost migration tasksTroubleshootingEdbMails Benefits

Office 365 Migration

100 Mailboxes $299 Only

Buy Now

Need help?

24/7 Customer support

Contact us on Live chat

Personalized Demo

Book a personalized demo

Still need help?

Email us / Call us

© 2026 Shifttocloud Inc. Privacy Policy | Terms of Use | GDPR | Security | Press Releases

hidden msg
Live Chat

Hi, May I help you?

Hide Chat Now